Building a Tweet Scheduler using Upstash
In this step-by-step guide, I talk about how I built a Tweet Scheduler using Upstash QStash, Upstash Redis, Next.js Server Actions and Vercel. Scheduling Twitter posts helps you maintain a consistent presence, engage with your audience at optimal times, and efficiently manage your content strategy.
Prerequisites
You will need the following:
- Node.js 18 or later
- An Upstash account
- A Twitter account
- A Vercel Account
Tech Stack
Following technologies are used in this guide:
| Technology | Description |
|---|---|
| Upstash | Serverless database platform. We're using both Upstash Queue & QStash for storing tweets in a queue and POST-ing schedule API at a given frequency, respectively. |
| Next.js | The React Framework for the Web. We’re using the populate shadcn/ui for rapid UI prototyping. |
| TailwindCSS | CSS framework for building custom designs. |
| Vercel | A cloud platform for deploying and scaling web applications. |
| Prettier | Opinionated code formatter for consistent code style. |
Steps
To complete this guide and deploy your own tweet scheduler, you will need to follow these steps:
- Setting up Upstash Redis
- Setting up Upstash QStash
- Setting up Twitter Developer Application
- Create a new Next.js application
- Implement User Authentication with Twitter OAuth 2.0
- Build the User Interface To Schedule Tweets
- Schedule Tweets using Upstash QStash
- Deploy To Vercel
Setting up Upstash Redis
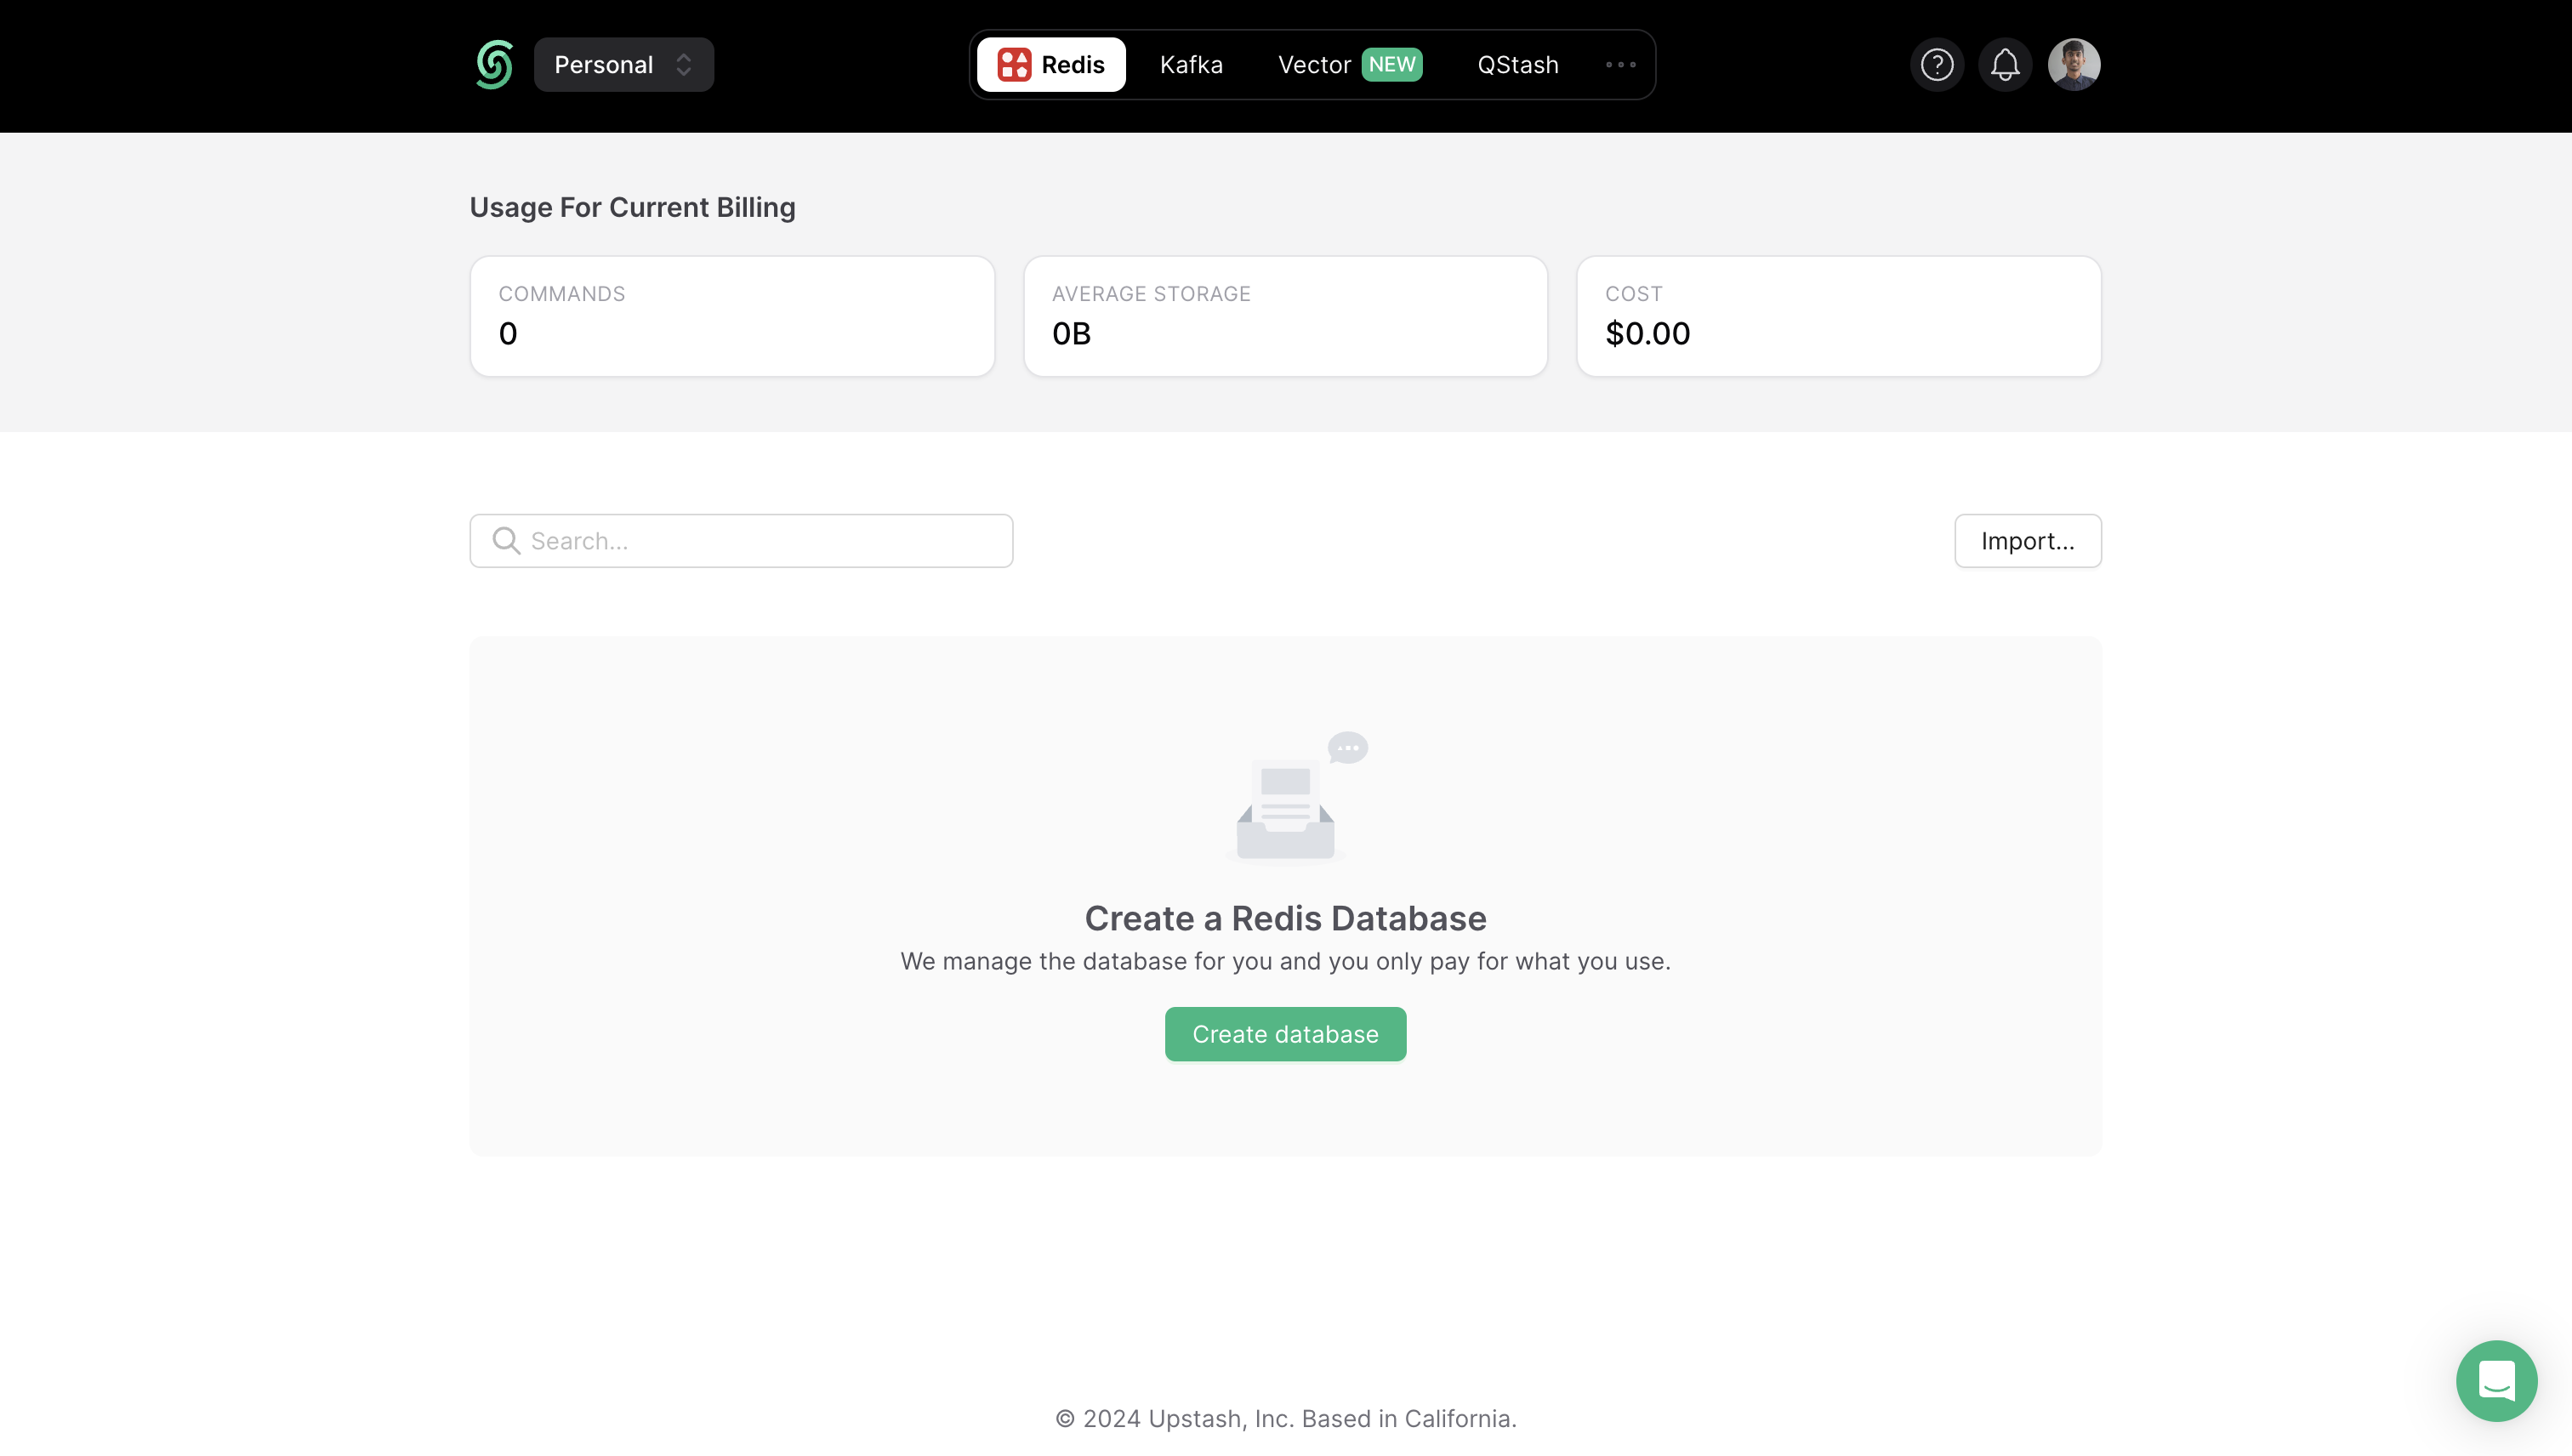
Once you have created an Upstash account and are logged in you are going to go to the Redis tab and create a database.
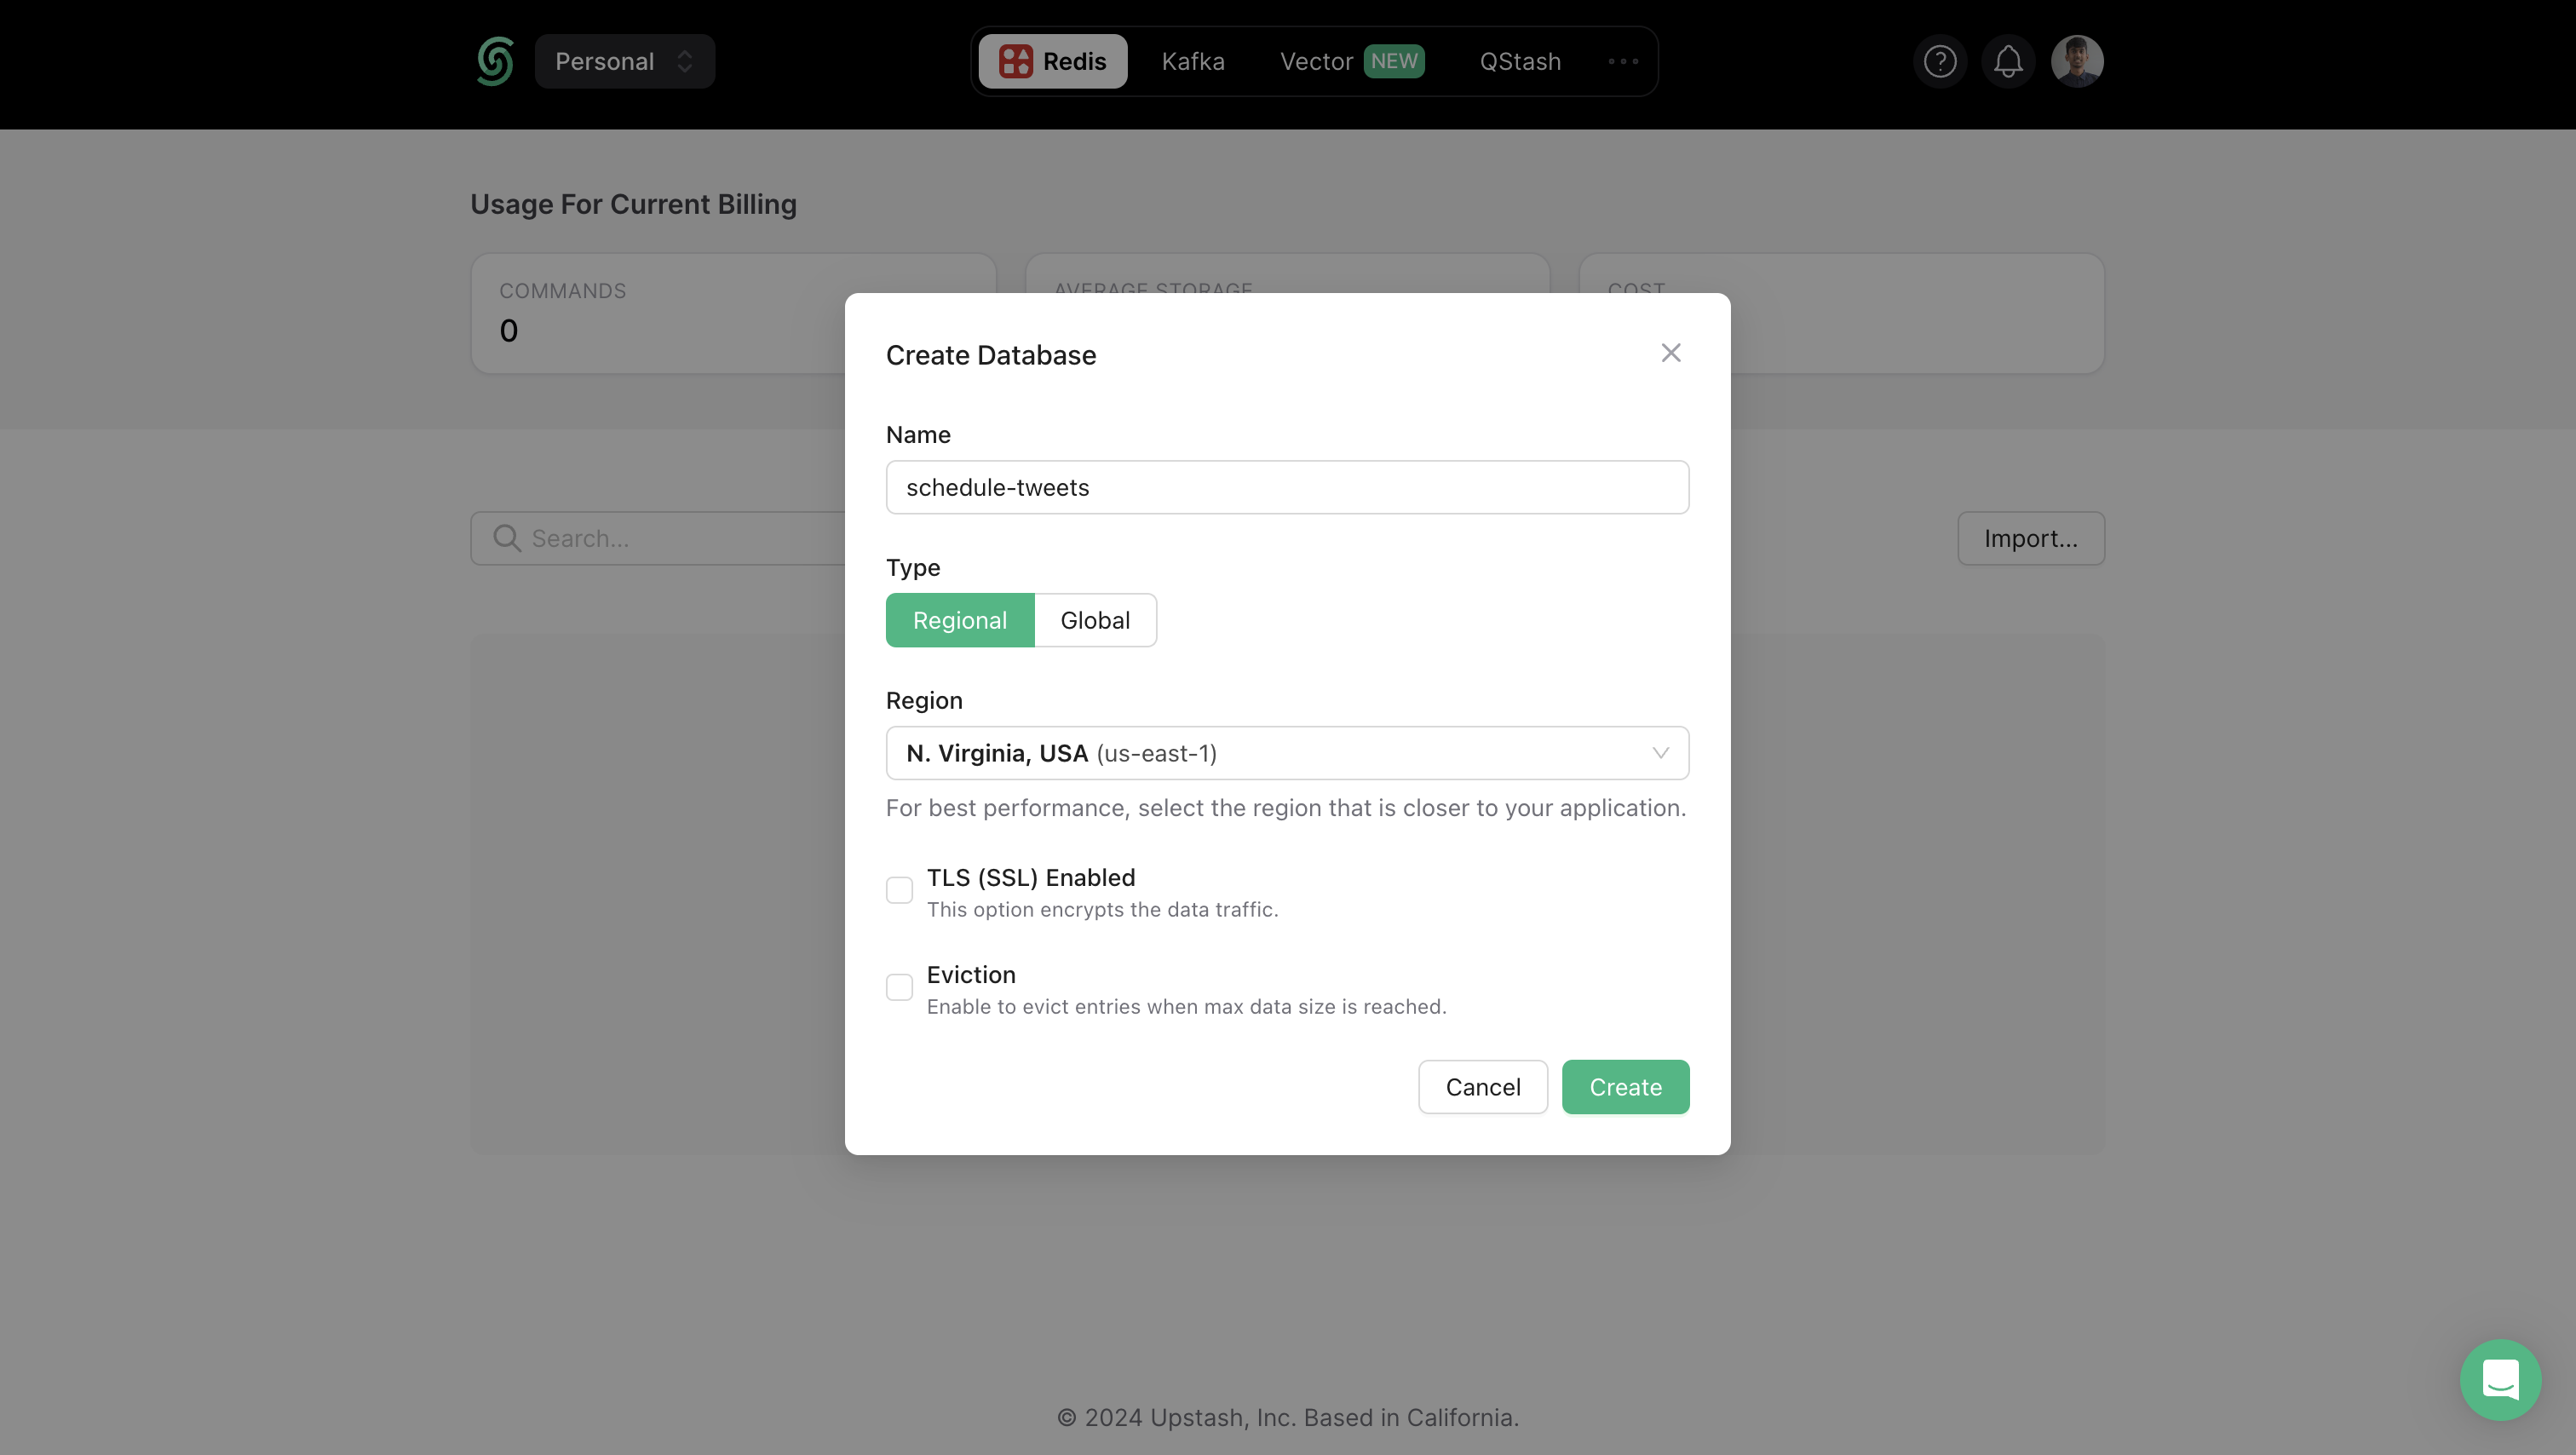
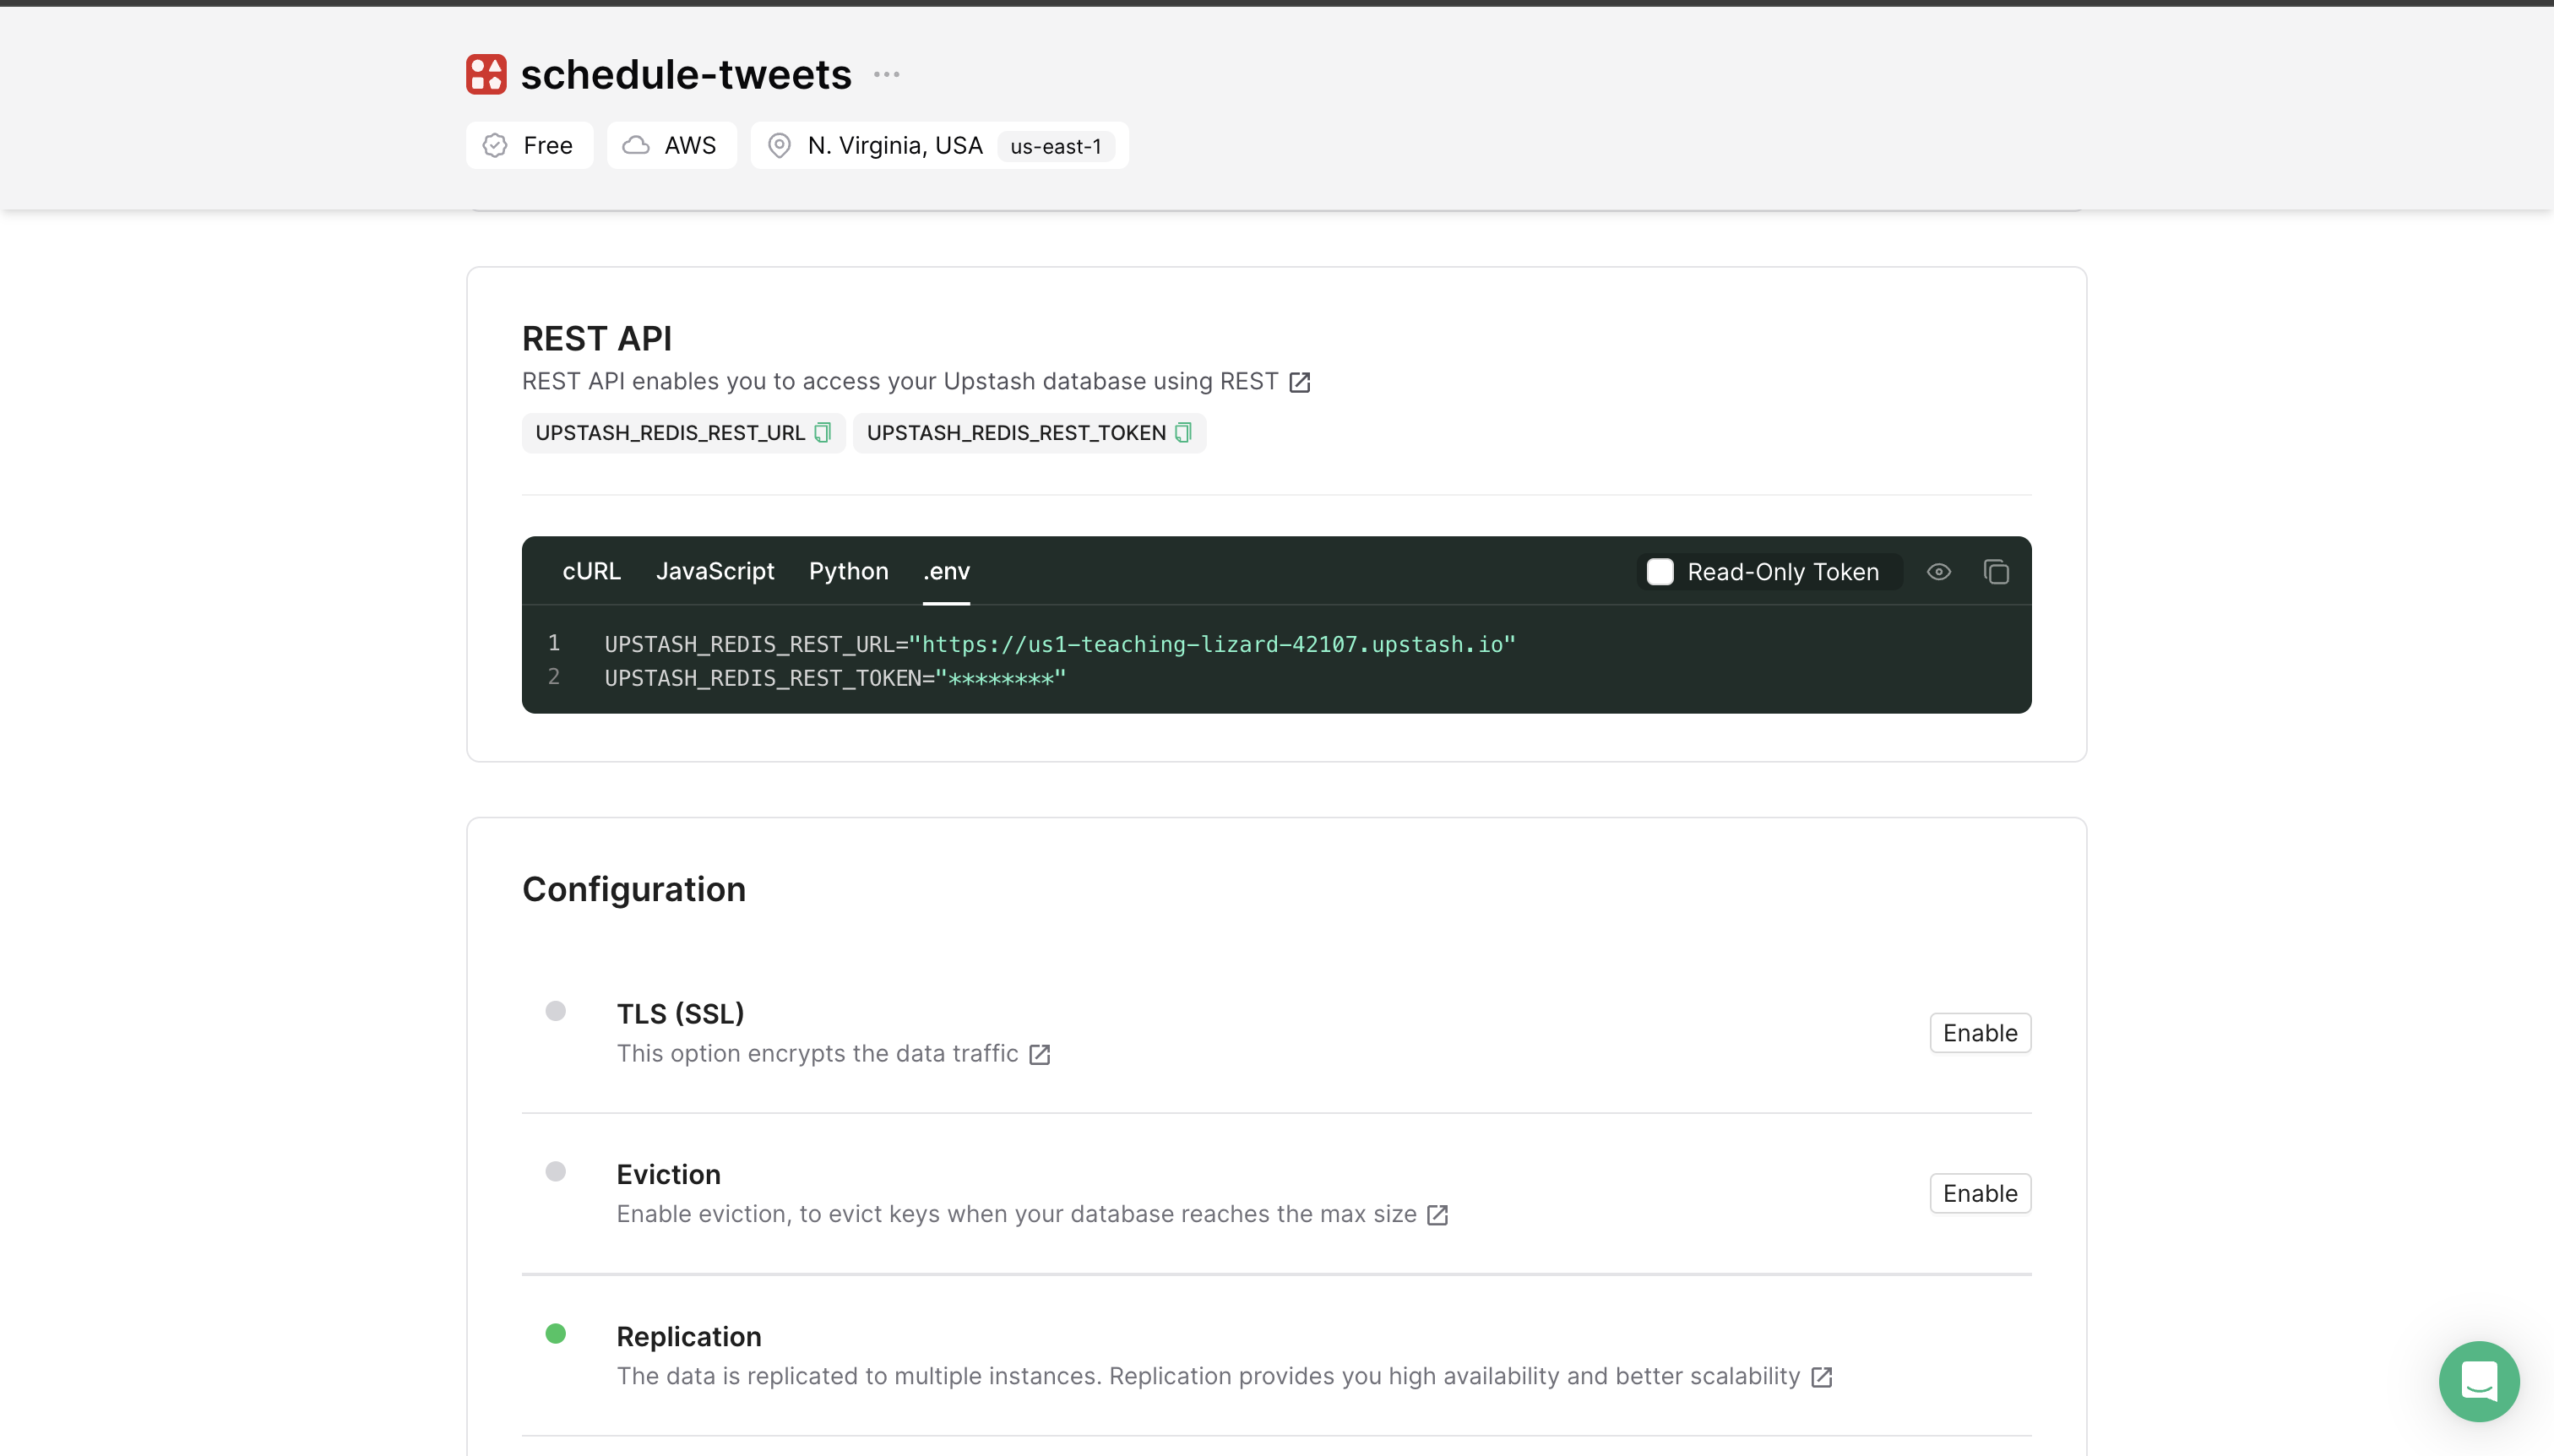
After you have created your database, scroll down until you find the REST API section and select the .env button. Copy the content and save it somewhere safe.
Setting up Upstash QStash
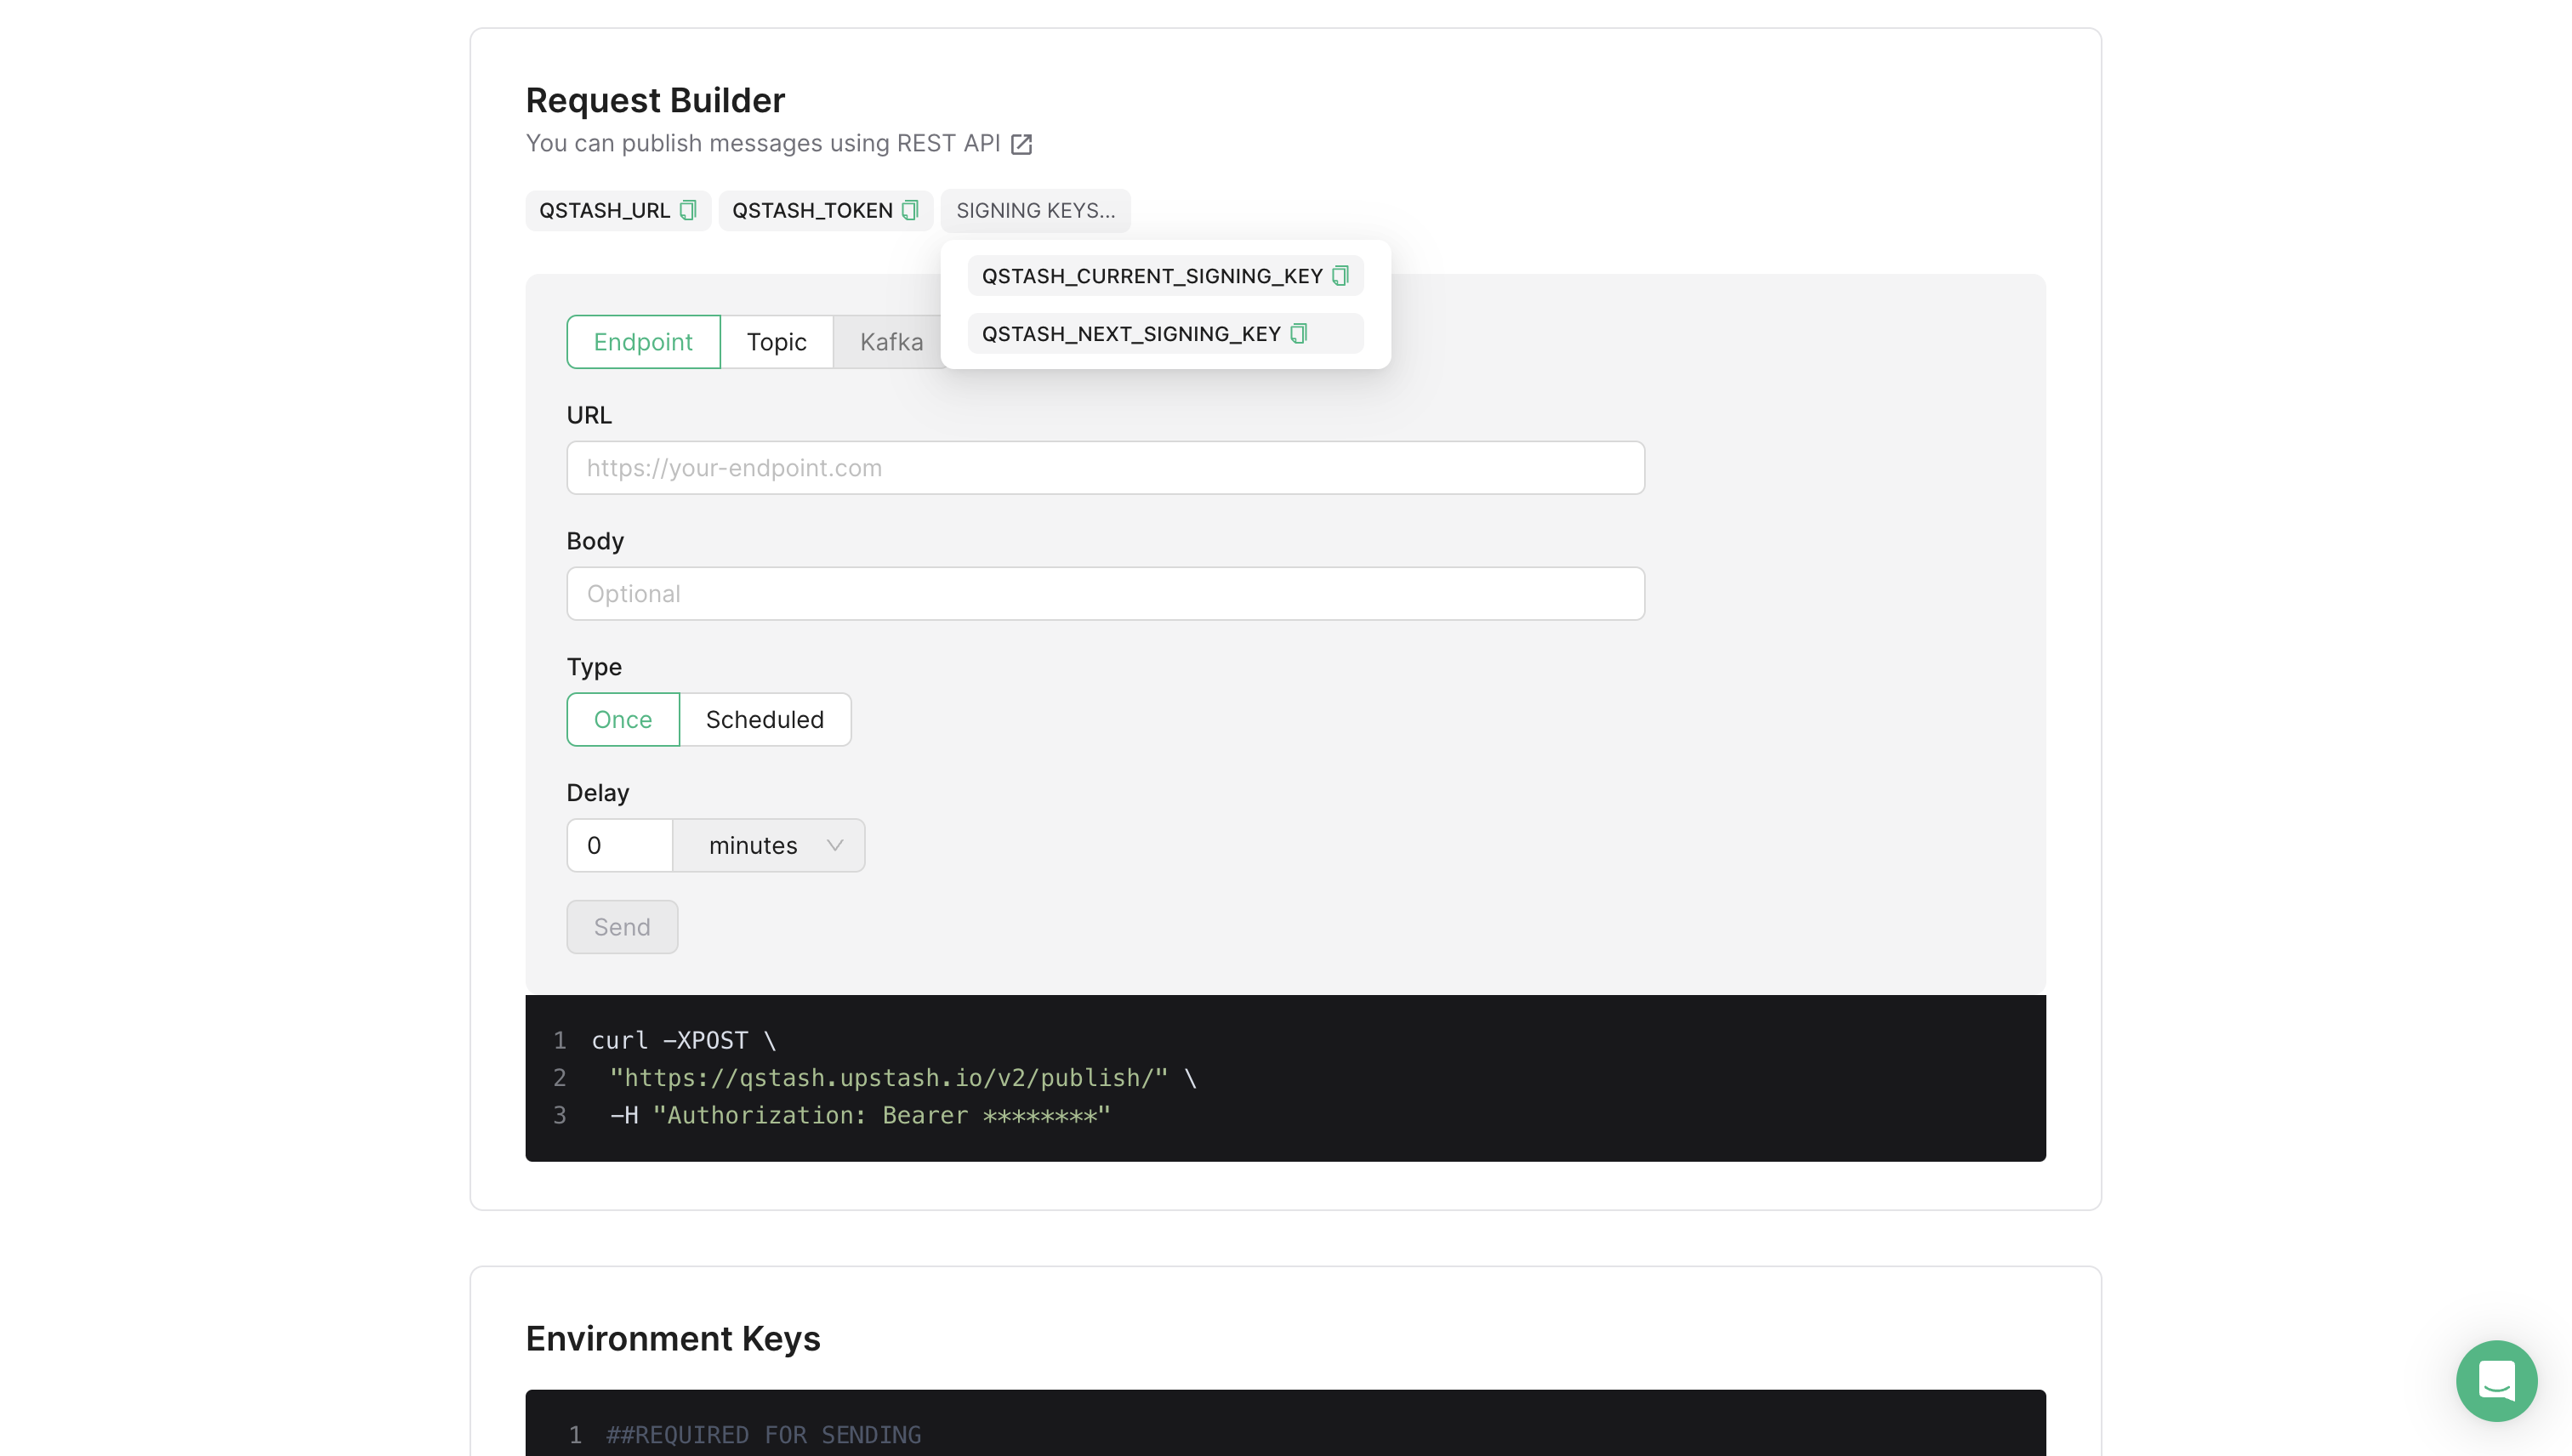
To schedule POST requests to the scheduling endpoint at a given interval, you will use QStash. Go to the QStash tab and scroll down to the Request Builder tab.
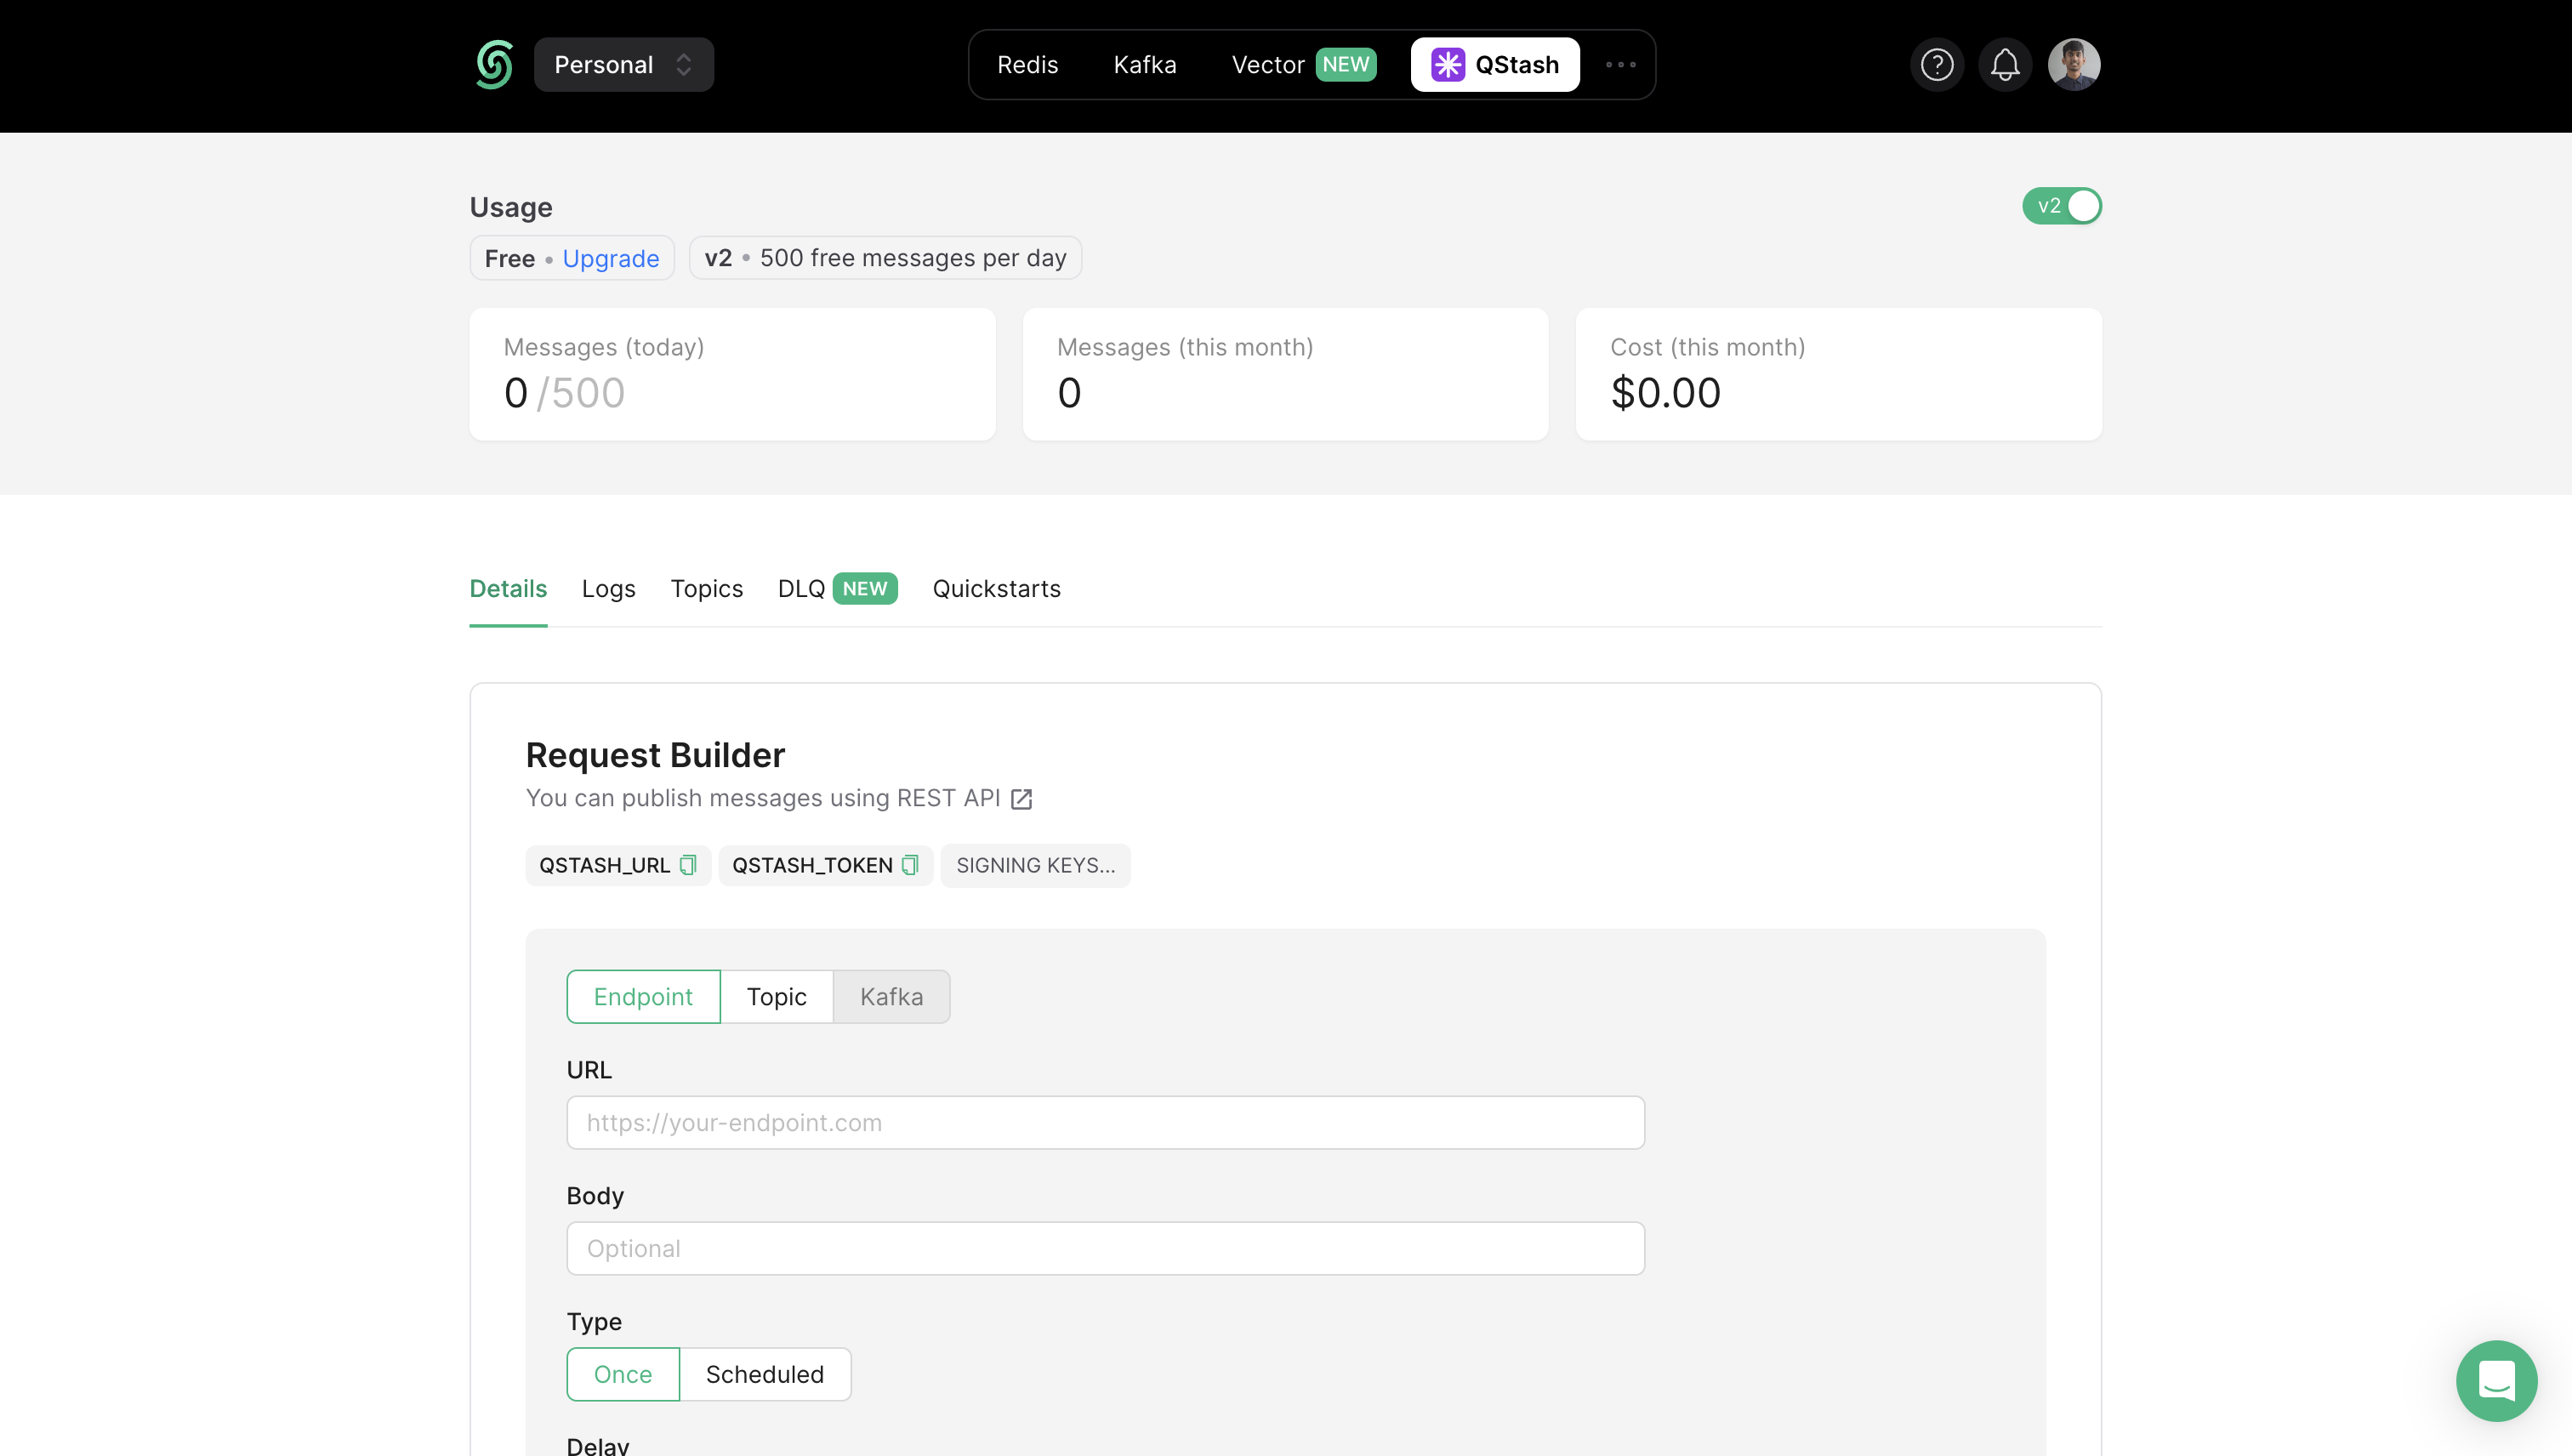
Copy the QStash URL, TOKEN, Current Signing Key and Next Signing Key and save them somewhere safe.
Setting up Twitter Developer Application
To set up authentication with Twitter OAuth 2.0, you're going to create an application in Twitter Developer Portal. To set up a Twitter application, do the following:
- Open Twitter's Developer Portal > Projects.
- Create a Project.
- Go the Settings tab in your application settings, and do the following:
- Select
Read and write and Direct messagein the App permissions. - Select
Web App, Automated App or Botin the Type of App. - Enter
http://localhost:3000/api/auth/callback/twitteras the Callback URI / Rediect URL.
- Select
- Go to the
Keys and tokenstab in your application settings, scroll down and do the following:- Copy the
Client IDand store it somewhere safe asTWITTER_CLIENT_ID. - Copy the
Client Secretand store it somewhere safe asTWITTER_CLIENT_SECRET.
- Copy the
That is all you needed to set succesfully set up your Twitter Developer Application for OAuth 2.0.
Create a new Next.js application
Let’s get started by creating a new Next.js project. Open your terminal and run the following command:
npx create-next-app@latest schedule-qstash-queue-upstashWhen prompted, choose:
Yeswhen prompted to use TypeScript.Nowhen prompted to use ESLint.Yeswhen prompted to use Tailwind CSS.Nowhen prompted to usesrc/directory.Yeswhen prompted to use App Router.Nowhen prompted to customize the default import alias (@/*).
Once that is done, move into the project directory and start the app in developement mode by executing the following command:
cd schedule-qstash-queue-upstash
npm run dev
The app should be running on localhost:3000.
Now, create a .env file at the root of your project. You are going to add the items we saved from the above sections.
It should look something like this:
# .env

# Obtained from the steps as above

# Twitter Environment Variables
TWITTER_CLIENT_ID="..."
TWITTER_CLIENT_SECRET="..."
TWITTER_AUTH_CALLBACK_URL="http://localhost:3000/api/auth/callback/twitter"

# Upstash Environment Variables
UPSTASH_REDIS_REST_URL="https://...upstash.io"
UPSTASH_REDIS_REST_TOKEN="...="
QSTASH_URL="https://qstash.upstash.io/v2/publish/"
QSTASH_TOKEN="...="
QSTASH_CURRENT_SIGNING_KEY="sig_..."
QSTASH_NEXT_SIGNING_KEY="sig_..."
Integrating shadcn/ui components
To quickly prototype the user interface, you’ll set up the shadcn/ui with Next.js. shadcn/ui is a collection of beautifully designed components that you can copy and paste into your apps. In your terminal window, run the command below to start setting up the shadcn/ui:
npx shadcn-ui@latest initYou will be asked a few questions to configure a components.json, choose the following:
Yeswhen prompted to use TypeScript.Defaultwhen prompted to select the style to use.Slatewhen prompted to choose the base color.app/globals.csswhen prompted to enter the global CSS file.yeswhen prompted to use CSS variables for colors.Leave blankwhen prompted to enter a custom tailwind prefix.tailwind.config.tswhen prompted to enter the location of tailwind.config.js.@/componentswhen prompted to configure the alias for components.@/lib/utilswhen prompted to configure the alias for utils.Yeswhen prompted to choose usage of React Server Components.Yeswhen prompted to proceed with writing the configuration to components.json.
Once that is done, you have set up a CLI that allows us to easily add React components to your Next.js application. Next, In your terminal window, run the command below to get the button, input, textarea, popover, calendar and toast elements:
npx shadcn-ui@latest add button
npx shadcn-ui@latest add input
npx shadcn-ui@latest add textarea
npx shadcn-ui@latest add toast
npx shadcn-ui@latest add popover
npx shadcn-ui@latest add calendar
Once that is done, you would now see a ui directory inside the app/components directory containing button.tsx, input.tsx, calendar.tsx, input.tsx, popover.tsx, textarea.tsx, toast.tsx, toaster.tsx, and use-toast.ts.
Next, open up the app/layout.tsx file, and make the following additions:
+ // File: app/layout.tsx

import './globals.css'
+ import { cn } from '@/lib/utils'
import type { Metadata } from 'next'
+ import { Inter } from 'next/font/google'
+ import { Toaster } from '@/components/ui/toaster'

+ const fontSans = Inter({
+   subsets: ['latin'],
+   variable: '--font-sans',
+ })

export const metadata: Metadata = {
  title: 'Create Next App',
  description: 'Generated by create next app',
}

export default function RootLayout({
  children,
}: Readonly<{
  children: React.ReactNode
}>) {
  return (
    <html lang="en">
      <body
+       className={cn(fontSans.variable, 'min-w-screen flex min-h-screen flex-col items-center justify-center bg-background font-sans antialiased')}
      >
         {children}
+        <Toaster />
      </body>
    </html>
  )
}
In the code changes above, you have imported the Toaster component (created by shadcn/ui), and made sure that it’s present in your entire Next.js application. It enables you to show toast notifications from anywhere in your code via the useToast hook.
Create an Upstash Queue to Store Scheduled Tweets
In this section, you will learn how to use the Upstash Queue to store scheduled tweets information. You will learn how to create server-side code which is invoked as a function instead of over an API route, using Next.js Server Actions.
First, in your terminal window, execute the following to install the Upstash SDKs:
npm install @upstash/qstash @upstash/queue @upstash/redis@1.28.0The above command installs the following packages:
@upstash/qstash: SDK to interact with your Upstash QStash instance over HTTP requests.@upstash/queue: SDK to manage stream based message queue, backed by Upstash Redis.@upstash/redis: SDK to interact over HTTP requests with Redis, built on top of Upstash REST API.
Initialize Upstash Redis and Upstash Queue Clients
To use the libraries installed above to interact with your Upstash Queue, create a file lib/upstash.ts with the following code:
// File: lib/upstash.ts

import { Redis } from '@upstash/redis'
import { Queue } from '@upstash/queue'

export const redis = new Redis({
  url: process.env.UPSTASH_REDIS_REST_URL as string,
  token: process.env.UPSTASH_REDIS_REST_TOKEN as string,
})

export const queue = new Queue({
  redis,
  queueName: 'tweets',
  concurrencyLimit: 5,
})
The code above does the following:
- Imports the
RedisandQueueclasses exported by the packages. - Exports a
redisinstance pointing to the Upstash Redis URL with the request authorization token. - Exports a
queueinstance pointing to the Upstash Redis created above. It sets the queue name totweetsand theconcurrencyLimitto 5, allowing up to 5 concurrent message processing.
Using the queue instance, you will create a Next.js Server Action that will accept the tweet text and the tweet date to form and push the tweet object into the queue for future processing. Create a file app/schedule.server.tsx with the following code:
// File: app/schedule.server.tsx

'use server'

import { queue } from '@/lib/upstash'
import type { FormProps } from './form'

export async function schedule(_: any, formData: FormData): Promise<FormProps> {
  try {
    const tweet_text = formData.get('tweet_text') as string
    const tweet_date = formData.get('tweet_date') as string
    const now = new Date().getTime()
    const delay = new Date(tweet_date).getTime() - now
    await queue.sendMessage({ tweet_text, tweet_date }, delay)
    return { ok: true, tweet_date }
  } catch (e) {
    console.log(e)
    return { ok: false }
  }
}
The code above does the following:
- Imports the
queueinstance - Exports a server action named
schedule, that accepts a form submission containing to-be scheduled tweet's text and date. - Computes the time between then to the time the tweet is scheduled for.
- Inserts the tweet object containing date and text with the delay set to the time computed above.
With this, you have ensured that the tweet is pushed to the queue only when it is scheduled for. This eases the process of maintaining the state of the queue, ensuring that only the tweets scheduled on any given day are available in the queue.
Let's move onto obtaining authorization from the user to tweet on their behalf using OAuth 2.0 PKCE flow.
Implement User Authentication with Twitter OAuth 2.0
In this section, you will learn how to set up Twitter OAuth 2.0 authentication flow in your application by configuring the Twitter OAuth client, and using the helper functions provided by Twitter SDK for authentication tasks. The authentication flow involves creating authorization and callback endpoints, enabling users to grant access and receive tokens, with the access token being stored in Upstash Redis. you will also create an authentication status through an endpoint indicating the presence of a valid access token in Upstash Redis.
First, in your terminal window, run the command below to install the necessary library for implementing Twitter OAuth 2.0 Authentication:
npm install twitter-api-sdkThe above command installs the following package:
twitter-api-sdk: A TypeScript SDK for the Twitter API.
Create a Twitter Authentication Client
To be able to generate an authorization URL without delving into the complexities of the Twitter API, you are going to use auth client by Twitter SDK. Create a file twitter.ts inside the lib directory with the following code:
// File: lib/twitter.ts

import { auth } from 'twitter-api-sdk'

export const authClient = new auth.OAuth2User({
  client_id: process.env.TWITTER_CLIENT_ID as string,
  callback: process.env.TWITTER_AUTH_CALLBACK_URL as string,
  client_secret: process.env.TWITTER_CLIENT_SECRET as string,
  scopes: ['tweet.write', 'tweet.read', 'offline.access', 'users.read'],
})
The code above begins with importing the auth helper from the Twitter SDK. Then, it exports the auth client that will save the time of learning Twitter API syntax by providing helper functions to generate authorization URL and requesting access token from an authenticated user.
Prepare Twitter Authorization URL
The first step in the OAuth 2.0 flow is that user gets redirected to an authorization URL. Authorization URL is an endpoint provided by the OAuth 2.0 server where the user is redirected to begin the authorization process by granting permissions to the client application. Usually, a user is presented with multiple choices (such as Continue with Twitter, Continue with Google, etc.) at the sign in/up screen, and then are taken to the platform's (here, Twitter) hosted authorization screen.
Create a file app/api/auth/twitter/route.ts with the following code:
// File: app/api/auth/twitter/route.ts

export const dynamic = 'force-dynamic'

import { NextResponse } from 'next/server'
import { authClient } from '@/lib/twitter'

export async function GET() {
  // Obtain an authorization URL from Twitter
  const authUrl = authClient.generateAuthURL({
    state: 'state',
    code_challenge: 'challenge',
    code_challenge_method: 'plain',
  })
  // Return with a 303 as a redirect to the authorization URL
  return NextResponse.redirect(authUrl, 303)
}
The code above does the following:
- Imports the
NextResponsehelper function that extends the Web Response API. - Imports the
authClientcreated earlier. - Exports a
GETHTTP Handler which responds to incoming GET requests on/api/auth/twitter. - Generates an authorization URL using the
generateAuthURLhelper function of Twitter SDK. - Redirects to the generated authorization URL using
redirectmethod of NextResponse.
Let's move onto creating an endpoint that responds to the request when a user authorizes your Twitter application with the access.
Prepare Authorization Callback URL
The second step in the OAuth 2.0 flow is responding to callbacks from authentication platform. To handle incoming authorization callback request from Twitter, you will configure an endpoint in your application where the user will be redirected after granting access. This callback URL is essential for receiving the authorization code, enabling your application to save the access token obtained in Upstash Redis. With that token, you can automate tweets over an API in your application.
Create a file app/api/auth/callback/twitter/route.ts with the following code:
// File: app/api/auth/callback/twitter/route.ts

export const dynamic = 'force-dynamic'

import { redis } from '@/lib/upstash'
import { NextResponse } from 'next/server'
import { authClient } from '@/lib/twitter'

export async function GET(request: Request) {
  // Look for the callback URL to contain code
  const code = new URL(request.url).searchParams.get('code')
  // If no code query param found, return 403
  if (!code) return NextResponse.json({}, { status: 403 })
  // If code query param found, create another authorization URL to update internal code_verifier
  authClient.generateAuthURL({
    state: 'state',
    code_challenge: 'challenge',
    code_challenge_method: 'plain',
  })
  // Obtain the access_token to use it for making requests in the future
  const {
    token: { access_token },
  } = await authClient.requestAccessToken(code)
  // Save the access_token in Upstash
  await redis.set('twitter_oauth_access_token', access_token)
  // Return back to homepage
  return NextResponse.redirect(new URL('/', request.url), 303)
}
The code above does the following:
- Imports the
redisinstance that is using Upstash Redis. - Imports the
NextResponsehelper function that extends the Web Response API. - Imports the
authClientcreated earlier. - Exports a
GETHTTP Handler which responds to incoming GET requests on/api/auth/callback/twitter. - Destructures
codequery parameter from the callback URL. - Creates an authorization URL like earlier as a hack to update the internal state created by SDK.
- Calls the
requestAccessTokenfunction by Twitter SDK to obtain the access and refresh tokens, that will allow you to create tweets over an API. - Destructures the
access_tokenfrom thetokenobject obtained. - Saves the access token value obtained with
twitter_oauth_access_tokenas the key in Upstash Redis. - Redirects to the index URL (
/) usingredirectmethod of NextResponse.
You are now done with the Twitter OAuth 2.0 flow.
Having a valid twitter_oauth_access_token in the Upstash Redis instance is an indicator of the authentication flow status. To communicate the same in the user interface, create a file app/api/auth/twitter/authenticated/route.ts with the following code:
// File: app/api/auth/twitter/authenticated/route.ts

export const dynamic = 'force-dynamic'

import { redis } from '@/lib/upstash'
import { NextResponse } from 'next/server'

export async function GET() {
  try {
    const access_token = await redis.get<string>('twitter_oauth_access_token')
    if (!access_token) return NextResponse.json({ ok: false }, { status: 200 })
    return NextResponse.json({ ok: true }, { status: 200 })
  }
  catch(e) {}
  return NextResponse.json({ ok: false }, { status: 200 })
}
The code above does the following:
- Imports the
redisinstance that is using Upstash Redis. - Imports the
NextResponsehelper function that extends the Web Response API. - Exports a
GETHTTP Handler which responds to incoming GET requests on/api/auth/twitter/authenticated. - Fetches the value associated with
twitter_oauth_access_tokenkey in Upstash Redis. - Returns a JSON response containing an
okboolean indicating if there's a valid access token present in Upstash Redis.
Let's move to creating the user interface to consume these API endpoints you have created.
Build the User Interface To Schedule Tweets
In this section, you will learn how to create reactive form states using React hooks useFormState and useFormStatus, and invoke the server action to schedule tweets.
First, you are going to create a React component that renders a form containing to-be scheduled tweet's information and shows a toast notification indicating if the tweet information . Create a file app/form.tsx with the following code:
// File: app/form.tsx
'use client'
// UI Imports
import { cn } from '@/lib/utils'
import { format } from 'date-fns'
import { Button } from '@/components/ui/button'
import { Calendar } from '@/components/ui/calendar'
import { useToast } from '@/components/ui/use-toast'
import { Textarea } from '@/components/ui/textarea'
import { Calendar as CalendarIcon } from 'lucide-react'
import { Popover, PopoverContent, PopoverTrigger } from '@/components/ui/popover'
// Form Status hook
import { useFormStatus } from 'react-dom'
import { useEffect, useState } from 'react'
// Define Form Props
export interface FormProps {
ok?: boolean
tweet_date?: string
}
export default function ({ ok, tweet_date }: FormProps) {
const { toast } = useToast()
// Use React's useFormStatus hook to detect form submission state
const { pending } = useFormStatus()
useEffect(() => {
// If the form is not pending
if (!pending) {
// If the server ok-ed the query, reset the form
if (ok) {
const scheduleForm = document.getElementById('schedule_form') as HTMLFormElement
if (scheduleForm) scheduleForm.reset()
// Display that scheduling was succesful
toast({
title: 'Scheduled Tweet',
description: tweet_date,
})
} else {
// Display that scheduling failed
toast({
variant: 'destructive',
title: 'Uh oh! Something went wrong.',
description: 'There was a problem with your request.',
})
}
}
}, [pending])
// Listen to the date picker changes
const [date, setDate] = useState<Date>()
return (
<>
<span className="font-semibold">Tweet Scheduler</span>
{/* Date Picker for Scheduling Tweet on future dates */}
<input id="tweet_date" name="tweet_date" className="hidden" value={date?.toString()} />
<Popover>
<PopoverTrigger asChild>
<Button variant={'outline'} className={cn('w-[280px] justify-start text-left font-normal', !date && 'text-muted-foreground')}>
<CalendarIcon className="mr-2 h-4 w-4" />
{date ? format(date, 'PPP') : <span>Pick a date</span>}
</Button>
</PopoverTrigger>
<PopoverContent className="w-auto p-0">
<Calendar mode="single" selected={date} onSelect={setDate} />
</PopoverContent>
</Popover>
{/* Text Area for Entering Text of Tweet */}
<Textarea id="tweet_text" name="tweet_text" className="min-h-[300px] w-[280px]" placeholder="Tweet" />
{/* Schedule Button Tweet */}
<Button disabled={pending} className="w-[280px]">
{pending ? 'Scheduling...' : <>Schedule →</>}
</Button>
</>
)
}The code above does the following:
- Imports the components created by
shadcn/uiCLI commands earlier. - Exports a React component that renders a visually hidden
inputHTML element describing the date of the scheduled tweet. - The component also renders a
textareaHTML element to accept the text of the tweet visually from the user. - The component also renders a
Buttonwhich is disabled conditionally based on the status of previous form submission(s). - The component also uses the
useEffecthook to reset the form if the server action resulted in success. Either way, it shows a toast notification on the bottom right corner to indicate the status of the request.
Next, you are going to create a component that shows the status of user's Twitter authentication status. Create a file components/twitter.tsx with the following code:
// File: components/twitter.tsx

'use client'

import { useEffect, useState } from 'react'
import { Button } from '@/components/ui/button'

export default function () {
  const state: { [k: string]: { message: string; variant: 'outline' | 'secondary' | 'destructive' } } = {
    pending: {
      message: '...',
      variant: 'outline',
    },
    true: {
      message: '✔️ Authenticated Instance',
      variant: 'secondary',
    },
    false: {
      message: '1-Time Authentication with Twitter →',
      variant: 'destructive',
    },
  }

  const [authenticated, setAuthenticated] = useState<string | boolean>('pending')
  useEffect(() => {
    fetch('/api/auth/twitter/authenticated')
      .then((res) => res.json())
      .then((res) => {
        setAuthenticated(res.ok as boolean)
      })
  }, [])

  {
    /* Authenticate with Twitter */
  }
  return (
    <Button
      className="w-[280px]"
      onClick={() => {
        if (!authenticated) window.location.href = '/api/auth/twitter'
      }}
      variant={state[authenticated.toString()].variant}
    >
      {state[authenticated.toString()].message}
    </Button>
  )
}
The code above does the following:
- Imports the
useEffectanduseStatehooks by React to use them to fetch the status of user authentication. - Exports a React component that renders the
Buttoncomponent (byshadcn/ui) in different states, associating each with user's Twitter authentication status.
To render a form for the users that allows them to interact and schedule a tweet as they open the index route (i.e. /), create a file app/page.tsx with the following code:
// File: app/page.tsx

'use client'

// Form with Pending Status
import Form from './form'

// Form with access to the server returned data
import { useFormState } from 'react-dom'

// Scheduling Next.js Action
import Twitter from '@/components/twitter'
import { schedule } from './schedule.server'

export default function () {
  const [state, formAction] = useFormState(schedule, {})
  return (
    <div className="flex w-[300px] flex-col gap-y-3 p-5">
      <Twitter />
      <form id="schedule_form" action={formAction} className="flex w-[300px] flex-col gap-y-3">
        <Form {...state} />
      </form>
    </div>
  )
}
The code above does the following:
- Imports
FormandTwittercomponents created earlier. - Imports the
useFormStatehook by React to be able to process the data returned by the Next.js server action using thestatevariable, and allow invocation of server action through form submission. - Imports the
scheduleserver action created earlier. - Expors a React component that contains a
<form>component withschedule_formid and is set to invoke theformActionwhen the form is submitted by the user.
Schedule Tweets using Upstash QStash
To schedule tweets on behalf of the user, you will create an endpoint that will consume the tweet data stored in Upstash Queue and then POST to Twitter API to perform the tweets. Create a file app/api/schedule/route.ts with the following code:
// File: app/api/schedule/route.ts

export const dynamic = 'force-dynamic'

import { NextResponse } from 'next/server'
import { queue, redis } from '@/lib/upstash'
import { verifySignatureAppRouter } from '@upstash/qstash/dist/nextjs'

interface TweetBody {
  tweet_text?: string
  tweet_date?: number
}

async function tweet(access_token: string, text: string | undefined) {
  if (text) {
    await fetch('https://api.twitter.com/2/tweets', {
      method: 'POST',
      headers: {
        'Content-Type': 'application/json',
        Authorization: ['Bearer', access_token].join(' '),
      },
      body: JSON.stringify({ text }),
    })
  }
}

async function handler() {
  const access_token = await redis.get<string>('twitter_oauth_access_token')
  if (!access_token) return NextResponse.json({}, { status: 403 })
  const tweets = await Promise.all(Array.from({ length: 4 }, () => queue.receiveMessage<TweetBody>()))
  await Promise.all(tweets.map((i) => tweet(access_token, i?.body?.tweet_text)))
  return NextResponse.json({}, { status: 200 })
}

export const POST = verifySignatureAppRouter(handler)
The code above does the following:
- Imports the
redisandqueueinstances that are using Upstash Redis and Upstash Queue respectively. - Imports the
verifySignatureAppRouterfunction by Upstash that will verify the request signature to ensure that the request is from QStash only. - Creates a function
tweetthat accepts a tweet text and access token to perform tweets on behalf of the authenticated user. - Creates a
POSTHTTP Handler which responds to incoming POST requests on/api/schedule. It fetches 4 messages from the Upstash Queue and invokes thetweetfunction to perform tweets on behalf of the user.
Using Upstash QStash, you can schedule the process of performing tweets. Say you want to automate it such that every day at midnight, the process starts itself and the tweets go out. To do that, you will use the endpoint created earlier: /api/schedule in QStash.
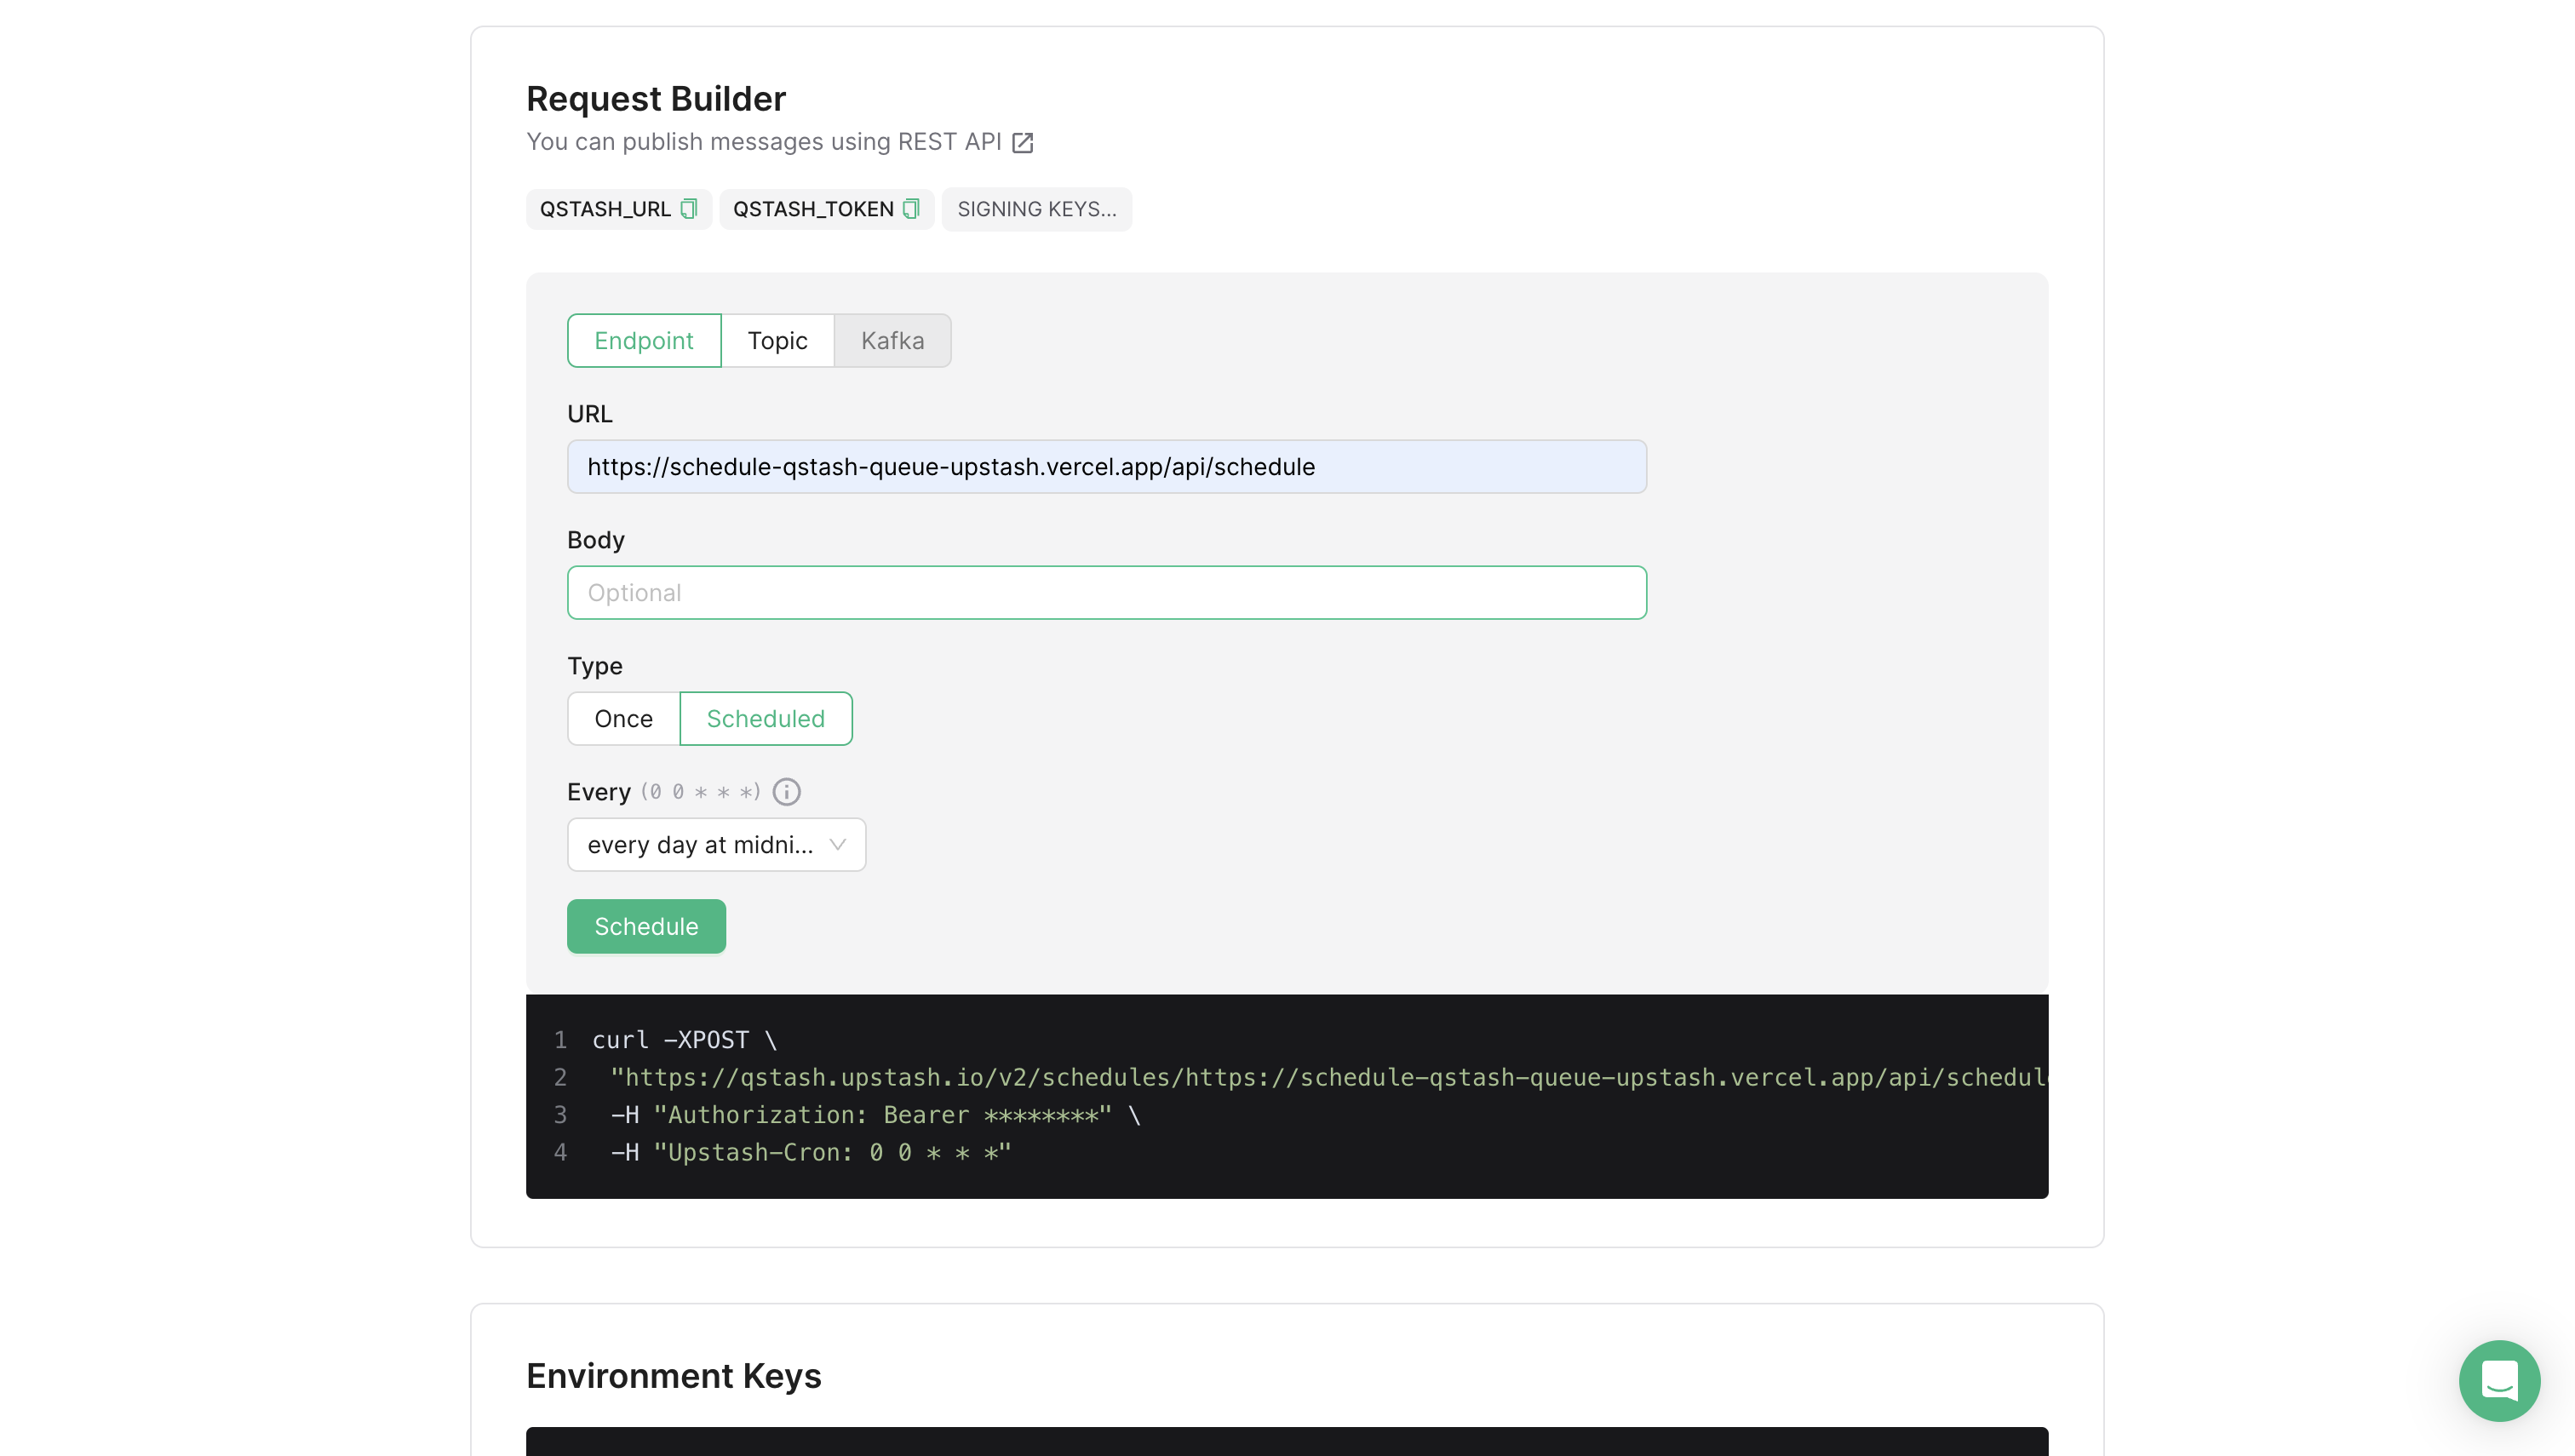
Go to the QStash tab in Upstash console, scroll down to the Request Builder tab and do the following:
- Select
Endpointtab. - Enter the
URLas the absolute URL to your/api/scheduleendpoint. - Select
TypeasScheduled. - Select
Everyasevery day at midnight. - Click
Schedule.
With the steps above, you have created a job that POST's to /api/schedule every day at midnight.
That was a lot of learning! You’re all done now ✨
Deploy to Vercel
The repository, is now ready to deploy to Vercel. Use the following steps to deploy:
- Start by creating a GitHub repository containing your app's code.
- Then, navigate to the Vercel Dashboard and create a New Project.
- Link the new project to the GitHub repository you just created.
- In Settings, update the
Environment Variablesto match those in your local.envfile. - Click
Deploy.
More Information
For more detailed insights, explore the references cited in this post.
- GitHub Repository
- Twitter OAuth 2.0 Flow
- Generating Twitter App Tokens
- React Form Hooks
- Next.js Server Actions
Conclusion
In this guide, you learned how to build a robust Tweet Scheduler leveraging Upstash's powerful Redis database and QStash queue. Upstash's scalability ensures reliable storage and scheduling of tweets combined with seamless deployment on Vercel create a fully automated system.
