Building Real-Time Notifications with Upstash Redis, Next.js Server Actions and Vercel
In this post, I talk about how I built real time notifications using Server-Sent Events with Upstash Redis, Next.js Server Actions and Vercel. Leveraging message channels in Upstash Redis can significantly enhance the communication architecture of your applications, making them more responsive and dynamic.
Demo
What we’ll be using
- Next.js (Front-end and Back-end)
- Upstash Redis (Server-Sent Events with PUBLISH command)
- Tailwind CSS (Styling)
- Vercel (Deployment)
What you'll need
- Node.js 18
- An Upstash account
- A Vercel account
Setting up Upstash Redis
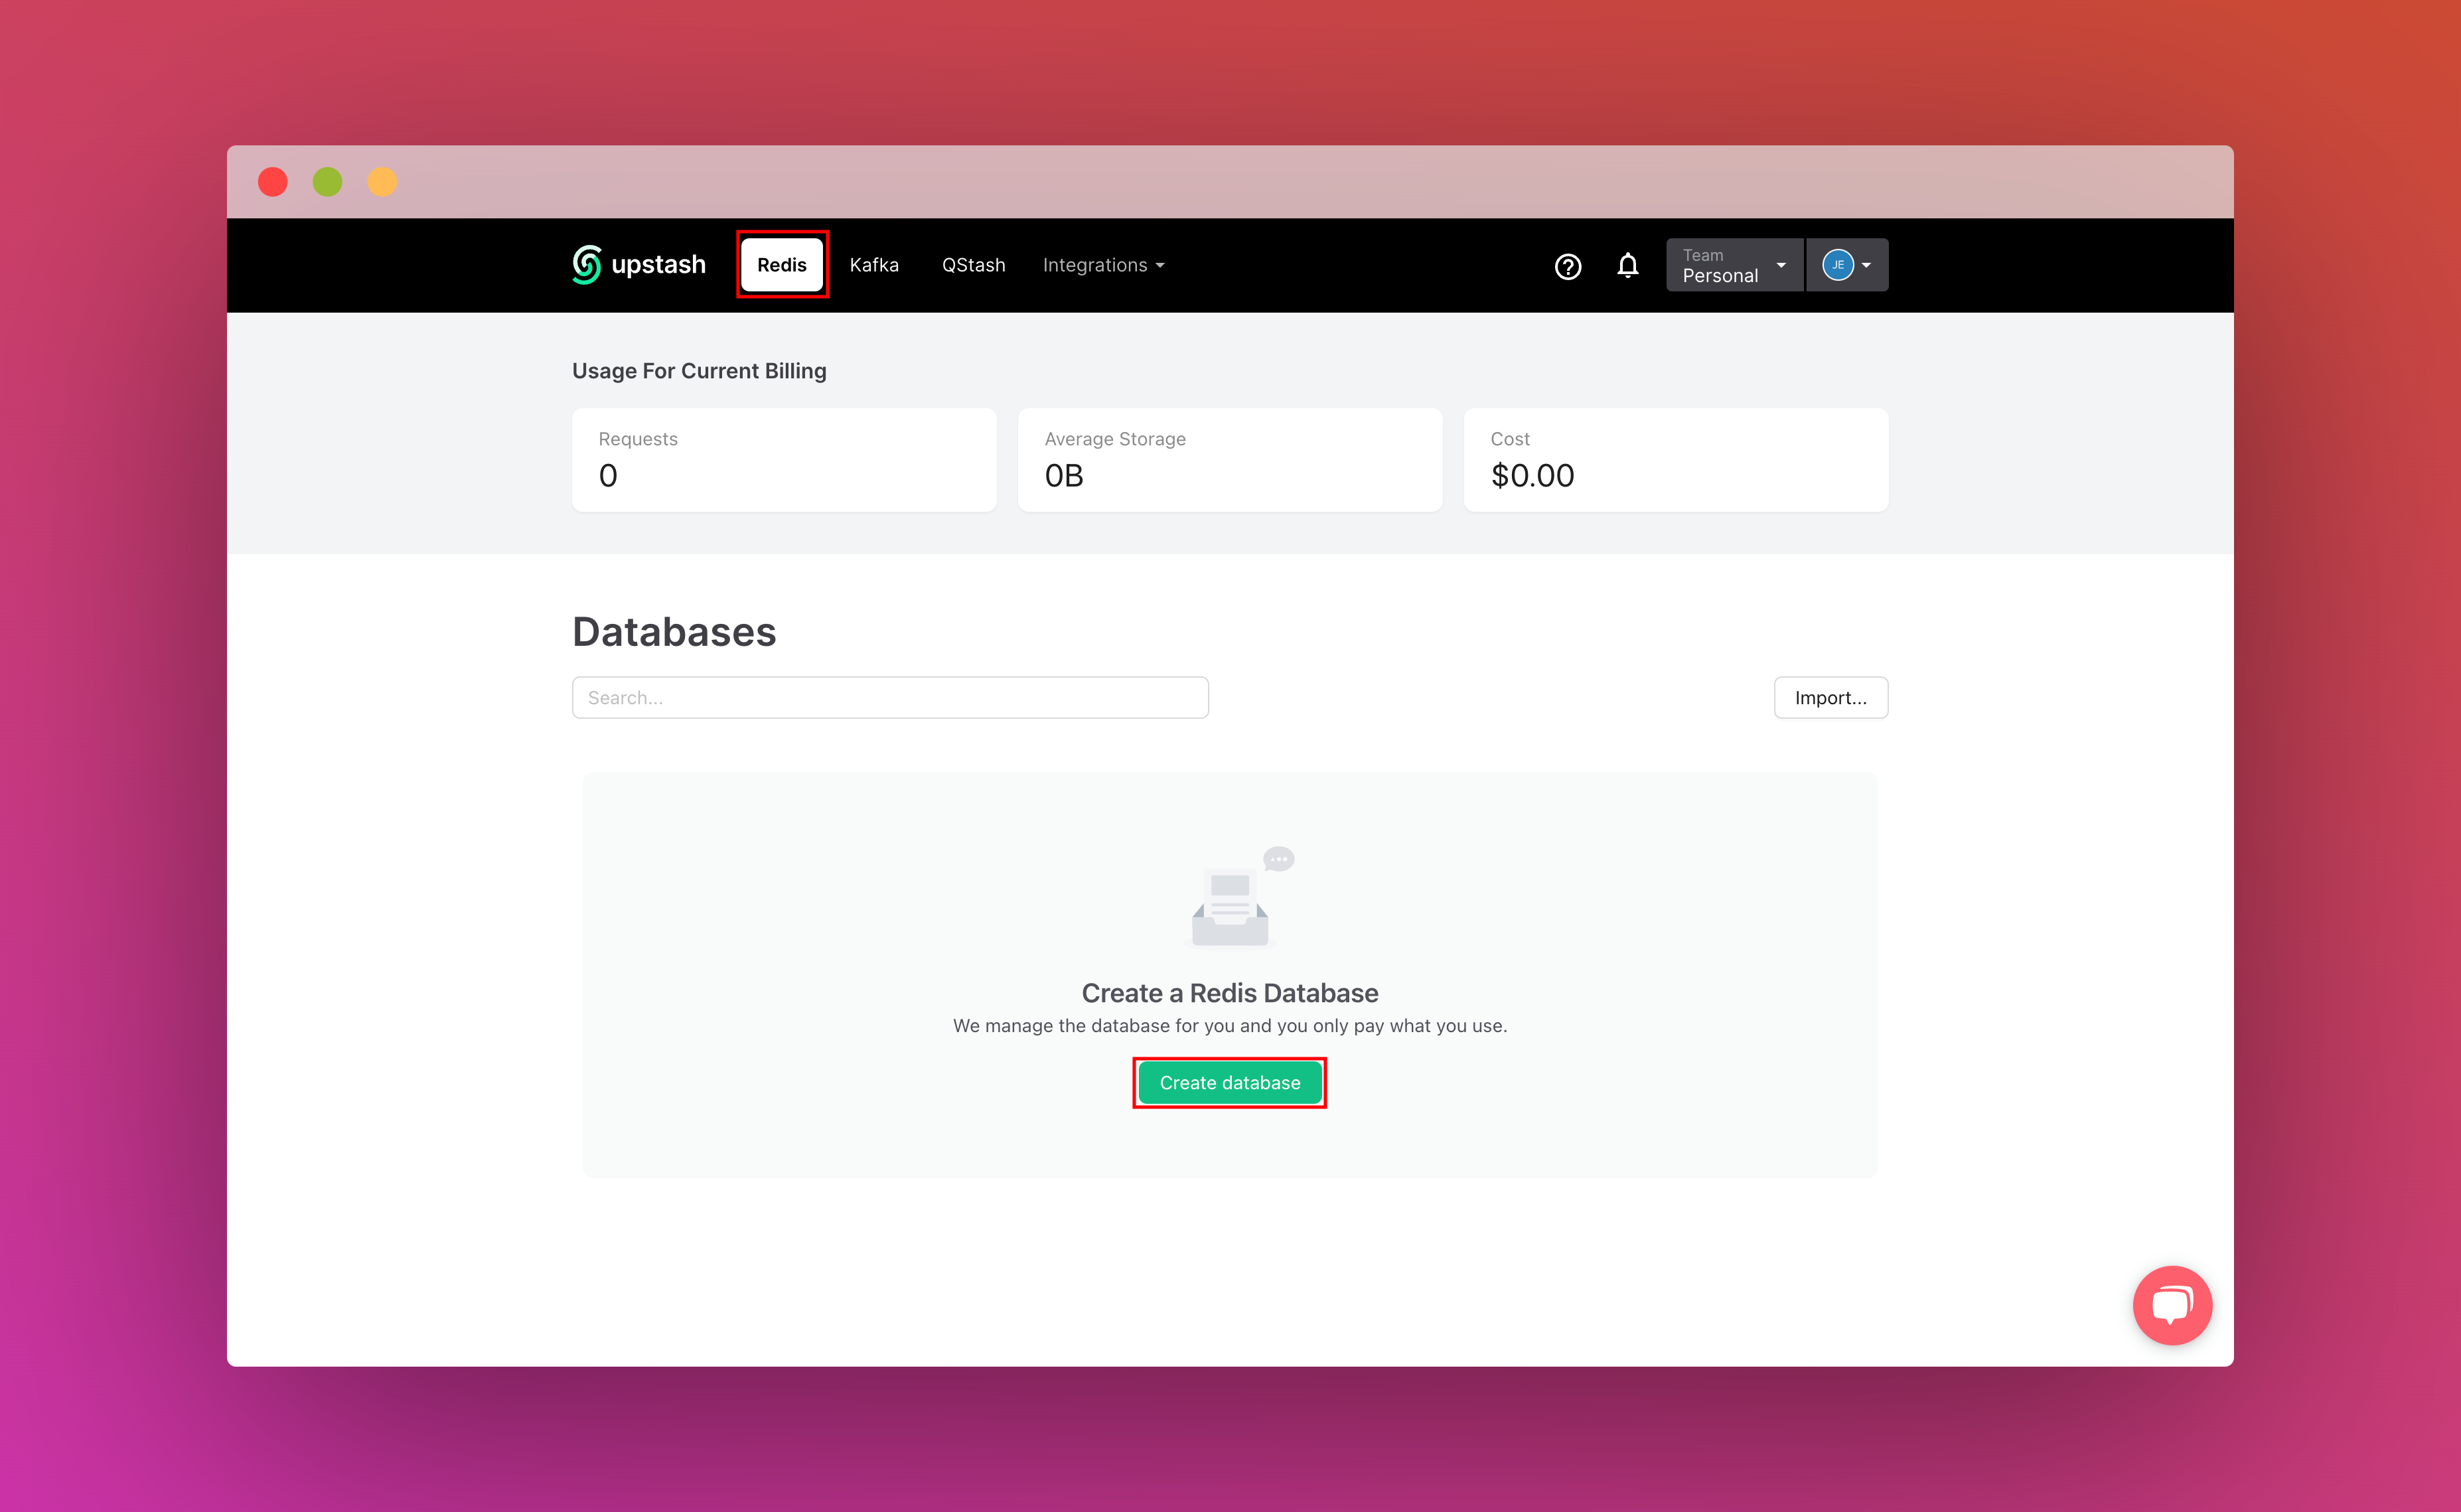
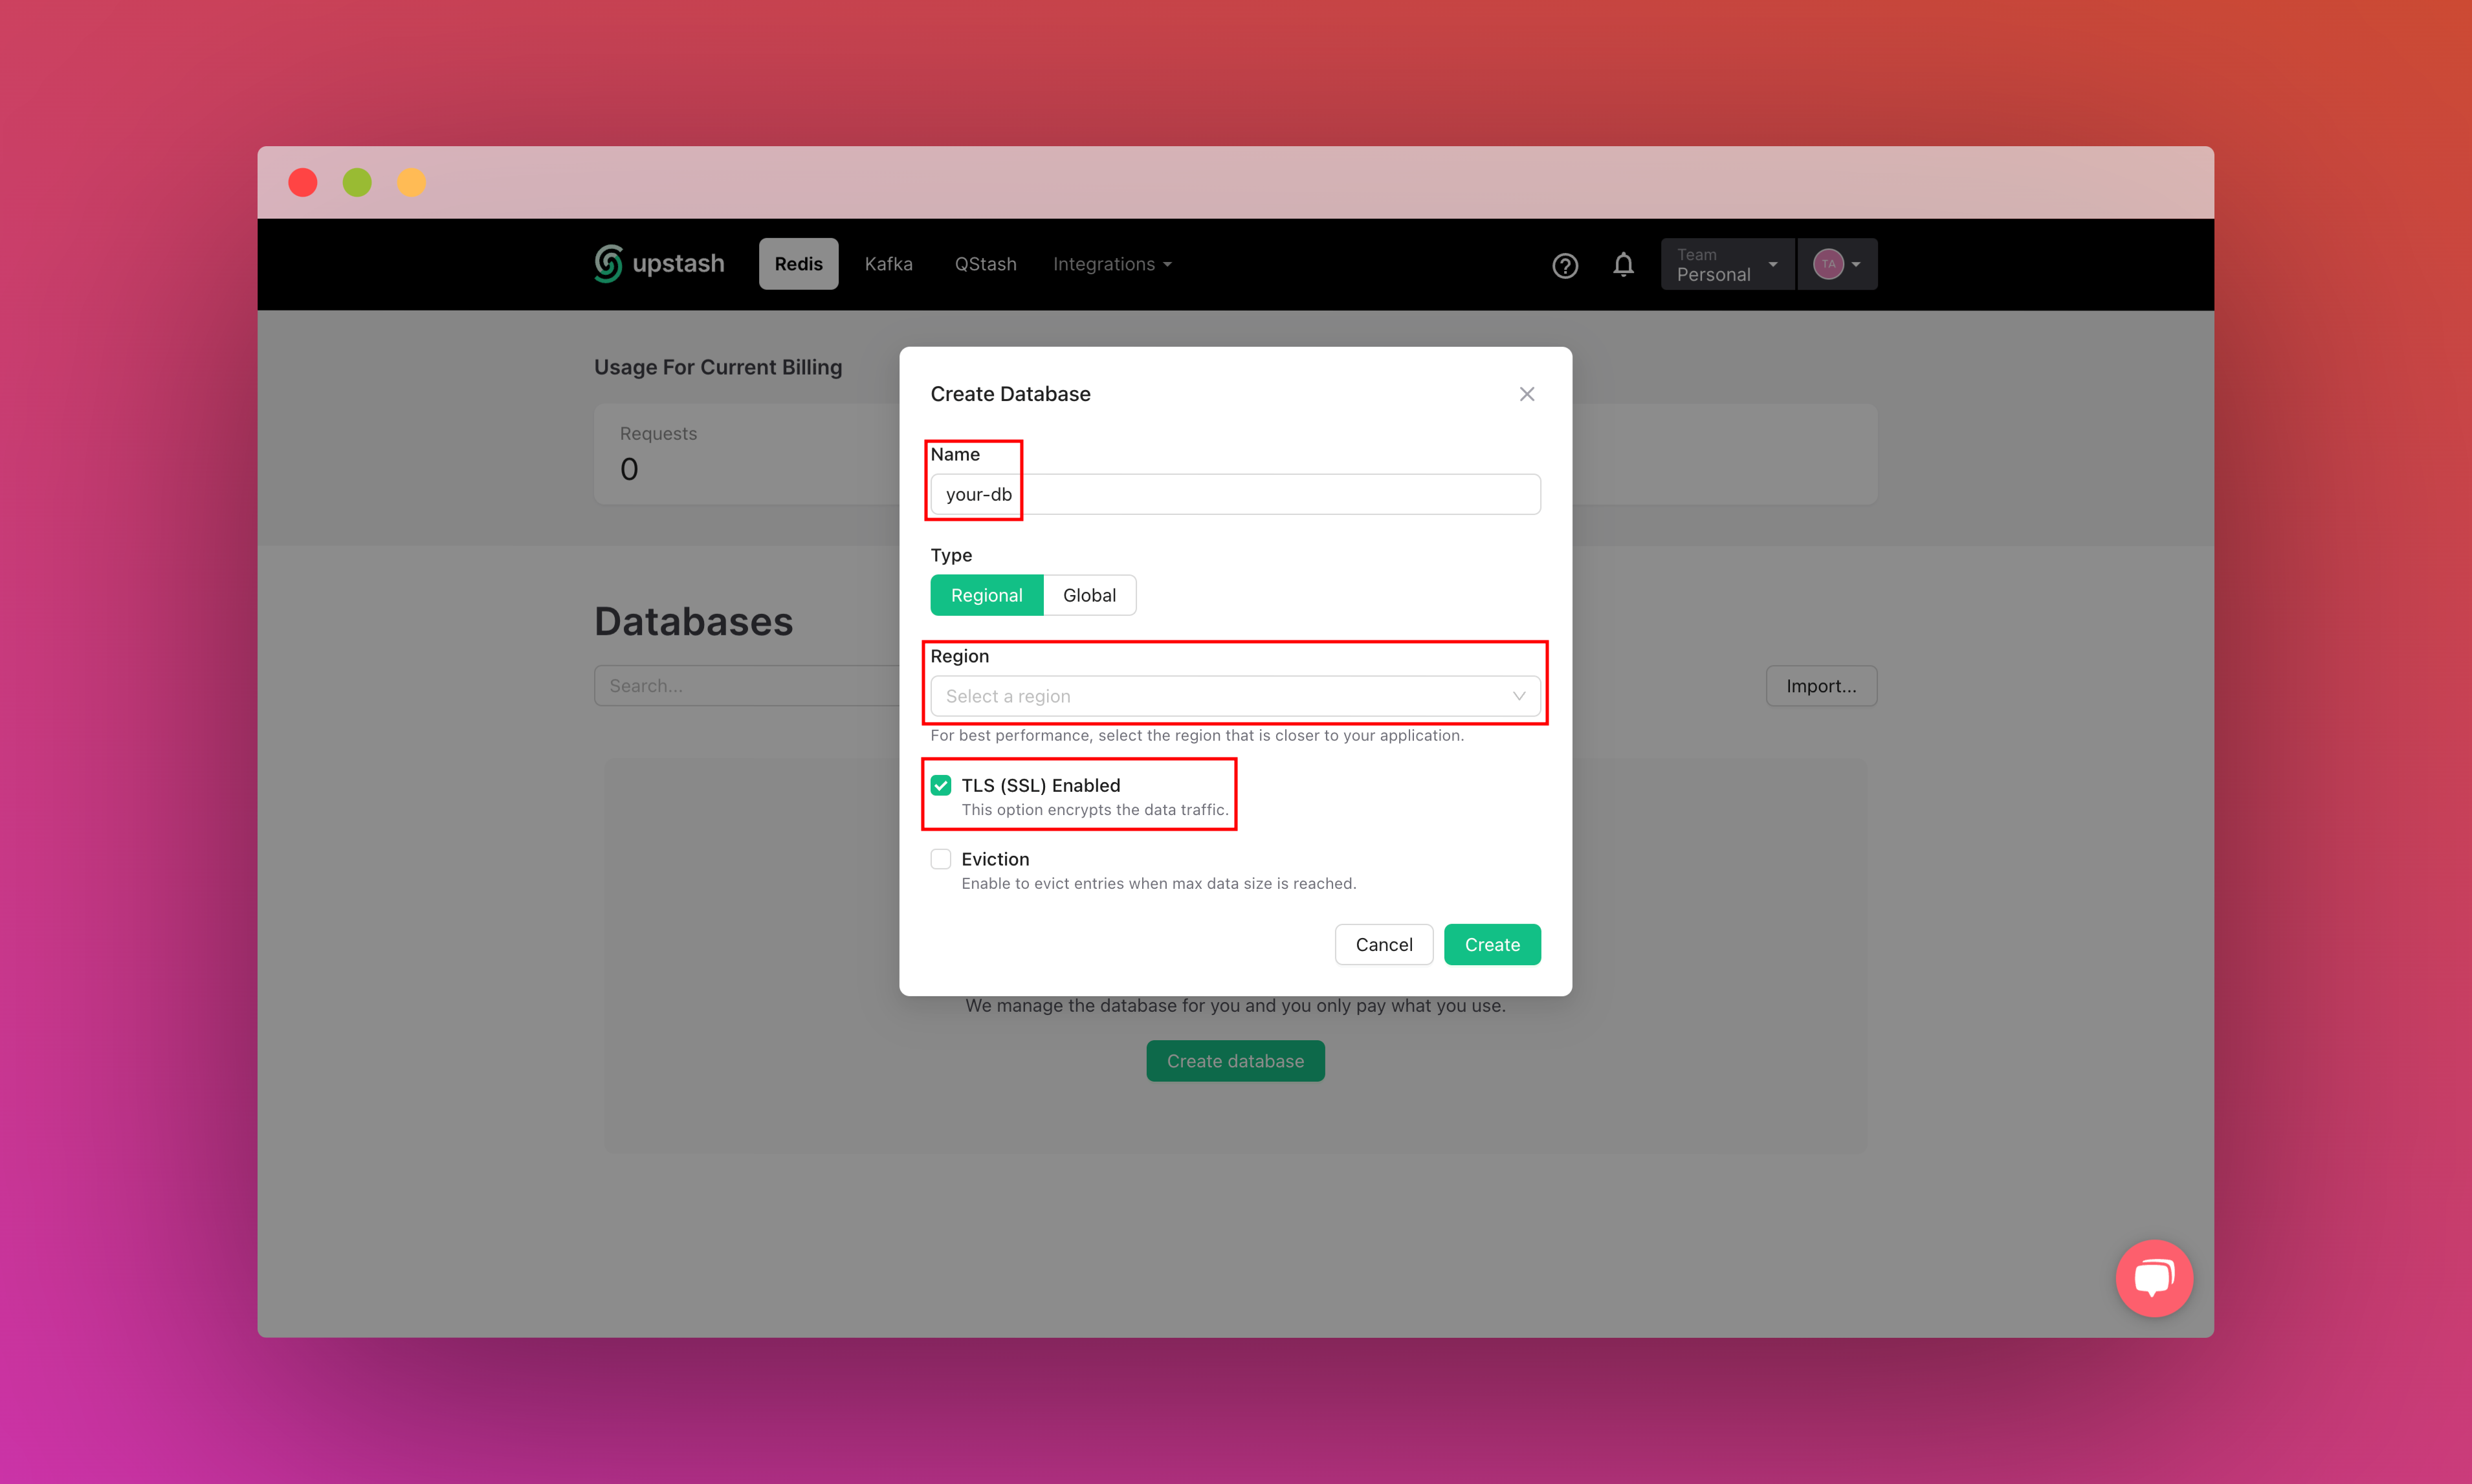
Once you have created an Upstash account and are logged in you are going to go to the Redis tab and create a database.


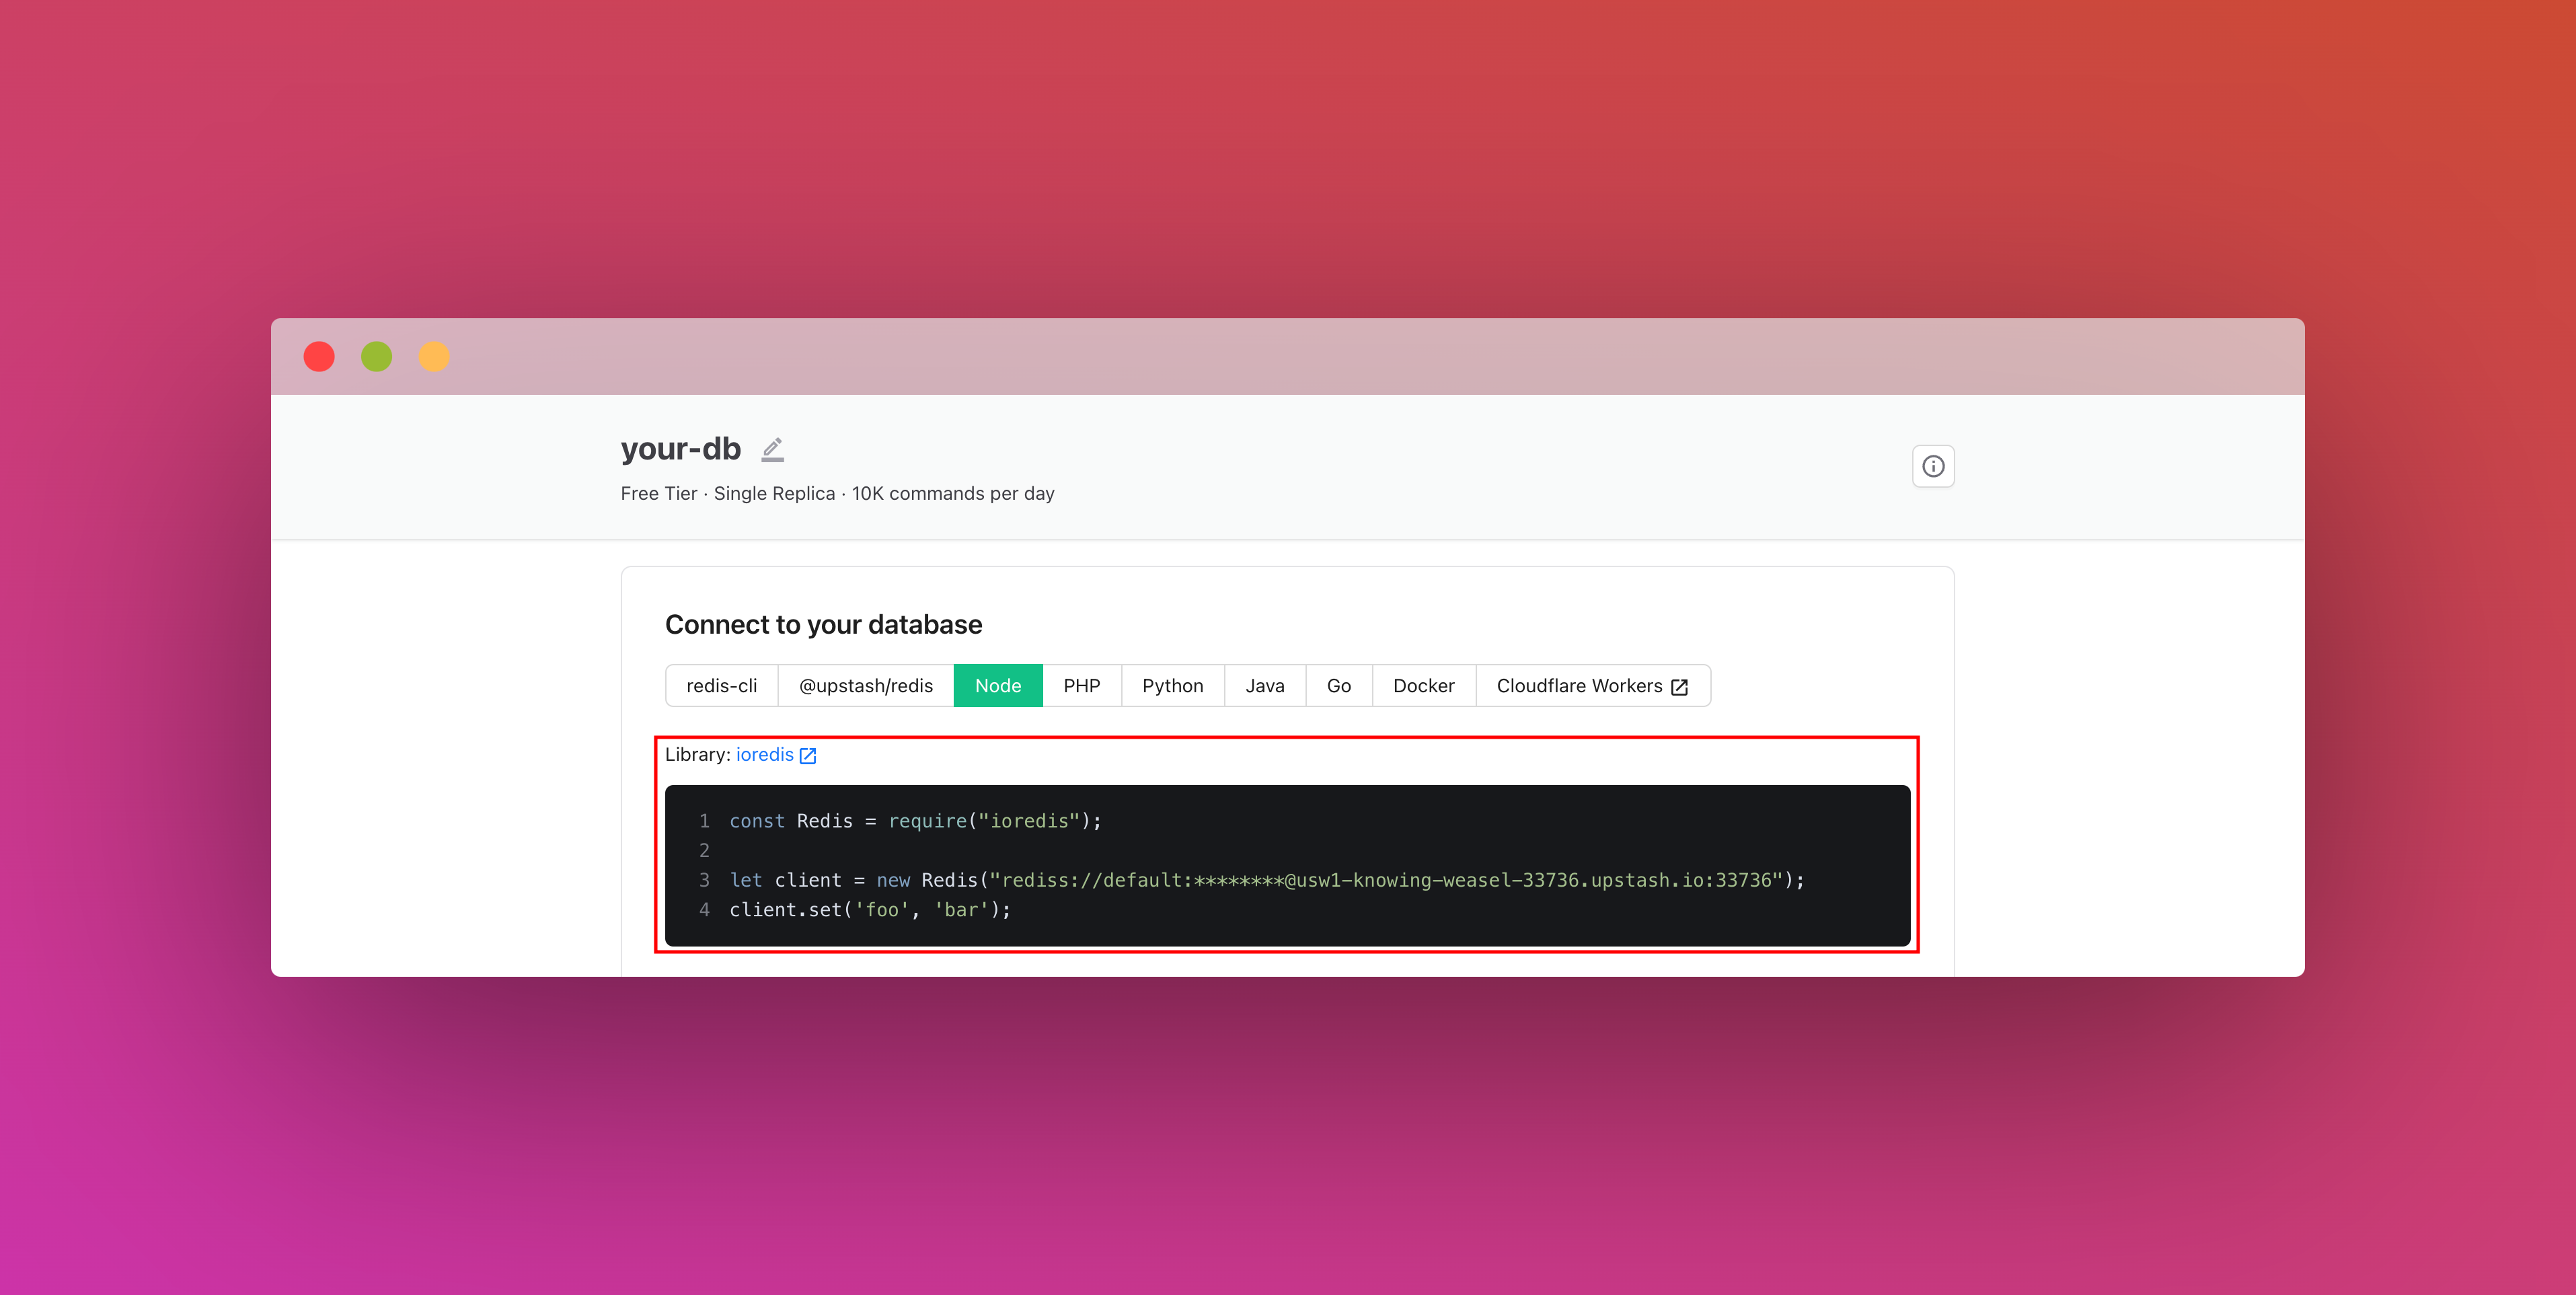
After you have created your database, you are then going to the Details tab. Scroll down until you find the Connect your database section. Copy the Redis URL and save it somewhere safe, we’ll be using it as UPSTASH_REDIS_URL as our environment variable.

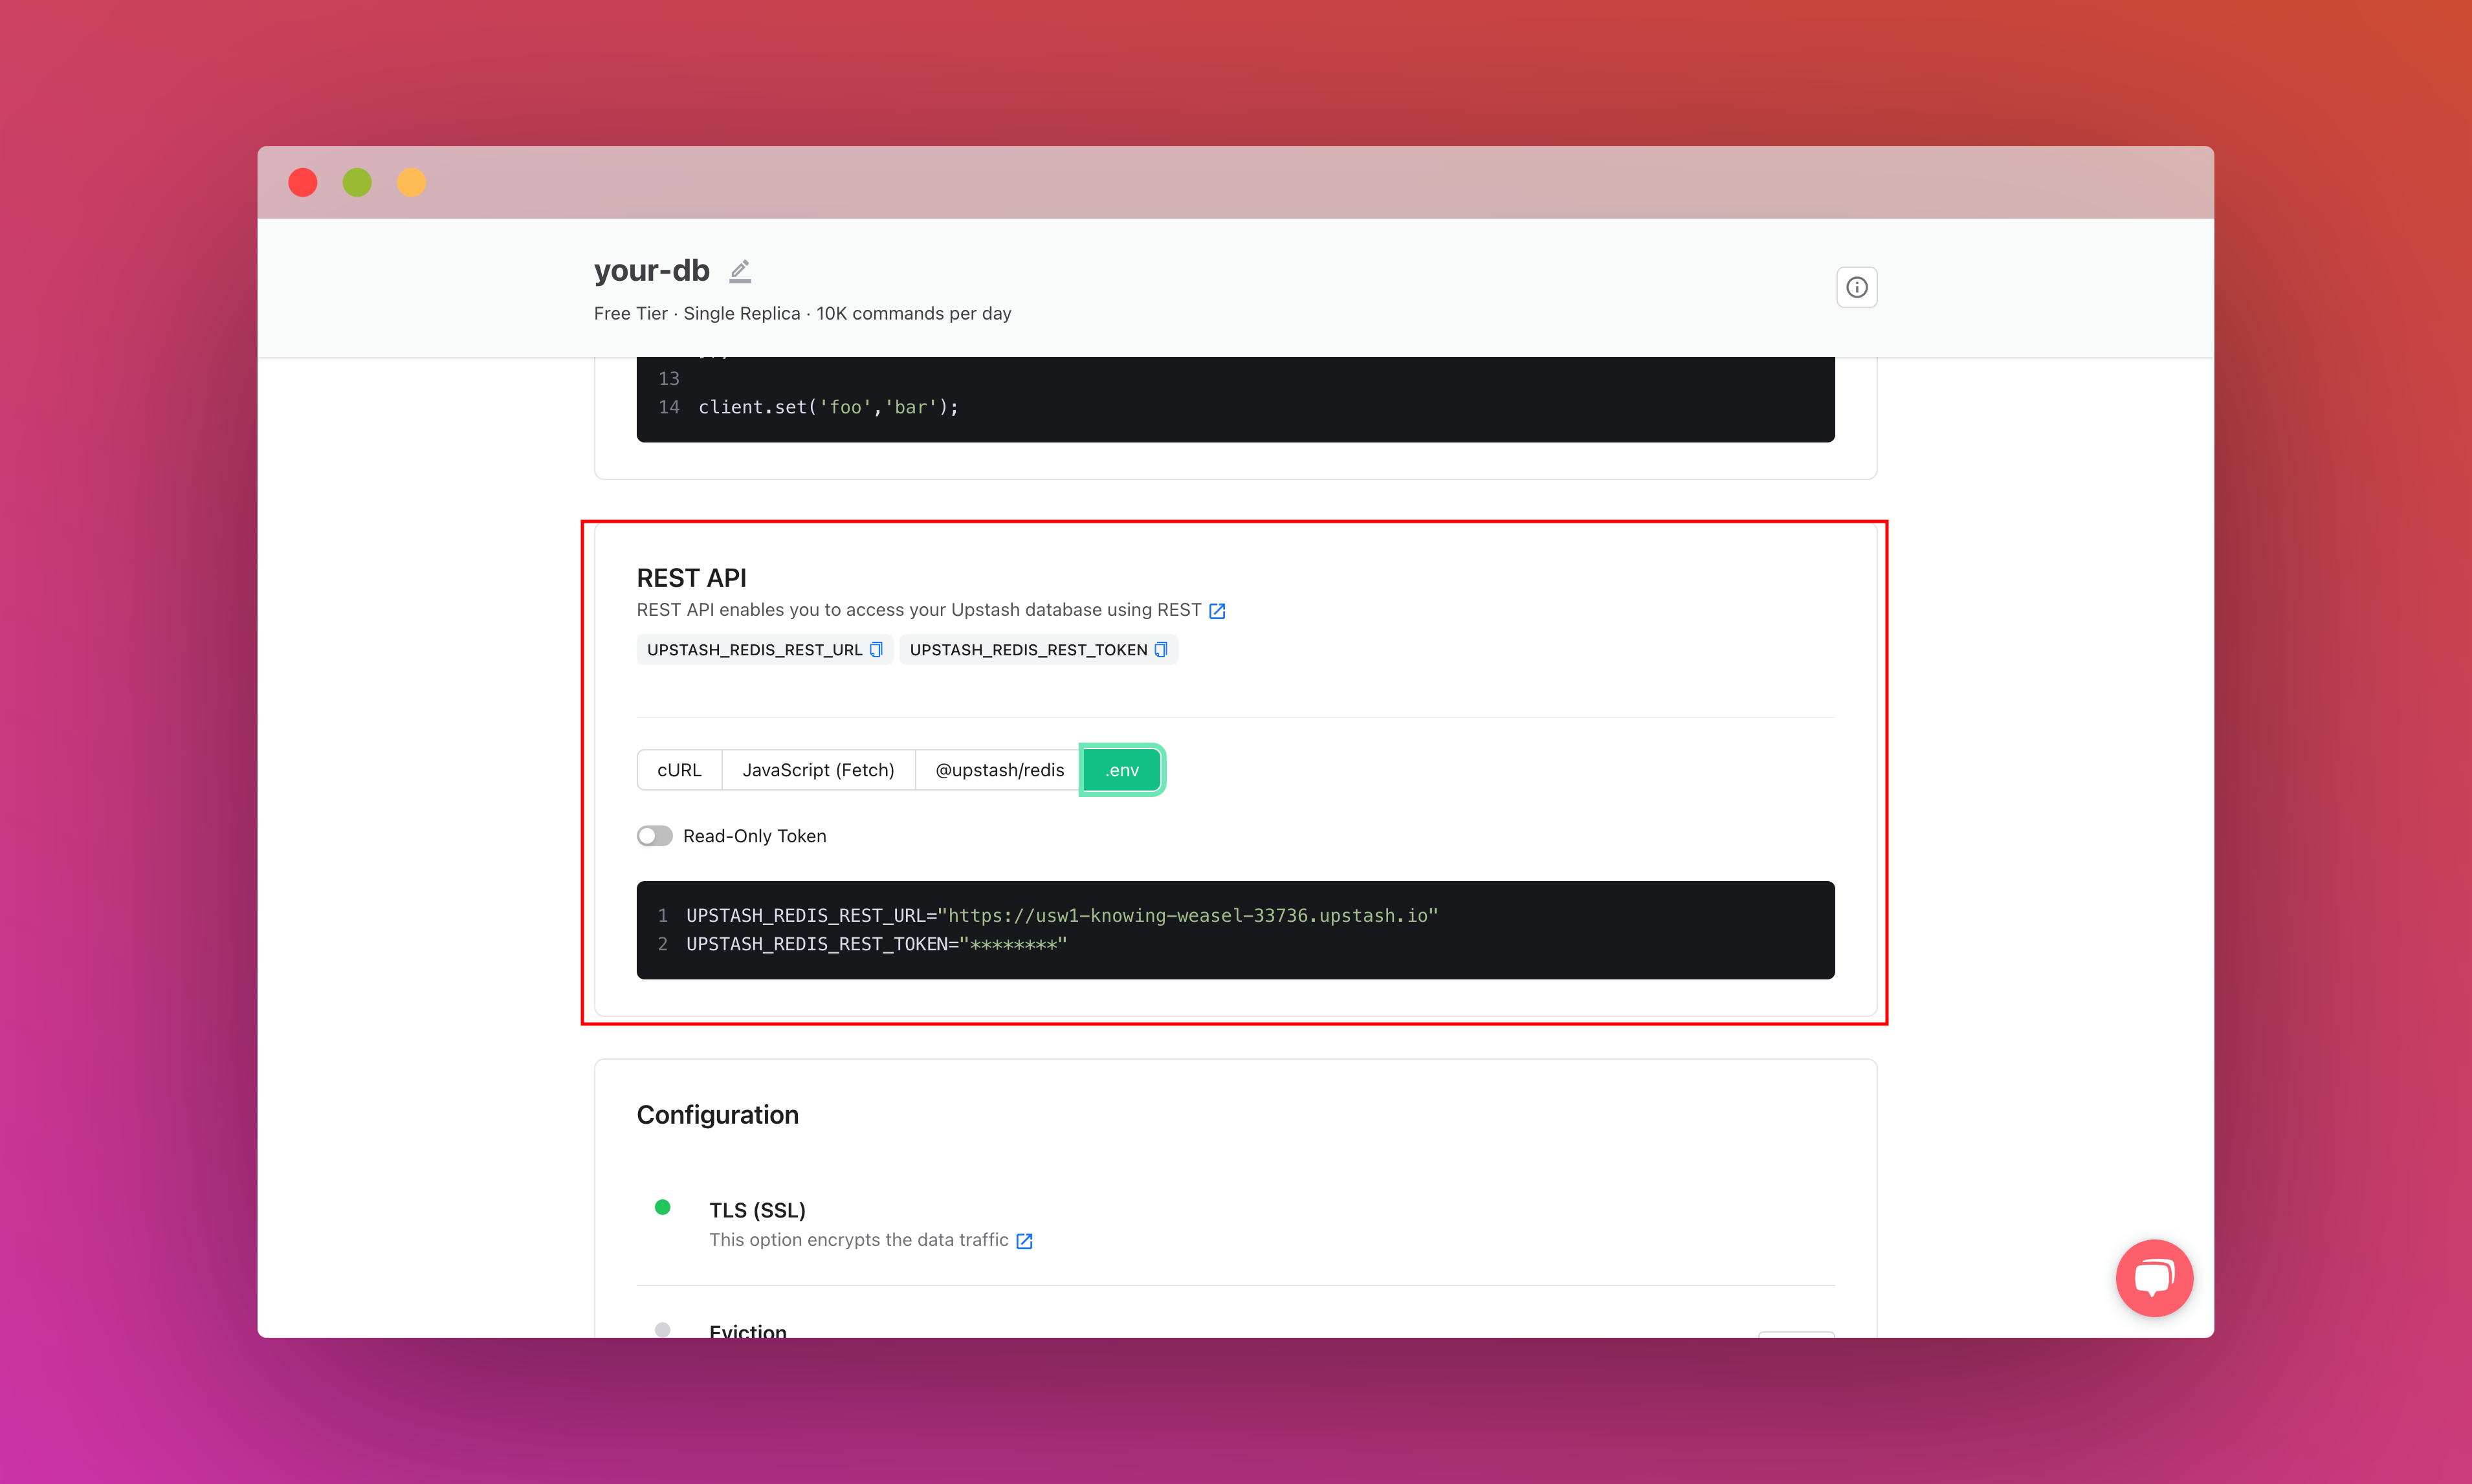
Also, scroll down until you find the REST API section and select the .env button. Copy the content and save it somewhere safe, we’ll be using the variables obtained as UPSTASH_REDIS_REST_URL and UPSTASH_REDIS_REST_TOKEN.

Setting up the project
To set up, just clone the app repo and follow this tutorial to learn everything that's in it. To fork the project, run:
git clone https://github.com/rishi-raj-jain/upstash-nextjs-publish-messages-with-sse-example
cd upstash-nextjs-publish-messages-with-sse-example
npm install
Once you have cloned the repo, you are going to create a .env file. You are going to add the items we saved from the above sections.
It should look something like this:
# .env

# Obtained from the steps as above

# Upstash Redis Secrets
UPSTASH_REDIS_URL="rediss://default:...@...-...-...-....upstash.io:..."
UPSTASH_REDIS_REST_URL="https://...-...-...-....upstash.io"
UPSTASH_REDIS_REST_TOKEN="...="
Note how at the UPSTASH_REDIS_URL variable says "rediss" and not "redis", that's to use the TLS/SSL option.
After these steps, you should be able to start the local environment using the following command:
npm run devRepository Structure
This is the main folder structure of the project. I have marked in red the files that will be discussed further in this post that deals with the following:
- Understanding Message Channels in Upstash Redis
- Creating Server-Sent Events API in Next.js App Router
- Setup Next.js Server Actions with Upstash Redis to publish notifications
- Setup Next.js frontend to persistently listen and display notifications in real-time
.png)
Understanding Message Channels in Upstash Redis
In Upstash Redis, the publish/subscribe model is at the core of message channels. Publishers broadcast messages to named channels, and subscribers are able to receive messages from specific channels in real-time. This model enables seamless communication between different parts of an application.
Here’s how messages can be published to a channel using the Edge compatible library, @upstash/redis 👇🏻
import { Redis } from '@upstash/redis'

// Connect to an Upstash Redis instance
const redis = Redis.fromEnv()

// Publish a message to the Upstash Redis instance
await redis.publish('posts', JSON.stringify({ date: new Date().toString(), message: "I am a new message." }))
Here’s how subscribers can listen to a Upstash Redis channel (here, posts) with Node compatible library, ioredis 👇🏻
// Use ioredis to be able to subscribe to an Upstash Redis instance
import Redis from 'ioredis'

// Create an Upstash Redis Subscriber instance
const redisSubscriber = new Redis(process.env.UPSTASH_REDIS_URL)

// Define the key to listen and publish messages to
const setKey = 'posts'

// Subscribe to Redis updates for the key: "posts"
// In case of any error, just log it
redisSubscriber.subscribe(setKey, (err) => {
  if (err) console.log(err)
})

// Listen for new posts from Redis
redisSubscriber.on('message', (channel, message) => {
  // Log the data when the channel message is received is same as the message is published to
  if (channel === setKey) console.log(mesage)
})
Upon publishing a message to a channel, all subscribers instantly receive the message, allowing for efficient and real-time communication within Upstash Redis.
Creating Server-Sent Events API in Next.js App Router
Server-Sent Events are a powerful way to send new data in real time without the need for multiple client requests. Unlike traditional request-response mechanisms, SSE enables a unidirectional flow of data from the server to the client over a single, long-lived HTTP connection.
Here’s how you can implement Server-Sent Events in Next.js App Router 👇🏻
// File: app/api/stream/route.js

// Prevents this route's response from being cached on Vercel
export const dynamic = 'force-dynamic'

export async function GET() {
  const encoder = new TextEncoder()
  // Create a streaming response
  const customReadable = new ReadableStream({
    start(controller) {
			const message = 'Hey, I am a message.'
			controller.enqueue(encoder.encode(`data: ${message}\n\n`))
    },
  })
  // Return the stream response and keep the connection alive
  return new Response(customReadable, {
    // Set the headers for Server-Sent Events (SSE)
    headers: {
			'Content-Type': 'text/event-stream; charset=utf-8',
			Connection: 'keep-alive',
			'Cache-Control': 'no-cache, no-transform',
			'Content-Encoding': 'none'
		},
  })
}
Publishing Messages to Upstash Redis using Next.js Server Actions
Next.js Server Actions allow you to define server-side logic directly within your frontend code in Next.js. This saves the process of creating API Routes manually and the hassle of submitting and tracking form submission status(es).
With use server at the top of the function, we’re able to make sure that the functions runs only server-side. Inside our form submission Server Action, we extract the message value from the form, use Vercel Header to obtain the country of the user and publish the information as a message to the posts Upstash Redis message channel.
// File: app/actions.jsx

'use server'

import { Redis } from '@upstash/redis'
import { headers } from 'next/headers'

// The function that takes care of obtaining the country code from Vercel headers
// And publishing messages to the Upstash Redis database with the current timestamp
export async function publishNotification(formData) {
  'use server'
  const redis = Redis.fromEnv()

	// Extract the message in the form submitted
	const message = formData.get('message')

	// Obtain country of the user using Vercel's x-vercel-ip-country header
  const headersList = headers()
  const country = headersList.get('x-vercel-ip-country')

	// Publish the message to the "posts" channel in Upstash Redis
  await redis.publish(
		'posts',
		JSON.stringify({
			message,
			country,
			date: new Date().toString(),
		}))
}
To invoke this Server Action as the form is submitted, we pass it as the handler to the form action event.
// File: app/page.jsx

// Import the server action
import { publishNotification } from './actions'

const Home = () => {
  return (
    <>
      <div>
        <form

					/* set the server action to invoked as form is submitted */
					action={publishNotification}

				>
          {/* Place a client side form component here */}
        </form>
      </div>
    </>
  )
}

export default Home
Setup Next.js frontend to display pending state during Form Submission with React’s useFormStatus hook
The following code demonstrates the setup of a Next.js Form client side component to handle form submission and display a pending state using React's useFormStatus hook. Let's break down the key elements of the code:
- Importing the recently released
[useFormStatushook from React](https://react.dev/reference/react-dom/hooks/useFormStatus), that gives you status information of the last form submission. - Using the
pendingstate reactive variable indicating whether the form submission is in progress. - If the submission is not pending,
resetthe form. - Use the
pendingboolean to show conditional states of the form.
'use client'
import { useEffect } from 'react'
import { useFormStatus } from 'react-dom'
const Form = () => {
// Use React's useFormStatus hook to detect form submission state
const { pending } = useFormStatus()
useEffect(() => {
// If the form is not pending, reset the form
if (!pending) document.getElementById('publish-form').reset()
}, [pending])
return (
<>
<input placeholder="Your message" className="border rounded px-3 outline-none focus:border-black/50 py-2" type="text" name="message" required />
<button
/* Disable button click while the form submission is pending */
disabled={pending}
className="hover:border-black/50 max-w-max border rounded py-1 px-3" type="submit"
>
{/* Display "pending" state placeholder */}
{pending ? (
<div className="flex flex-row gap-x-2 items-center">
<div className="animate-spin border border-gray-800 rounded-full h-[15px] w-[15px]"></div>
<span>Publishing</span>
</div>
) : (
<>Publish Notification →</>
)}
</button>
</>
)
}
export default FormSetup Next.js frontend to persistently listen to Server-Sent Events
In this section, we’ll learn how to setup a minimal listener to Server-Sent Events API messages, and an approach to persist the connection to the SSE API.
Listening to Server-Sent Events API in React Frontend
To listen to SSE API in our client side component in React, we make use of the useEffect hook. To establish a connection to the SSE API, create a new EventSource instance pointing to the /api/stream endpoint. Then attach an event listener for the message event, where incoming data from the stream is parsed as JSON and further processed or displayed in the component.
Finally, the code includes a cleanup function to close the SSE connection when the component is unmounted, preventing potential memory leaks.
import { useEffect, useState } from 'react'

const ClientSideComponent = () => {

  useEffect(() => {

    // Initiate the first call to connect to SSE API
    const eventSource = new EventSource('/api/stream')

    eventSource.addEventListener('message', (event) => {
      // Parse the data received from the stream into JSON
      // Add it the list of messages seen on the page
      const tmp = JSON.parse(event.data)
			// Do something with the obtained message
    })

    // As the component unmounts, close listener to SSE API
    return () => {
      eventSource.close()
    }

  }, [])

	return <></>
}

export default ClientSideComponent
Persisting Connection to Server-Sent Events API in React Frontend
In the enhanced version of the React component, we've implemented a mechanism to ensure a continuous and persistent connection to the SSE API by handling errors and automatically reconnecting.
This is achieved through the connectToStream function which is responsible for establishing and maintaining a connection to the SSE API.
Here's a breakdown of its functionalities 👇🏻
- Initial Connection and Message Handling:
The function creates a new EventSource instance, connecting to the /api/stream endpoint.
// Function to take care of initial connect to the SSE API
// Also, it reconnects to the SSE API as soon as it shuts down
// This keeps the connection alive - forever with micro second delays
const connectToStream = () => {
  // Connect to /api/stream as the SSE API source
  const eventSource = new EventSource('/api/stream')
	// ..
}
Further, it sets up an event listener for the message event, where incoming data from the stream is parsed as JSON. The parsed data can then be processed or displayed in the React component.
const connectToStream = () => {
	// ...
	eventSource.addEventListener('message', (event) => {
	  // Parse the data received from the stream into JSON
	  // Add it the list of messages seen on the page
	  const tmp = JSON.parse(event.data)
	  setPosts((prevPosts) => [...prevPosts, tmp])
	})
	// ...
}- Error Handling and Automatic Reconnection:
An additional event listener is set for the error event. In case of any error, such as a connection failure, the event source is closed.
After closing, the function utilizes setTimeout to trigger a reconnection after a minimal delay of 1 millisecond. This small delay helps in creating a smoother and continuous reconnection process without overwhelming the server with rapid connection attempts
// In case of any error, close the event source
// So that it attempts to connect again
eventSource.addEventListener('error', () => {
  eventSource.close()
  setTimeout(connectToStream, 1)
})- Handling SSE API Source Closure:
The onclose event is utilised to detect when the SSE API source is closed. Upon closure, the function schedules another attempt to connect to the stream after a brief delay.
// As soon as SSE API source is closed, attempt to reconnect
eventSource.onclose = () => {
  setTimeout(connectToStream, 1)
}
By combining these strategies, the function ensures that the connection to the SSE API remains persistent. Even in the face of errors or closures, the React component will keep attempting to reconnect with minimal delay, effectively maintaining a continuous connection.
Deploy to Vercel
The repository is ready to deploy to Vercel. Follow the steps below to deploy seamlessly with Vercel 👇🏻
- Create a
GitHub Repositorywith the app code - Create a
New Projectin Vercel Dashboard - Link the created
GitHub Repositoryas your new project - Scroll down and update the
Environment Variablesfrom the.envlocally - Deploy! 🚀
References
| GitHub Repo | https://github.com/rishi-raj-jain/upstash-nextjs-publish-messages-with-sse-example |
|---|---|
| Server Sent Events | https://developer.mozilla.org/en-US/docs/Web/API/Server-sent_events |
| Next.js Server Actions | https://nextjs.org/docs/app/api-reference/functions/server-actions |
| Next.js Streaming | https://vercel.com/docs/functions/streaming/quickstart |
