In this blog post, I will guide you through building a serverless URL shortener service built on Upstash Redis, AWS Lambda (Python), and AWS API Gateway. The main purpose of this blog post is to demonstrate the process of creating a Python Lambda function, connecting it to Redis, and consuming it via an API.
You may reach an implementation of the project via: URL Shortener
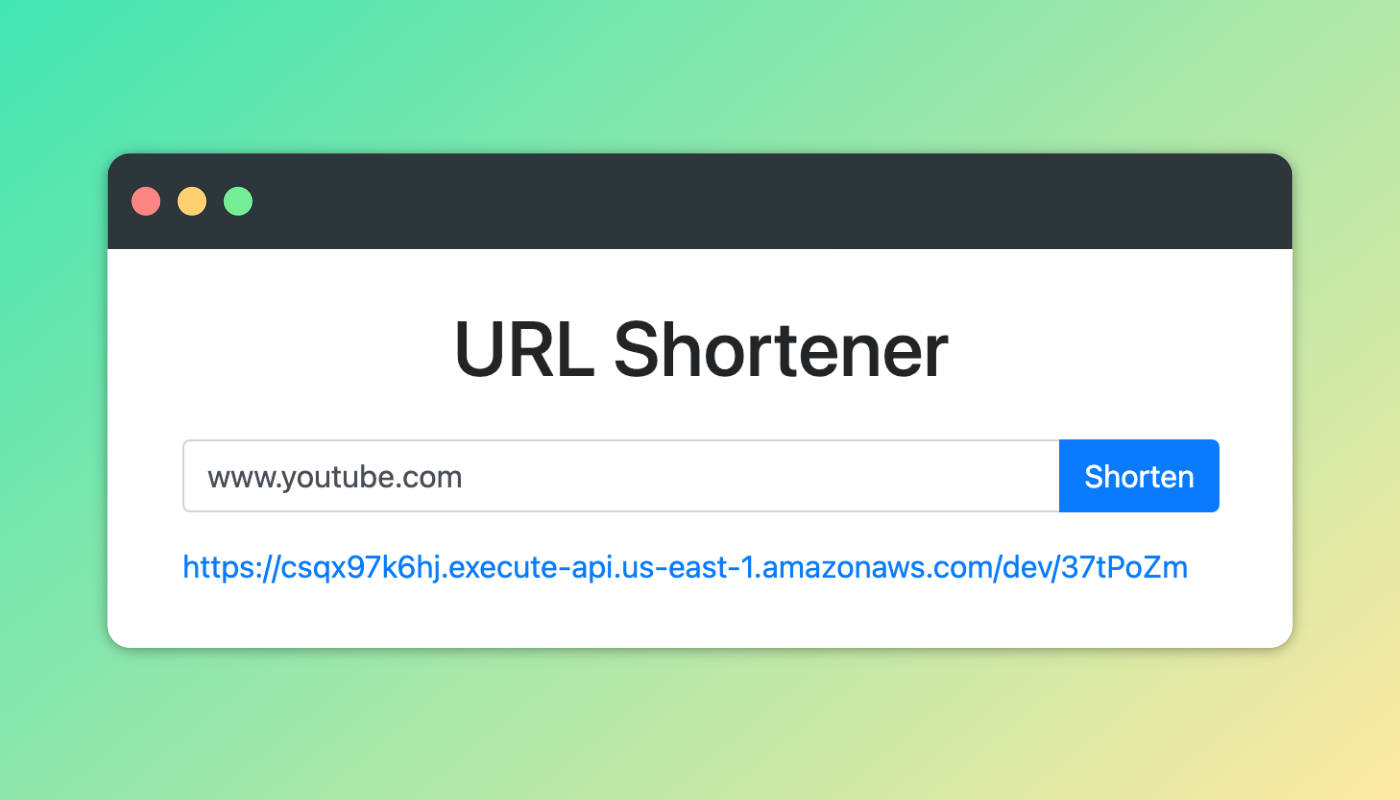
NOTE: The output URLs are for demonstration purposes; an active URL shortener would have a shorter and simpler domain address, so our focus here is on the functionality.
Project Description
The project consists of one database on Upstash Redis, two Python Lambda functions, and an API Gateway on AWS. Users may use either the web interface or the API to consume the shortener service.
The shortener Lambda function creates a shortened URL key from a long URL provided in an HTTP request query. It then stores the short URL key and its corresponding long URL value in Upstash Redis, before returning the short URL to the user.
The redirector Lambda function redirects users from a short URL to its corresponding long URL. It retrieves the long URL from Redis using the short URL key and sends an HTTP 302 redirection response to the user’s browser. This function helps users access the desired content without the need to recall or manually enter the long URL.
Finally, we'll create an API Gateway to consume the Lambda functions. This API will be connected to our basic URL shortener frontend.

Setting up the Upstash Redis
We can create our Redis Database on Upstash Console. After logging in, click the Create Database button. It'll take a few seconds, and you are all set up. Then, copy and paste the UPSTASH_REDIS_REST_HOST, UPSTASH_REDIS_REST_PORT and UPSTASH_REDIS_REST_PASSWORD variables from Details section to a file. We are going to use these keys in the AWS environment variables.
Creating the Serverless Functions on AWS Lambda
Next up, we will create our serverless Python functions. After logging in to AWS, direct to AWS Lambda. From the Dashboard, create the lambda function.
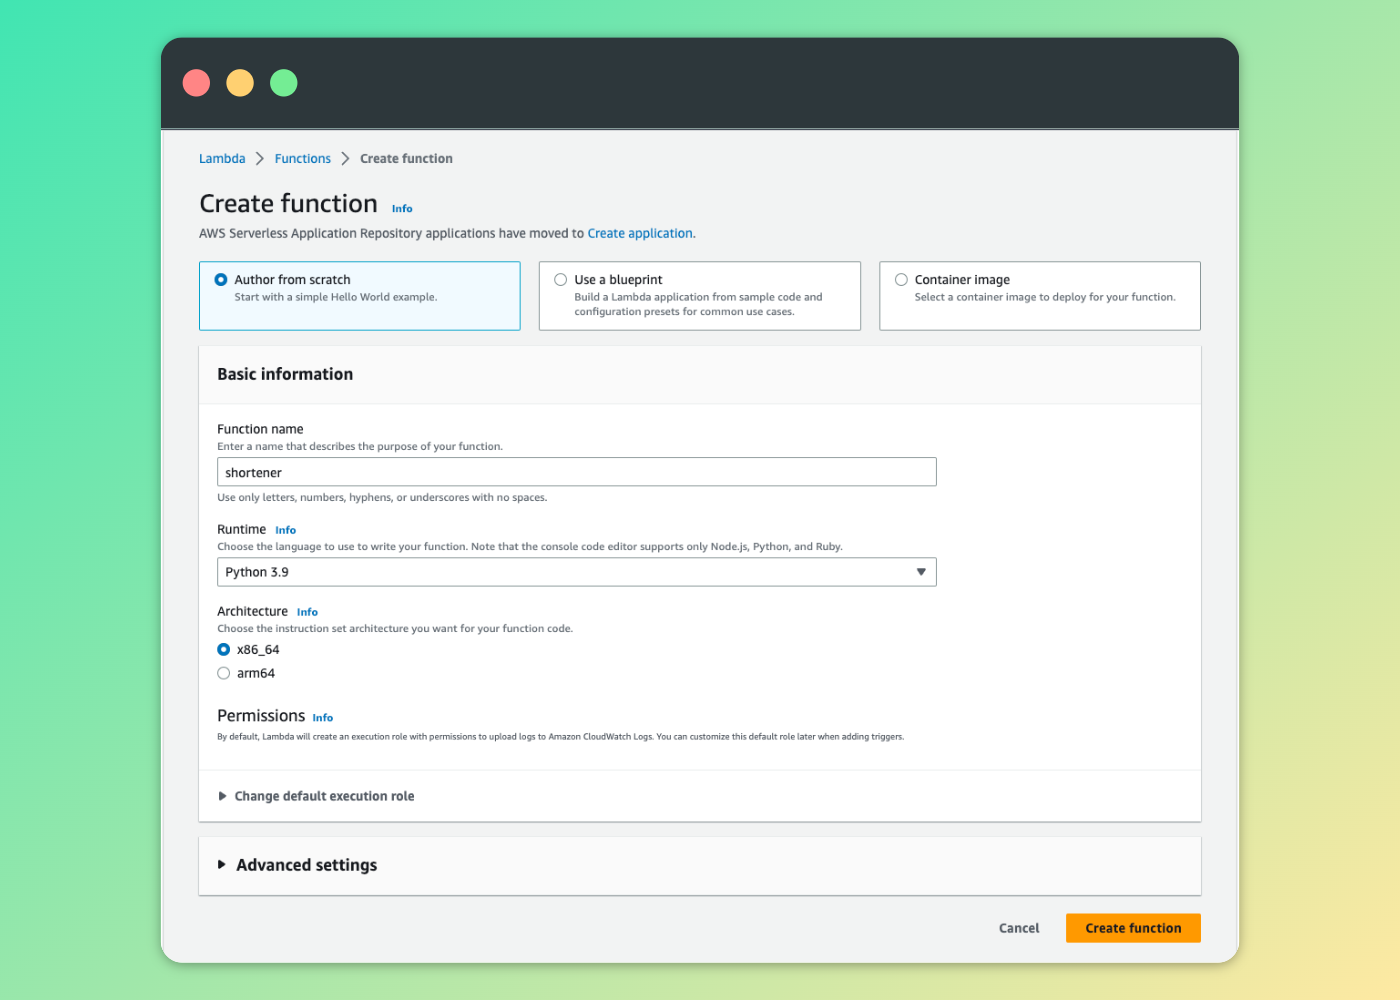
Lambda Function for URL Shortening
The first thing to do is add the environment variables. From the shortener function overview, go to Configuration > Environment variables > Edit > Add environment variable. Then, type in the UPSTASH_REDIS_REST_HOST, UPSTASH_REDIS_REST_PORT and UPSTASH_REDIS_REST_PASSWORD as the keys, and their corresponding values from Upstash Console.
Now we can start coding. Return back to the Code section of shortener function, and paste the code below. This will provide us the connection to Upstash Redis Database.
import random
import string
import json
import redis

#Create a redis client.
redis_client = redis.Redis(
  host= UPSTASH_REDIS_REST_HOST,
  port= UPSTASH_REDIS_REST_PORT,
  password= UPSTASH_REDIS_REST_PASSWORD
)
Then we will implement our main shortener algorithm. What the code snippet below does is:
- getting the query parameter
long_urlfrom the API Request URL, - generating a random 7 character key for the shortened URL,
- setting the value of this key on Upstash Redis to the long URL,
- returning an HTTP 200 Response with our full short URL in the body of the response.
Just below the Redis client creation, add the generate_short_url and lambda_handler functions.
def generate_short_url():
	# Define the character set for generating the short URLs
    CHARSET = string.ascii_letters + string.digits

    # Generate a random short URL using the character set
    short_url = ''.join(random.choice(CHARSET) for _ in range(7))

    # Check if the short URL already exists in Redis
    if redis_client.exists(short_url):
        # If it does, recursively generate a new short URL
        return generate_short_url()

    # Otherwise, return the new short URL
    return short_url


def lambda_handler(event, context):
    long_url = event["queryStringParameters"]['long_url']

    base_url = f"https://{event['headers']['Host'] }/{event['requestContext']['stage']}/"

    # Generate a unique short URL
    short_url_key = generate_short_url()

    # Store the mapping between the short URL and long URL in Redis
    redis_client.set(short_url_key, long_url)

    # Return the short URL to the client
    response_body = {
        'short_url' :  base_url + short_url_key,
    }

    response={
        'statusCode' : 200,
        'headers' : {'ContentType':'application/json',
                    "Access-Control-Allow-Origin": "*"},
        'body' : json.dumps(response_body)
    }

    return response
Then click Deploy. Even though the codes are ready; if you test the lambda now, you will get the response below from Lambda
Unable to import module 'lambda_function': No module named 'redis'
That is because, in order to use the external Python libraries, we need to create our own libraries as a custom package and then find a way to attach the package to Lambda. There are several ways to resolve this, but my go-to solution would be using Lambda Layers. Don't let that confuse you, it's rather a simple process.
Creating the Layer
First up, we have to create and zip the package. Go to your local terminal and type in the commands below. That will create a requirements-package.zip file in the packages folder with Redis installed.
mkdir packages
cd packages
python3 -m venv venv
source venv/bin/activate

mkdir python
cd python
pip install redis -t .

rm -rf *dist-info
cd..
zip -r requirements-package.zip python
Then, go back to the shortener function on AWS and direct to Layers from the sidebar. Click on the Create layer and fill in the needed configuration and upload the requirements-package.zip file, just similar to mine.
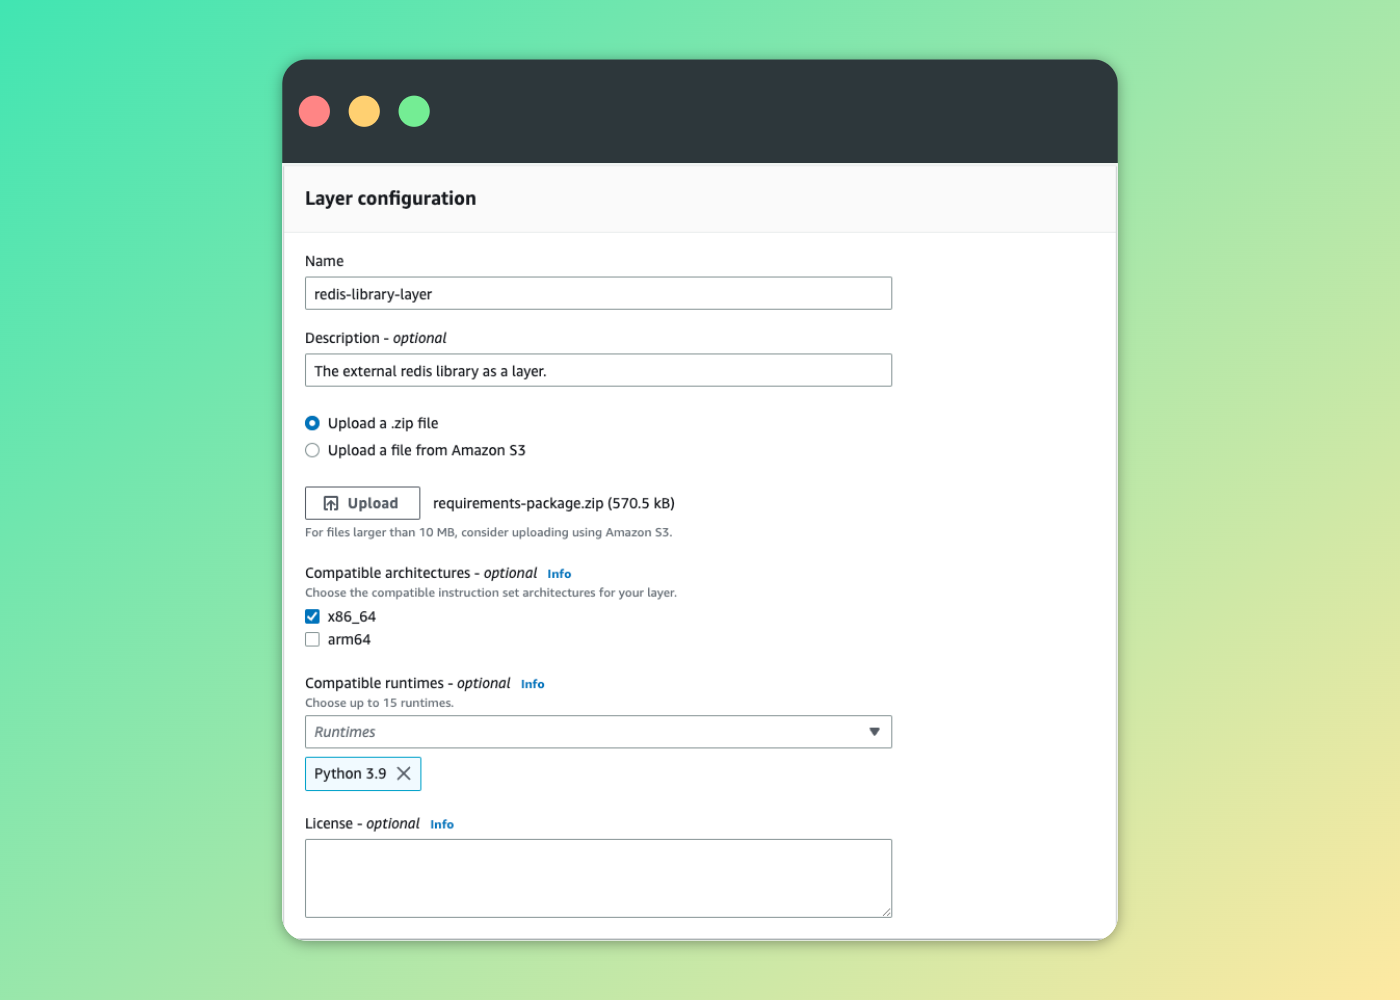
When the layer is created, we need to connect this layer to our shortener function. Go to the Layers section of the function and click Add a layer button.
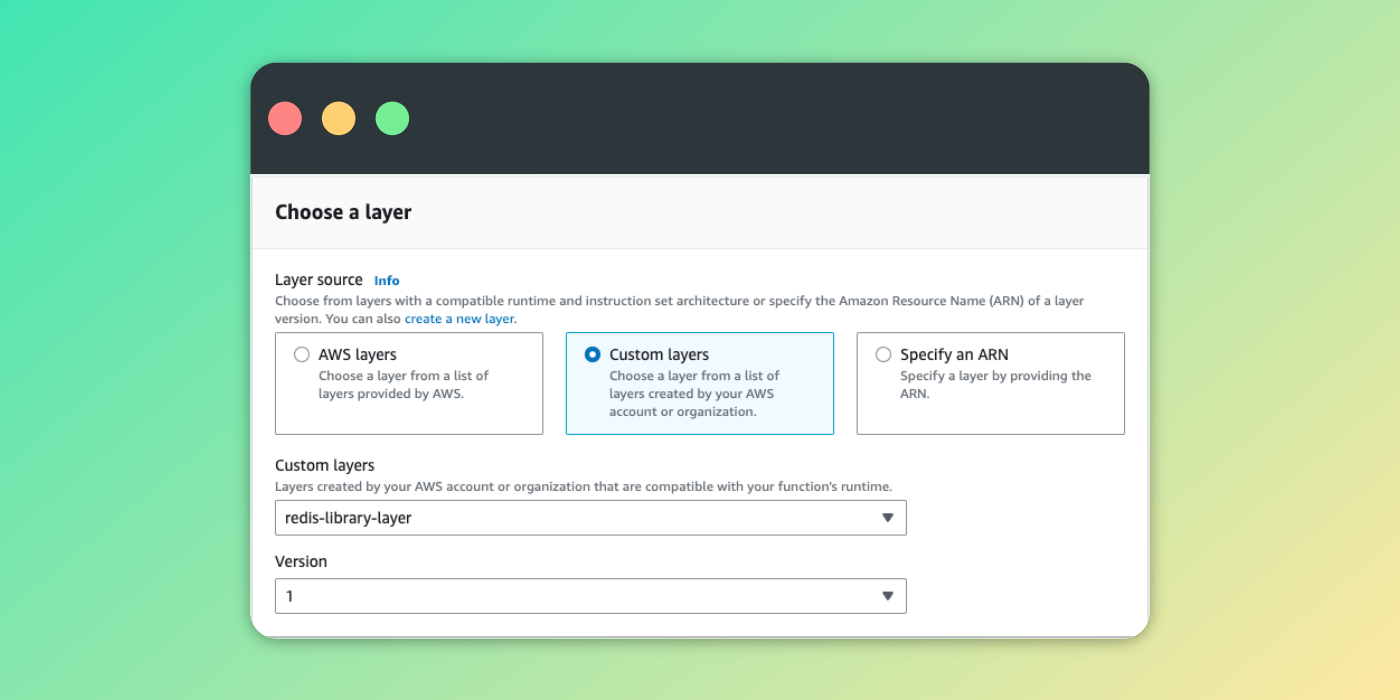
Now, we should be able to shorten the URLs. What remains is retrieving the long URL from the short_url key and redirecting the browser to that URL. For that, we are going to create a redirector lambda function.
Lambda Function for URL Redirection
The process of creating redirector lambda is the same as described above. Here are the steps once again:
- Creating a lambda function named
redirectorfrom the Lambda dashboard. - Setting the environment variables.
- Typing in the code given just below.
- Creating a layer with the
requirements-package.zipfile. (We may use theredis-library-layeragain, requirements are the same in this case.) - Adding the layer to the lambda function.
Here's the main algorithm for the redirector lambda.
import json
import redis

#Create a redis client.
redis_client = redis.Redis(
  host= UPSTASH_REDIS_REST_HOST,
  port= UPSTASH_REDIS_REST_PORT,
  password= UPSTASH_REDIS_REST_PASSWORD
)

def lambda_handler(event, context):
    # Get the short URL from the request path
    short_url = event['pathParameters']['short_url']

    # Look up the long URL associated with the short URL in Redis
    long_url = redis_client.get(short_url).decode('utf-8').strip('"')

    long_url = format_url_for_redirection(long_url)

    # If the short URL doesn't exist, return a 404 error
    if not long_url:
        response = {
            'statusCode': 404,
            'body': json.dumps({'error': 'Short URL not found'})
        }
        return response

    # Otherwise, redirect the user to the long URL
    response = {
        'statusCode': 302,
        'headers' : {'Location':long_url},
        'body' : ''
    }
    return response


def format_url_for_redirection(url):
    if not url.startswith("http://") and not url.startswith("https://"):
        url = "https://" + url
    return url
Just like that, our lambdas are all ready! Although this is functional, to make this URL shortener an accessible service, we have to find a way to run our lambdas. There are several ways to consume lambda functions, but for this implementation we'll use the AWS API Gateway.
Creating the API Gateway on AWS
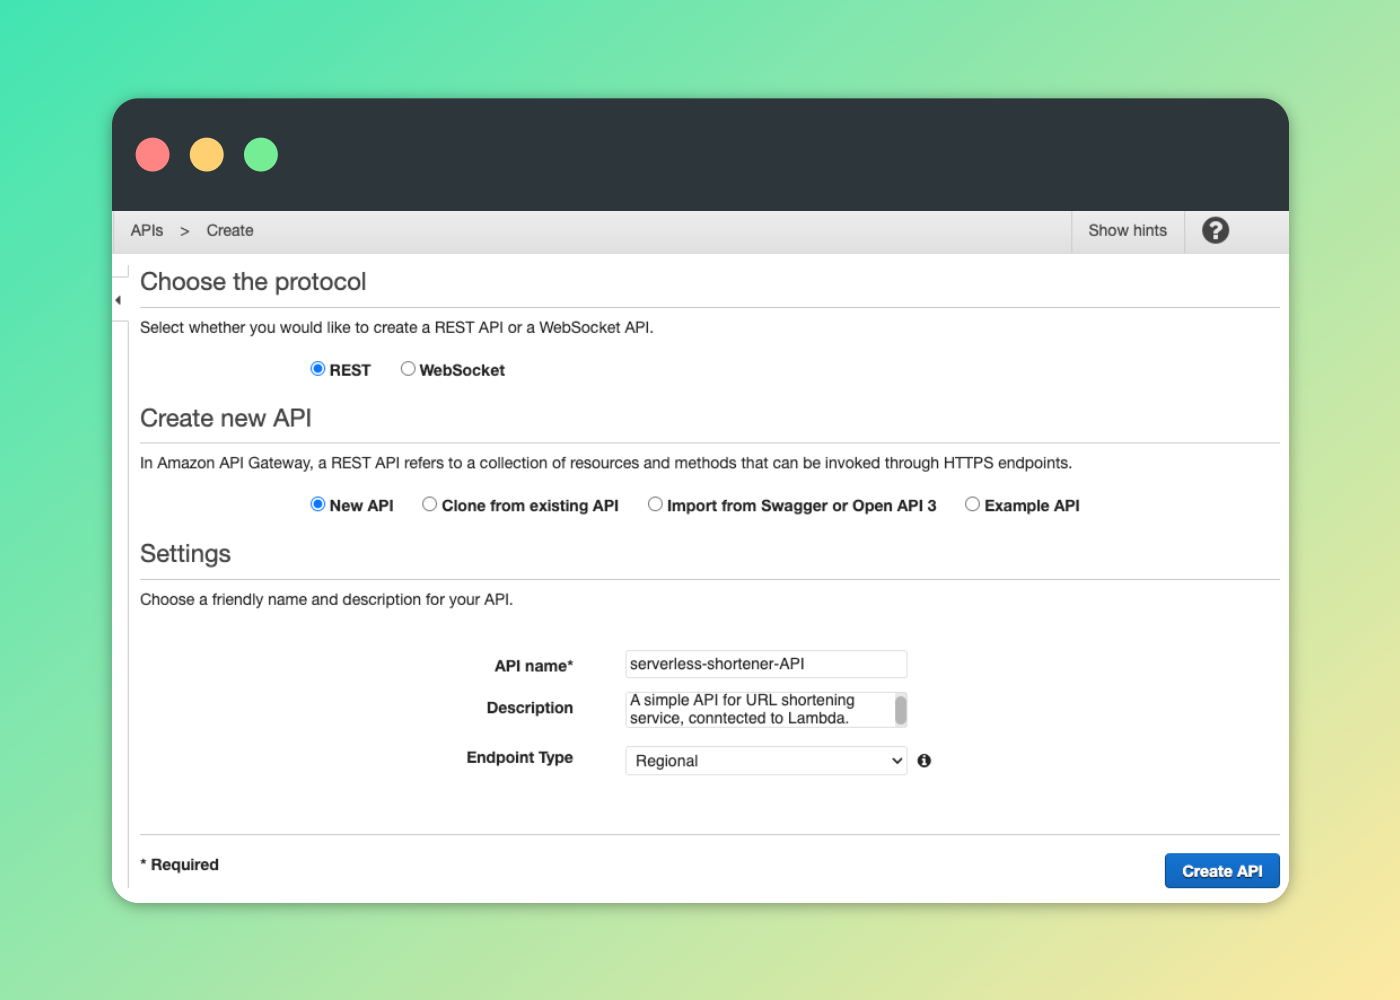
First, head to API Gateway from the AWS Console. In the dashboard, click the Create API button and build a REST API. After doing the basic configuration, we have our API in seconds.
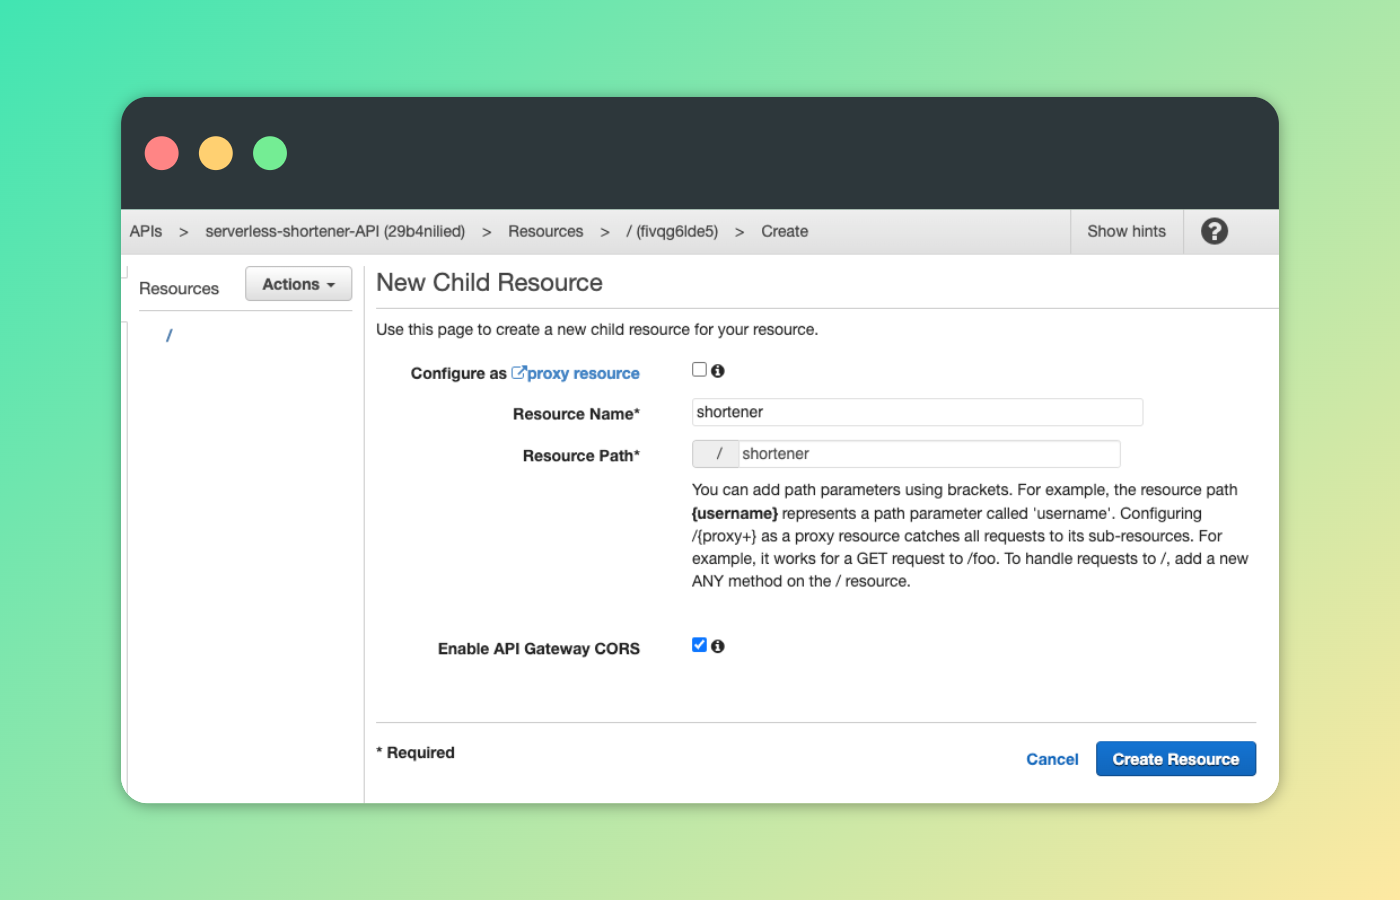
We then need to connect the API Gateway to our Lambda functions. In the resources section, go to Actions > Create Resource. Enter the resource name and resource path.
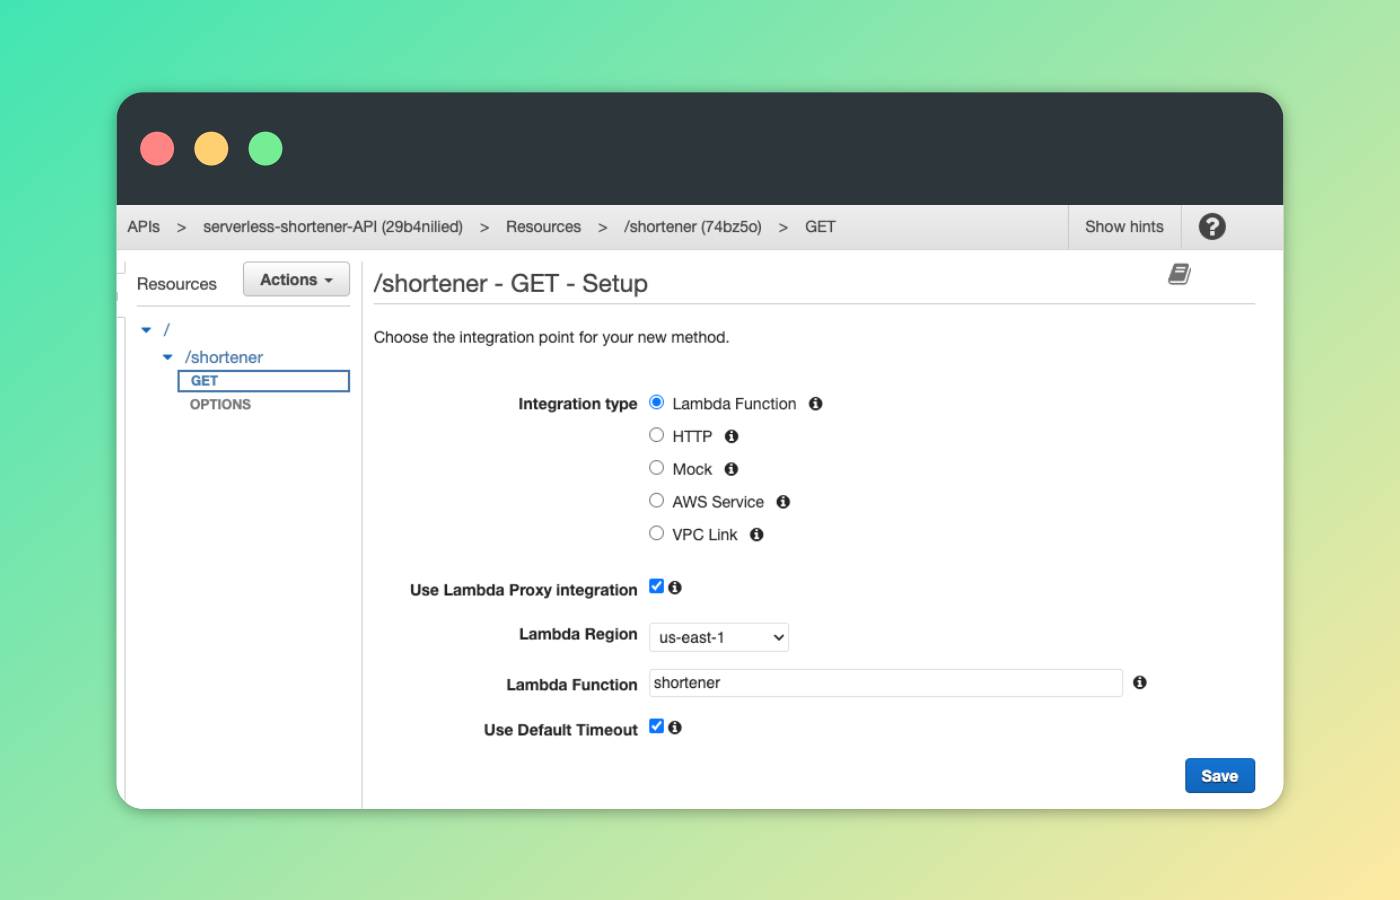
Then click on the /shortener path in the Resources and head to Actions > Create Method > Select GET > Confirm. This part is pretty important, this configuration enables us to transfer the request data from the API Gateway to the Lambda functions. Make sure they're correct!
We have connected the shortener function to our API, so we can now shorten our URLs. However, we need the redirector Lambda function connected to the API for our service to work. Click on the / in the Resources, head to Actions > Create Resource.
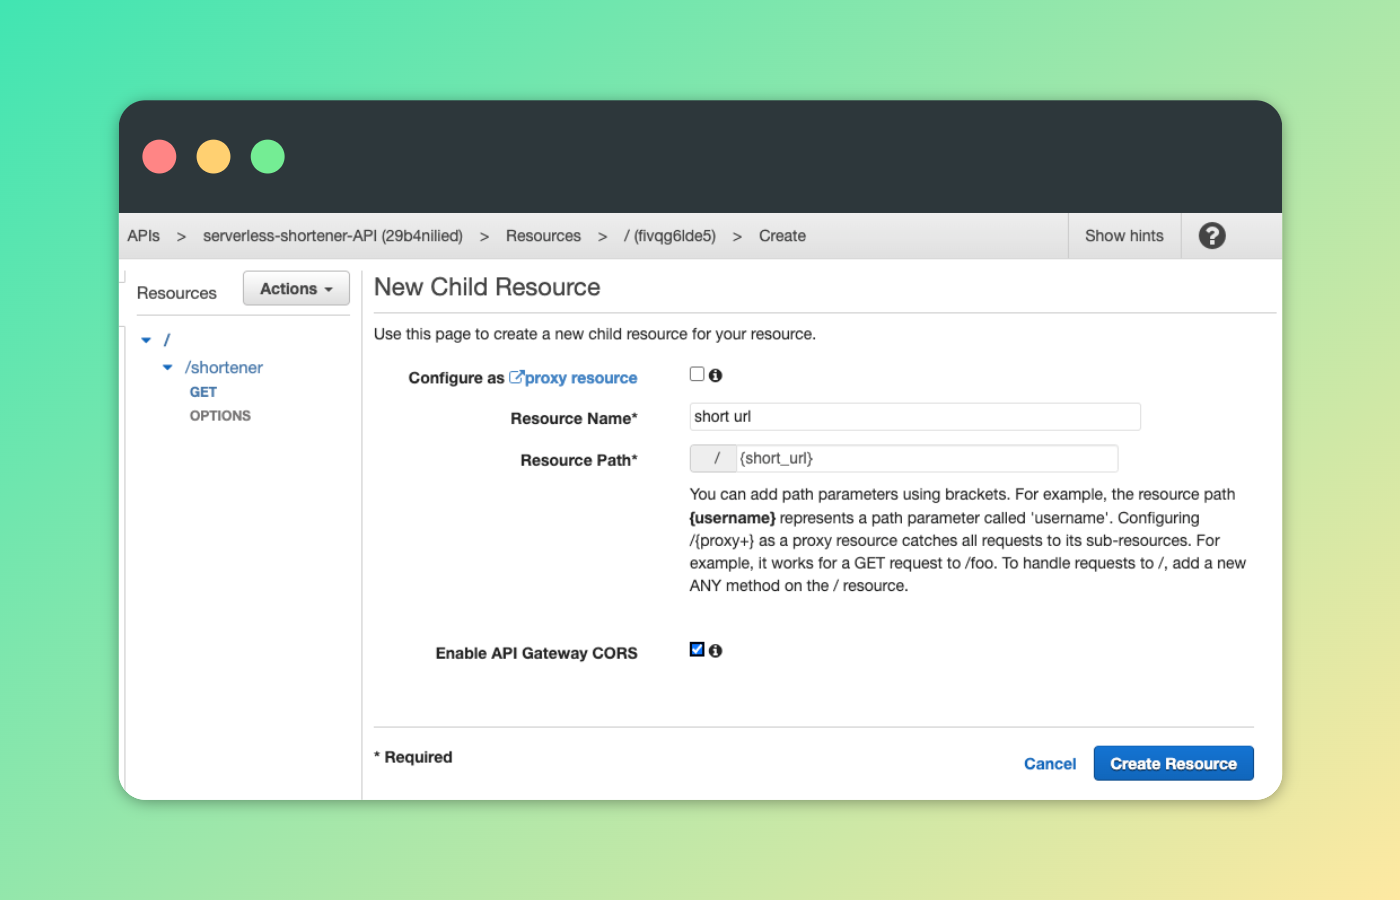
Click on the /{short_url} in the Resources section, then Actions > Create Method > Choose GET > Confirm.
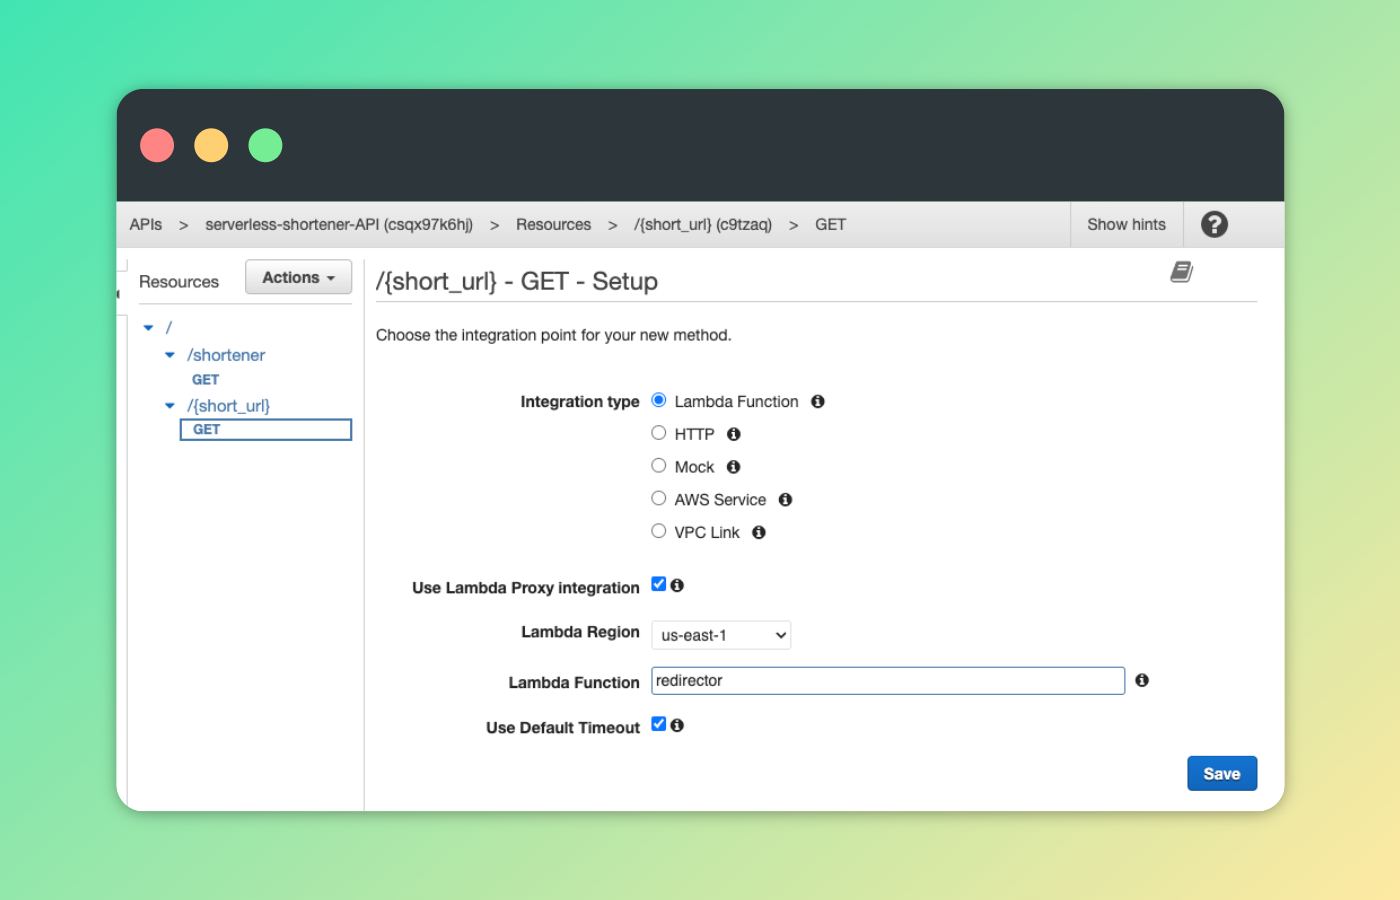
Finally, our API is set up. The final step is deploying the API. Go to Actions > Deploy API > Create New Stage. Type in the necessary fields and deploy. We now have a public API. In the Stages section, you can see the public Invoke URL for your API.
There is a final task to do: triggering the Lambda Functions via the serverless-shortener-API gateway.
Go to the shortener Lambda function, within the Function overview section, click the Add Trigger button.
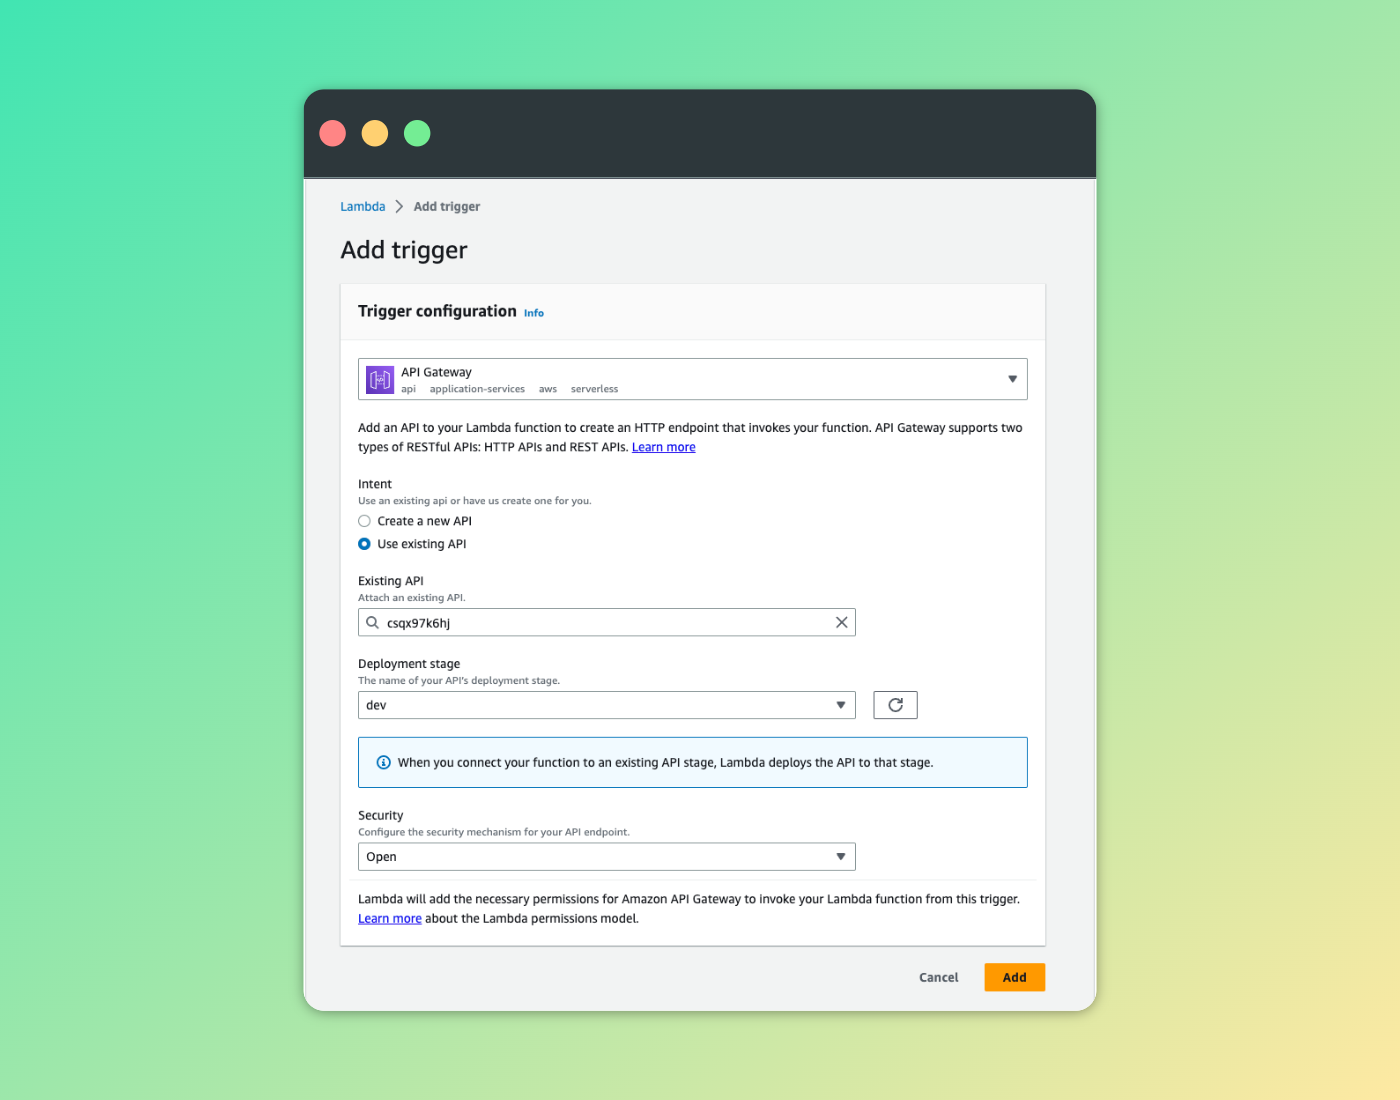
When you add the trigger to both of the functions, our public API and the Lambda functions are ready to consume. For the shortener function, triggering URL path is as such:
<YOUR_INVOKE_URL>/shortener?short_url="<LONG_URL>"
To trigger the redirector function, you'll need the response from the shortener function. The triggering URL for the redirector has the structure below:
<YOUR_INVOKE_URL>/<SHORT_URL_KEY>
When you click it or send an HTTP Request to it, you'll be redirected to your long URL. Actually, our service is ready, but we'll create a web interface as a bit of sparkle.
Creating the Web Interface and Handling Function Usage
We'll use HTML, Bootstrap and JavaScript for the frontend. When the user types in a URL and click the Shorten button, a url will be prompted, redirecting the user to the original website.

This is a rather simple website with a few elements. First, add the following line to the <head> block of the HTML code in order to use the Bootstrap features.
<link rel="stylesheet" href="https://maxcdn.bootstrapcdn.com/bootstrap/4.0.0/css/bootstrap.min.css"/>
Within the <body> block, we'll have the main HTML elements.
<div class="container mt-5">
  <h1 class="mb-4 text-center">URL Shortener</h1>
  <div class="row justify-content-center">
    <div class="col-md-6">
      <div class="input-group mb-3">
        <input
          type="text"
          class="form-control"
          id="url-input"
          placeholder="Enter URL to shorten"
        />
        <div class="input-group-append">
          <button class="btn btn-primary" type="button" id="shorten-btn">
            Shorten
          </button>
        </div>
      </div>
      <a id="short-url" class="d-none"></a>
    </div>
  </div>
</div>
After adding the elements, only the data fetching from the API Gateway remains. We'll handle that with JavaScript. Before the end of the <body> part, insert the URL fetching functionality. Don’t forget to replace <INVOKE_URL> with the one from your AWS API Gateway.
<!-- Add Bootstrap JS -->
<script src="https://code.jquery.com/jquery-3.2.1.slim.min.js"></script>
<script src="https://cdnjs.cloudflare.com/ajax/libs/popper.js/1.12.9/umd/popper.min.js"></script>
<script src="https://maxcdn.bootstrapcdn.com/bootstrap/4.0.0/js/bootstrap.min.js"></script>

<!-- Add custom JS -->
<script>
  const shortenBtn = document.getElementById("shorten-btn");
  const urlInput = document.getElementById("url-input");
  const urlOutput = document.getElementById("short-url");

  shortenBtn.addEventListener("click", async function () {
    let long_url = urlInput.value;
    const apiUrl = `<INVOKE_URL>/shortener?long_url="${long_url}"`;
    const response = await fetch(apiUrl);
    const data = await response.json();
    shortUrl = data.short_url;

    urlOutput.innerHTML = shortUrl;
    urlOutput.href = shortUrl;
    urlOutput.classList.remove("d-none");
  });
</script>
Final Words and Project Improvements
We've implemented the main features for our serverless URL shortener project. I hope it has been a clear demonstration of creating Python Lambda functions and consuming them. I'll also have some suggestions for improving the project, if you'd like to keep working on this project.
- Setting a custom domain for the URL shortener. The
Invoke URLgiven by AWS is rather complex. Since this project's main purpose was demonstrating AWS Lambda and Upstash Redis, I didn't want to make this post longer with it. But If you'd like you could change the URL to a simpler and shorter one from the AWS API Gateway. - Implementing Upstash Rate Limit for the API. I have used free tier services for this project, but if you intend to build an active and public service, you should consider setting up a request limit to avoid unexpected costs.
- Hosting this project on Vercel.
Thanks for reading.
