Change Data Capture (CDC) from PostgreSQL into Upstash Vector using Kafka, Python and Quix
Change Data Capture (CDC) is a database management technique that detects and captures changes to data. The most common use case is database replication but it also unlocks other event-driven use cases such as monitoring. Its main advantage is efficiency; it processes, transmits, and stores only the updated information so you don't have to reprocess the entire dataset.
This approach is particularly useful for vector databases, which are vital for AI-chatbots that require current, domain-specific knowledge. Traditional batch updates often result in data being outdated by almost a day, which is impractical in fast-moving fields like e-commerce, where an AI chatbot needs the latest inventory updates to make accurate product recommendations. CDC supports an event-driven process, eliminating the delays inherent in batch processing and keeping your vector database instantly up-to-date. This tutorial will demonstrate the power of CDC in maintaining real-time accuracy in vector databases.
Using Continuous, Event-based Vector Ingestion
Here's the basic idea: as soon as new product entries are added to a database, an event is emitted to Kafka with the details of the change as a payload. A consumer process immediately passes the event to the embedding model as it arrives. Embeddings are created and the payload is enriched with the relevant vectors. This data is streamed to another Kafka topic where an ingestion process consumes the data and upserts the vectors at a pace that the vector database can handle.
To show you how this works, we've created a prototype application, which you can replicate yourself. It uses Upstash's serverless Kafka along with a complementary tool called Quix.
What is Quix?
Quix provides a pure-Python stream processing framework through its open source library and cloud platform. It's designed for teams looking to build real-time data pipelines using Python and DataFrames (tabular representation of streaming data). In a sense, Quix Streams is very similar to Faust. It has been described as “...more or less Faust 2.0 - pure Python with the annoying bits handled.” —and with its own serverless cloud platform.
The following diagram illustrates how these two cloud platforms (Quix and Upstash) work together to fulfill this use case:
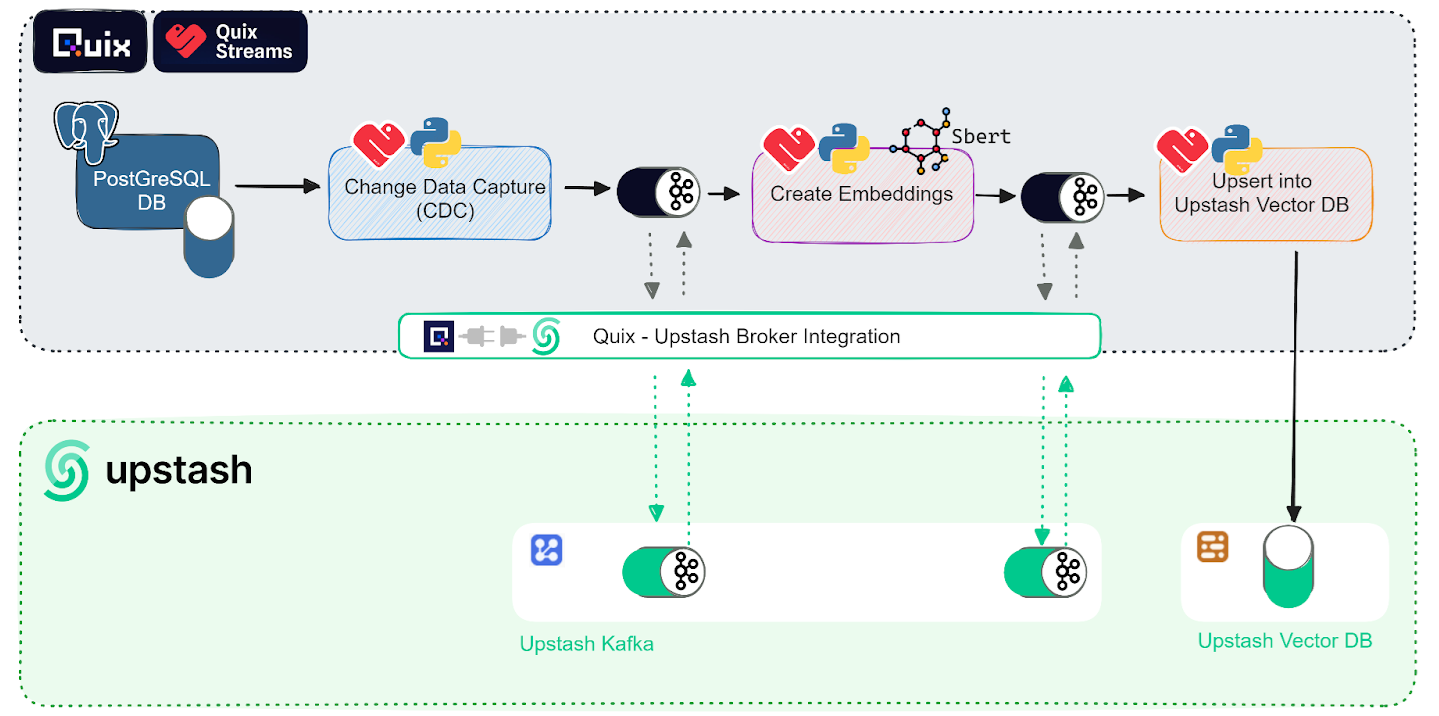
Essentially, you'll be using the Upstash Kafka and Vector database services for data storage and Quix for data processing and Change Data Capture (CDC).
You can find the full code for this prototype in the accompanying GitHub repository.
Prerequisites
To try out the pipeline, you'll need free accounts with both Quix and Upstash. Use the following links if you don't have these accounts already.
Both services let you use an existing Google or GitHub account so you can sign up with a few clicks.
You'll also need an Upstash Kafka cluster. If you don't have one already, go to the Upstash console and create a Kafka cluster under the **Kafka **tab.
You can create the Kafka cluster by following the Upstash Kafka docs.
Quix Setup
You'll be able to try out this whole process yourself using a Quix template—this basically uses the previously linked GitHub repo to spin up an environment in Quix Cloud.
To get started, click this Quix template creation link.
You'll be prompted to sign up with Quix (if you haven't already), and guided through a wizard to create a project. If you're prompted to “Choose your configuration”, select the “advanced” option.
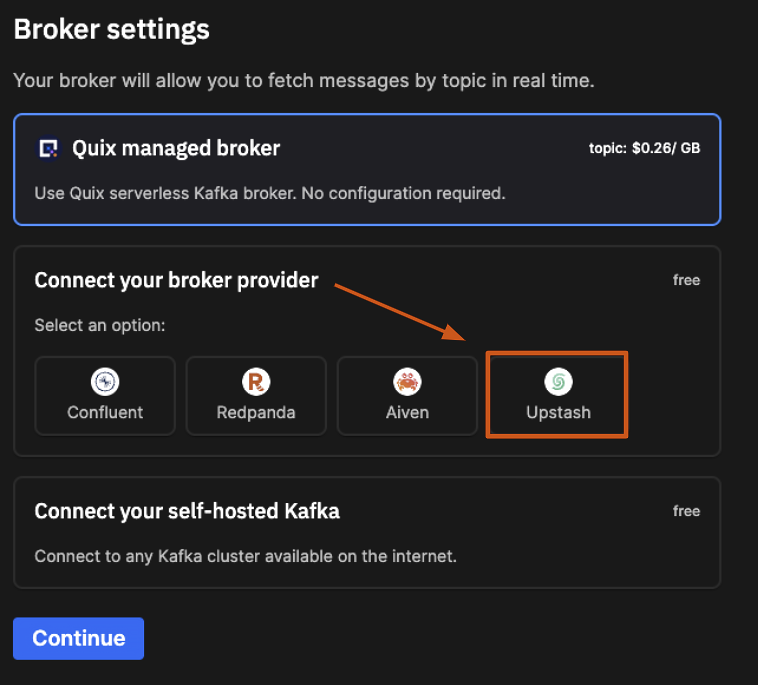
When you're asked to configure a message broker, select Upstash as your broker provider
Configure the connection settings shown in the following screenshot:
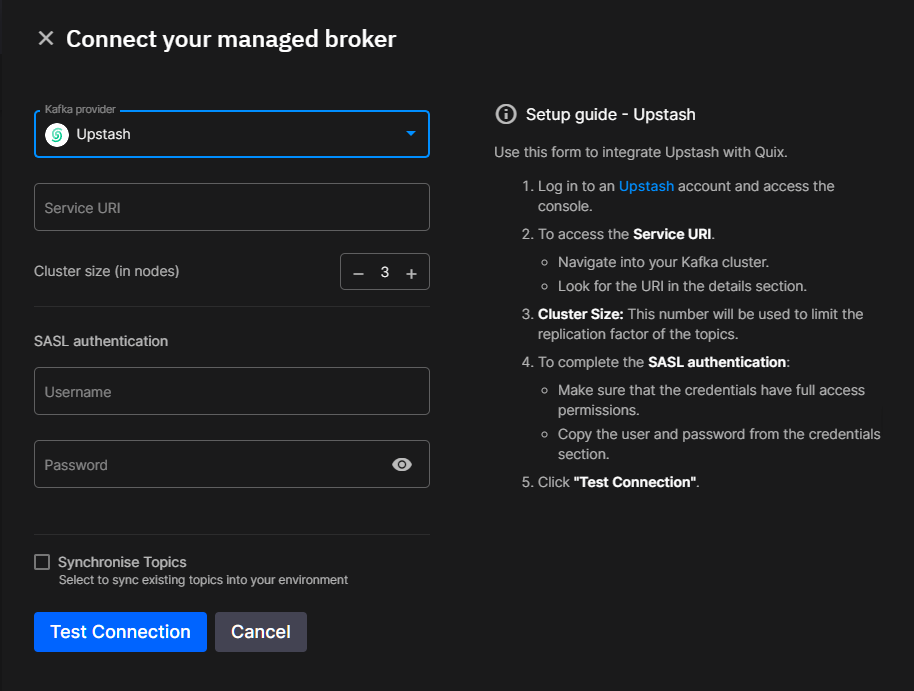
After you've completed this wizard, click Sync environment.
Another wizard will appear to guide you through the process of importing the code from GitHub into the environment.
During the wizard, you'll be prompted to add any missing credentials—in this case you'll need to add your Upstash token.
- In the prompt that appears, Click Add secrets, paste your token into both fields, click Save Changes, and proceed with the wizard.
Secondly, you'll need to add the endpoint URL for your vector database as an environment variable.
- Open the “edit” menu for the “Ingest to Upstash VectorDB” deployment,

- Update the
upstash_vectordb_endpointenvironment variable with the URL to your own vector database and click Save.
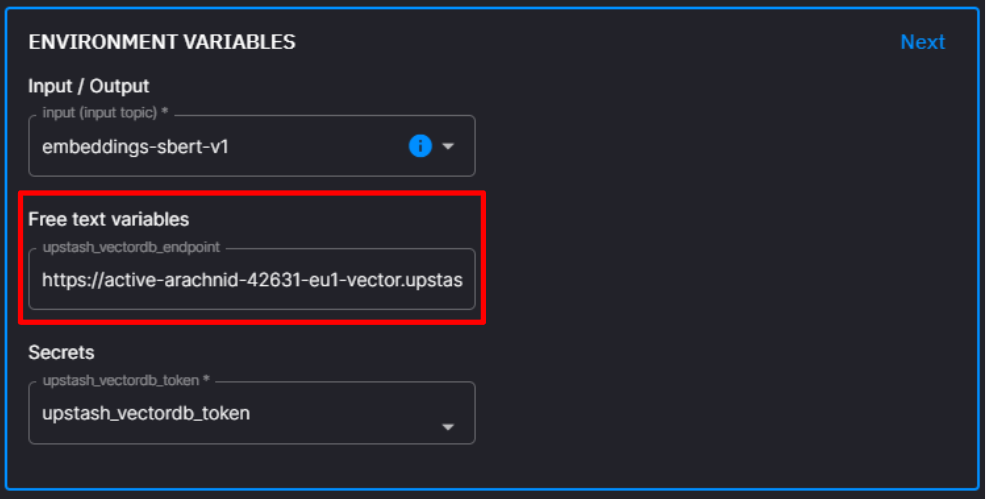
Now you're ready to add some data to a regular database and see that data upserted into your Upstash Vector database.
This project pipeline includes a fully functioning PostgreSQL database service and pgAdmin service so you can test the implementation without setting up your own database (of course, in production, you should use your own database server. In Quix, the database is only for testing and the data is dropped every time you restart the service)
To get started, start all the services so that they all have the “Running” status (click the status button to change the status).

Database Setup
First, we'll create a table in the default test database and add some data.
Since we're focused on e-commerce, let's say we're running an online bookstore and we're constantly updating the books catalog. We need to make sure our vector store as the embeddings for the newest book descriptions whenever new books are added.
Here, we'll simulate catalog updates by writing to the database directly:
Log into pgAdmin
-
Open the pgAdmin UI by clicking the launch icon
 next to the service name
 -
Log into pgAdmin with the user name “admin@admin.com” and the password “root”
Configure a connection to the PostgreSQL database
-
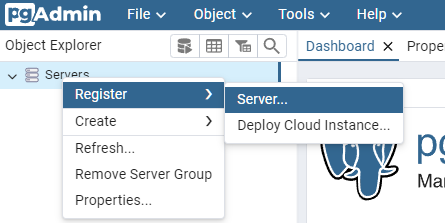
Click **Servers **> **Register **> Server
-
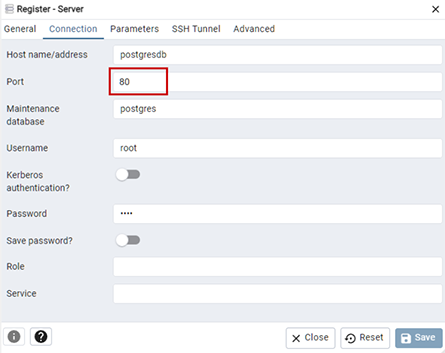
In the dialog that appears, enter any name on the “General” tab, then configure the connection with host “postgresdb” and “root” as both the Username and Password, and “80” as the port, then click Save.
Adding Data
Create a “books” table
CREATE TABLE books (
    id SERIAL PRIMARY KEY,
    name VARCHAR(255) NOT NULL,
    description TEXT NOT NULL,
    author VARCHAR(255) NOT NULL,
    year INT NOT NULL
);- Navigate to **Servers **> **postgresdb **>Databases > test_db > Schemas, right click on Tables, and select Query Tool
- In the Query tool that appears, paste and run the following query:
Now add some books by executing the following SQL query:
INSERT INTO books (name, description, author, year) VALUES
('The Time Machine', 'A man travels through time and witnesses the evolution of humanity.', 'H.G. Wells', 1895),
('Brave New World', 'A dystopian society where people are genetically engineered and conditioned to conform to a strict social hierarchy.', 'Aldous Huxley', 1932),
('An Absolutely Remarkable Thing', 'A young woman becomes famous after discovering a mysterious alien artifact in New York City.', 'Hank Green', 2018),
('Dune', 'A desert planet is the site of political intrigue and power struggles.', 'Frank Herbert', 1965),
('Foundation', 'A mathematician develops a science to predict the future of humanity and works to save civilization from collapse.', 'Isaac Asimov', 1951),
('Snow Crash', 'A futuristic world where the internet has evolved into a virtual reality metaverse.', 'Neal Stephenson', 1992),
('The War of the Worlds', 'A Martian invasion of Earth throws humanity into chaos.', 'H.G. Wells', 1898),
('The Hunger Games', 'A dystopian society where teenagers are forced to fight to the death in a televised spectacle.', 'Suzanne Collins', 2008);
The change should be automatically picked up and the data sent through the pipeline.
You can confirm this in Quix Cloud by navigating to **Topics **> postgres-cdc-source.
In the “OFFSET” dropdown, select “Newest” and you should see messages start to come through:

Now let's make sure the vectors have been ingested properly.
In the Upstash vector console, open the data browser.
Search for “books like star wars” — the top result should be “Dune”.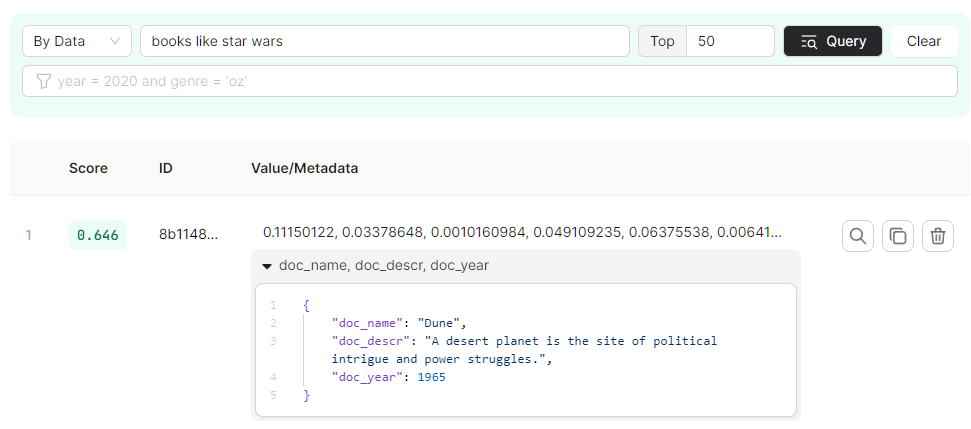
We can assume it matched because the words in the description are semantically similar to the query: “planet" is semantically close to "star" and "struggles" is semantically close to "wars".
Time to add some more books. Go back to pgAdmin and execute the following SQL query.
INSERT INTO books  (name, description, author, year) VALUES
('Childhood''s End', 'A peaceful alien invasion leads to the end of humanity''s childhood.', 'Arthur C. Clarke', 1953),
('The Day of the Triffids', 'After a meteor shower blinds most of the population, aggressive plant life starts taking over.', 'John Wyndham', 1951),
('The Three-Body Problem', 'Humanity faces a potential invasion from a distant alien civilization in crisis.', 'Liu Cixin', 2008),
('The Puppet Masters', 'Slug-like aliens invade Earth by attaching to humans and controlling their minds.', 'Robert A. Heinlein', 1951),
('The Kraken Wakes', 'Alien beings from the depths of the ocean start attacking humanity.', 'John Wyndham', 1953),
('The Invasion of the Body Snatchers', 'A small town discovers that some of its residents are being replaced by perfect physical copies that emerge from plantlike pods.', 'Jack Finney', 1955),
('Out of the Dark', 'An alien race invades Earth, underestimating humanity''s will to survive.', 'David Weber', 2010),
('Old Man''s War', 'Earth''s senior citizens are recruited to fight in an interstellar war, discovering new alien cultures and threats.', 'John Scalzi', 2005);
Lets see how this update has affected the results for our similarity search
In the Upstash data browser, search for “books like star wars” again—the top result should now be “Old man's war”, and the second result should be “Dune”. 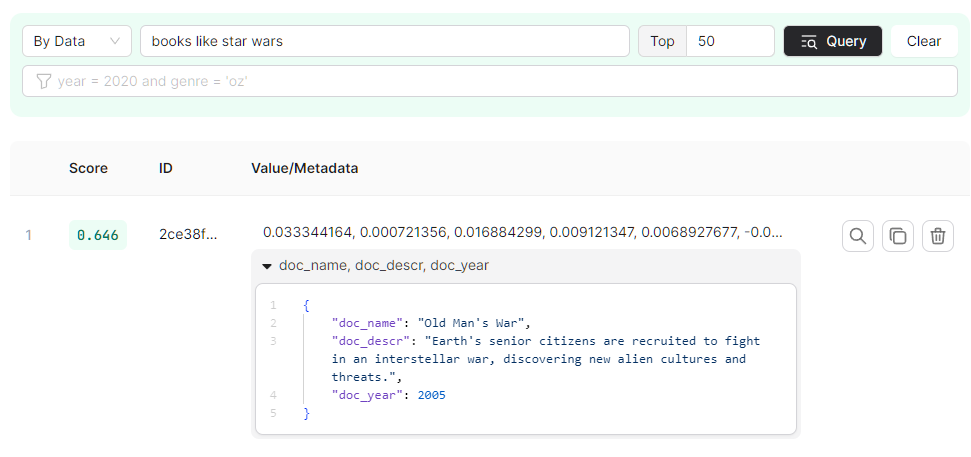
We can assume that Dune has been knocked off the top spot because the new addition has a more semantically relevant description: the "term" war is almost a direct hit, and "interstellar" is probably semantically closer to the search term "star" than "planet".
How it Works Under the Hood
Now that you understand what this prototype does, let's explore how it works.
First, let's zoom in on the processing part of our architecture diagram. You can see that there are three services that are small continuously running Python applications: ”CDC”, “Create embeddings”, and “Upsert into Upstash VectorDB”

Each application uses the Quix Streams python library to receive data, process it in some way, then send it to a downstream Kafka topic or write it to a sink of some sort.
Let's walk through the source code for each application.
Configuring CDC
Before I get into the code behind the CDC process, it's worthwhile to note some extra prerequisites for your PostgreSQL database:
-
The Write Ahead Log needs to be set to “logical
- You can check the current setting by running the SQL query:
SHOW wal_level; - If it's not already set to “logical”, update the
postgresql.conffile and set thewal_leveltowal_level = logical. \
- You can check the current setting by running the SQL query:
-
The wal2json plugin needs to be installed on the server or container where PostgreSQL is running.
Once those prerequisites are in place you can start experimenting with the CDC code. Instead of using the Debezium Source PostgreSQL Connector, we use the Quix Python CDC connector. You can find the full CDC code files in this GitHub folder.
Connecting to a PostgreSQL database
The connection to PostgreSQL is defined in the file postgres_helper.py through environment variables—so if you want to connect to your own database you just need to change the relevant variables.
import psycopg2
import os
def connect_postgres():
    # PostgreSQL constants
    PG_HOST = os.environ["PG_HOST"]
    PG_PORT = os.environ["PG_PORT"]
    PG_USER = os.environ["PG_USER"]
    PG_PASSWORD = os.environ["PG_PASSWORD"]
    PG_DATABASE = os.environ["PG_DATABASE"]

    conn = psycopg2.connect(
        database = PG_DATABASE, user = PG_USER, password = PG_PASSWORD, host = PG_HOST, port = PG_PORT
    )
    return conn
...
Producing the change data to Kafka
For the sake of brevity, I won't get into how the change data is actually captured in this article, but you can inspect the postgres_helper.py file for more details on how the write ahead log is used to capture changes.
Here, let's focus on the structure of the data and how it's produced to Kafka.
First, we initialize a Kafka producer. If you've used the Python examples from our “Connect to your cluster” page, this part should be familiar. But in this case, we didn't want to use kafka-python or confluent-kafka. Instead, we use the Quix Streams Python library. Why? For one, it comes with several convenience functions.
For example:
- When you run it in a Quix Cloud Docker container, it automatically detects the Kafka broker address and seamlessly authenticates with Kafka without you having to define any config parameters (like “
bootstrap_servers” or “security_protocol” which you have to define in other libraries) - It uses the concept of Streaming Dataframes which makes it a lot easier to process data, and reuse Pandas code written for static datasets.
With Quix Streams, we define an application and initial output topic in main.py, like so:
from quixstreams import Application
...
app = Application() # No extra arguments needed when running in Quix Cloud.
...
output_topic = app.topic(output_topic_name) # The topic name is defined in an environment variable — defaults to "posgres-cdc-source"
...
We then add a function to get the latest database changes, add them to a buffer, then iterate through the buffer and send results to our output Kafka topic.
# to reduce network traffic, we buffer the messages for 100ms
def main():
    buffer = []
    last_flush_time = time.time()

    while run:
        records = get_changes(conn, PG_SLOT_NAME)
        for record in records:
            changes = json.loads(record[0])
            for change in changes["change"]:
                buffer.append(change)

        # Check if 100 milliseconds have passed
        current_time = time.time()
        if (current_time - last_flush_time) >= 0.5 and len(buffer) > 0:
           # If 500ms have passed, produce all buffered messages
    with app.get_producer() as producer:
            for message in buffer:
                producer.produce(topic=output_topic.name,
                                    key=PG_TABLE_NAME,
                                    value=json.dumps(message))
                print("Message sent to Kafka")
                # Flush the producer to send the messages

            # Clear the buffer
            buffer = []
            # Update the last flush time
            last_flush_time = current_time
        time.sleep(WAIT_INTERVAL) # Wait interval defined as a global variable in main.py (currently 0.1 seconds)
The resulting payload has the following structure:
{
  "kind": "insert",
  "schema": "public",
  "table": "books",
  "columnnames": [
    "id",
    "name",
    "description",
    "author",
    "year"
  ],
  "columntypes": [
    "integer",
    "character varying(255)",
    "text",
    "character varying(255)",
    "integer"
  ],
  "columnvalues": [
    60,
    "Old Man's War",
    "Earth's senior citizens are recruited to fight in an interstellar war, discovering new alien cultures and threats.",
    "John Scalzi",
    2005
  ]
}
Later, we simplify this structure so that it is easier to process.
Creating the Embeddings
This is what we call a “transformation” process, in other words, it sits between two Kafka topics reading from one and writing to another. The full source code files are in this GitHub folder.
The Quix Streams library provides a simplified process for implementing transformations. Instead of defining a producer and consumer as you would with other libraries, you put the relevant settings in the Application constructor and define your input and output topics via the app instance.
Example:
from quixstreams import Application
...
app = Application(
    consumer_group="vectorsv1",
    auto_offset_reset="earliest",
    auto_create_topics=True,  # Quix app has an option to auto-create topics if they don't exist yet
)

# Define input and ouput topics with JSON deserializer
input_topic = app.topic(os.environ['input'], value_deserializer="json")
output_topic = app.topic(os.environ['output'], value_serializer="json")
Further down, you'll see how we produce and consume data using the app.dataframe method, but first we define the functions that we want to apply to the data.
The first function compresses the structure of the change data capture payload:
def simplify_data(row):

    # Creating a new dictionary that includes 'kind' and zips column names with values
    new_structure = {"kind": row["kind"],"table": row["table"]}
    new_structure.update({key: value for key, value in zip(row["columnnames"], row["columnvalues"])})

    # Optionally converting integers to strings
    new_structure["year"] = str(new_structure["year"])

    return new_structure
Which results in the following payload structure:
{
	"kind": "insert",
	"table": "books",
"id": 60,
"name": "Old Man's War",
"description": "Earth's senior citizens are recruited to fight in an interstellar war, discovering new alien cultures and threats.",
"author": "John Scalzi",
"year": 2005
}
The second function uses the Sentence Transformers library to create an embedding for the “description” field in the simplified payload
encoder = SentenceTransformer('all-MiniLM-L6-v2') # Model to create embeddings

# Define the embedding function
def create_embeddings(row):
    text = row['description']
    embeddings = encoder.encode(text)
    embedding_list = embeddings.tolist() # SentenceTransformers outputs a numpy Array but upstash vector store expects a plain list
    print(f'Created vector: "{embedding_list}"')

    return embedding_list
Finally, we consume the data, apply the functions, and produce the data to a downstream Kafka topic.
# Initialize a streaming dataframe based on the stream of messages from the input topic:
sdf = app.dataframe(topic=input_topic)

sdf = sdf.filter(lambda data: data["table"] == "books") # Filter only for changes to the "books" table.

sdf = sdf.apply(simplify_data)
sdf = sdf.update(lambda val: logger.info(f"Received update: {val}"))

# Trigger the embedding function for any new messages(rows) detected in the filtered SDF
sdf["embeddings"] = sdf.apply(create_embeddings, stateful=False)

# Update the timestamp column to the current time in nanoseconds
sdf["Timestamp"] = sdf.apply(lambda row: time.time_ns())
Note the difference between sdf.apply() and sdf.update():
.apply()passes the result of the callback downstream. It takes the original data and processes it to produce new data. This method doesn't alter the original data itself; instead, it generates a new version based on the original.- For example, if you use
.apply()to add a new key to a dictionary, it actually creates a new dictionary with that addition. - In our case, we use
sdf.apply(simplify_data)to transform the CDC payload into a simple dictionary andsdf.apply(create_embeddings) to compute the vector and write it to a new “embeddings” field _within _that dictionary.
- For example, if you use
.update()passes the actual callback argument downstream. It allows you to modify or use the original data directly. However, it's most commonly used to log the data to the console or write it to an external database (It's similar to the peek() method in Kafka Streams).
And last but not least, we simply use sdf.to_topic to produce the transformed data to the downstream topic.
sdf = sdf.to_topic(output_topic)

app.run(sdf)
Upserting to Upstash
This process uses the sdf.update() method again but first we need to define the function that we'll pass to sdf.update — namely, a function to ingest the incoming vector and metadata to Upstash. As usual, you'll find the full code in this GitHub folder.
Here, we use environment variables to define the connection to Upstash, extract the relevant data from the Streaming Dataframe row, and use the upsert() method to add an entry to the Upstash Vector store.
from quixstreams import Application
from upstash_vector import Index
...
# Define the Quix Application constructor, just like in the previous step
...

# Define the Upstash index to write to
index = Index(url=os.environ['upstash_vectordb_endpoint'], token=os.environ['upstash_vectordb_token'])

# Define the ingestion function
def ingest_vectors(row):

    index.upsert(
        vectors=[
            (row["id"],
            row["embeddings"],
               {"name": row["name"],
                "description": row["description"],
                "author": row["author"],
                "year": str(row["year"])}),
        ]
    )

  logger.info(f"Ingested vector entry id: '{row['id']}'...")
Finally we read from the input topic and pass the ingest_vectors function to sdf.update(). As a reminder, we're using sdf.update() because this is the terminus of our pipeline. There's no downstream topic to pass data to, we're simply updating the data “in-place” (i.e. sending it to Upstash).
# Initialize a streaming dataframe based on the stream of messages from the input topic:
sdf = app.dataframe(topic=input_topic) # input is the topic "embeddings-sbert-v1"

# Trigger the ingestion function for any new messages(rows) detected in the StreamingDataframe
sdf = sdf.update(lambda row: ingest_vectors(row))
app.run(sdf)
Lessons Learned
Keeping the underlying data fresh is a crucial component to search results quality. We saw how we were able to give the user more semantically accurate search results by updating the vector store.
We could have just updated the vector store manually, by exporting data from the database and writing to the vector store in batches. Yet this introduces several questions such as:
- How does this work in a production e-commerce scenario where your product catalog is constantly changing?
- How do you organize your batches and what is an acceptable delay between the product arriving in the catalog and it being included in user search queries?
If you set up an event-based system where embeddings are created and ingested as soon as data is entered (via CDC), you don't have to deal with these questions, which is why Kafka-based architectures are so popular.
Many large enterprises are already using event based solutions such as Apache Kafka for traditional search indexing. For example, the DoorDash engineering team produced the article “Building Faster Indexing with Apache Kafka and Elasticsearch” which provides a spot-on description of the problem-solution fit. The challenges involved in keeping text embeddings up to date are similar so it makes sense to apply the same approach to text embeddings.
Further Resources
For more information on how to set up this architecture with Quix and Upstash, join the Quix Community Slack and start a conversation with the Quix team.
- To learn more about the Quix Streams Python library, check out the introduction in the Quix documentation.
- To see more Quix project template, check out the Quix template gallery.
And if you'd like to learn more about Upstash and Gen AI, check out the latest Upstash blog posts. As a reminder, you can find all the relevant code in this project's GitHub repository.
