Building an AI Chatbot trained on custom content with LangChain, Faiss and Next.js
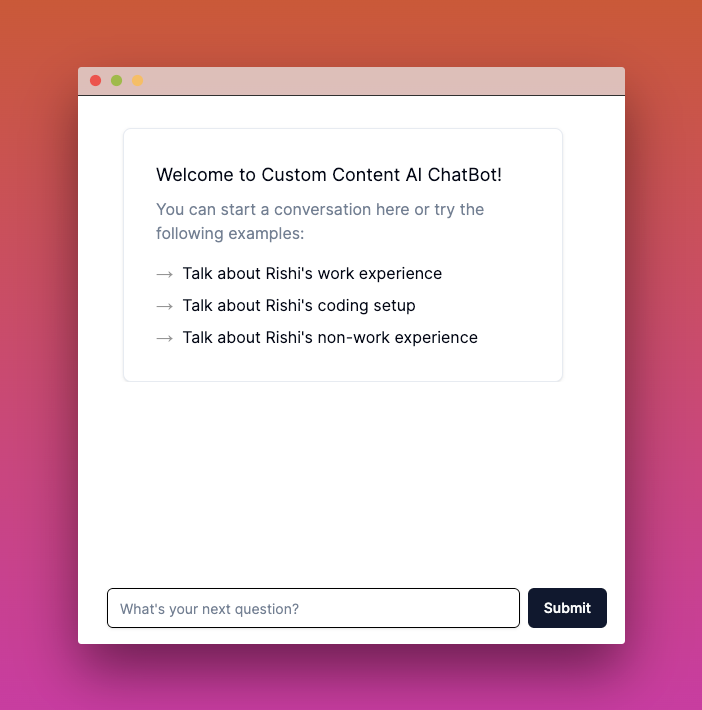
In this post, I talk about how I built an open-source Custom Content AI Chatbot with Upstash, Next.js, LangChain and Fly.io. Upstash helped me to schedule model training, offered way of generous rate limiting and caching OpenAI API responses.
What we’ll be using
- Next.js (Front-end and Back-end)
- LangChain (framework for developing applications powered by language models)
- Upstash (Scheduling Training Model via QStash, Rate Limting & Caching OpenAI Responses)
- Tailwind CSS (Styling)
- Fly.io (Deployment)
What you'll need
- Node.js 18
- An Upstash account
- An OpenAI account (for OpenAI API Key)
Setting up Upstash Redis
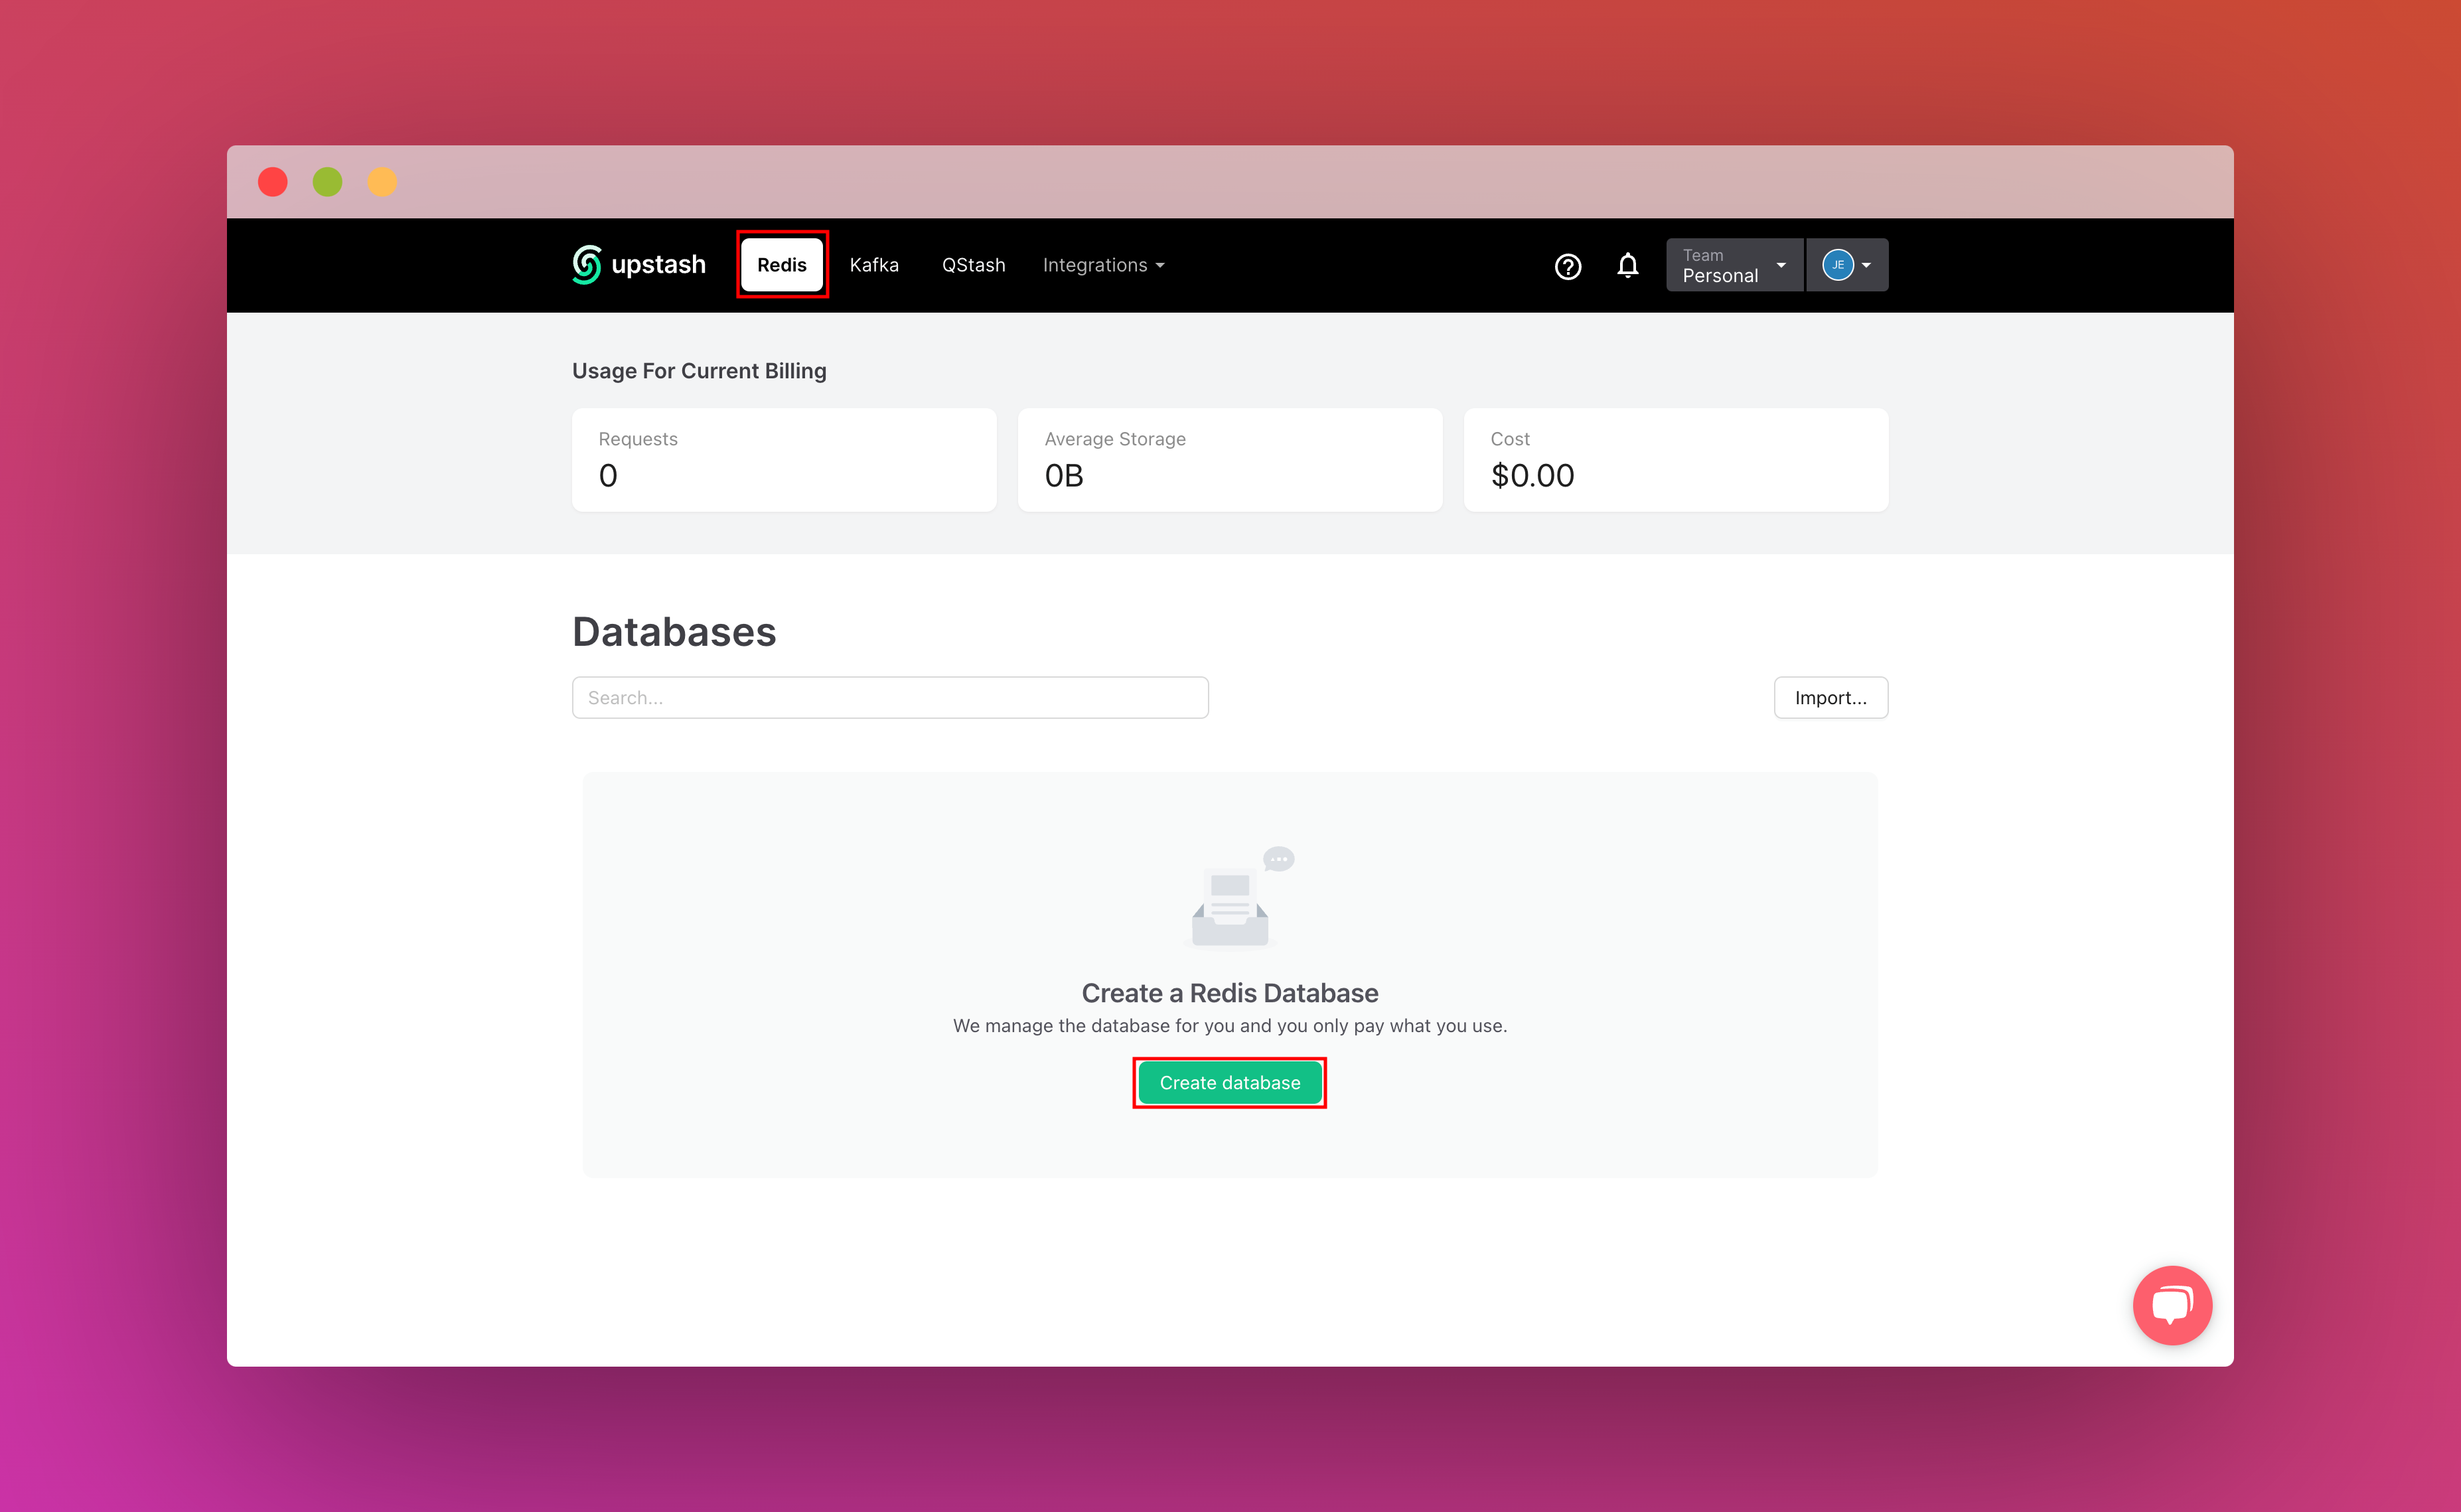
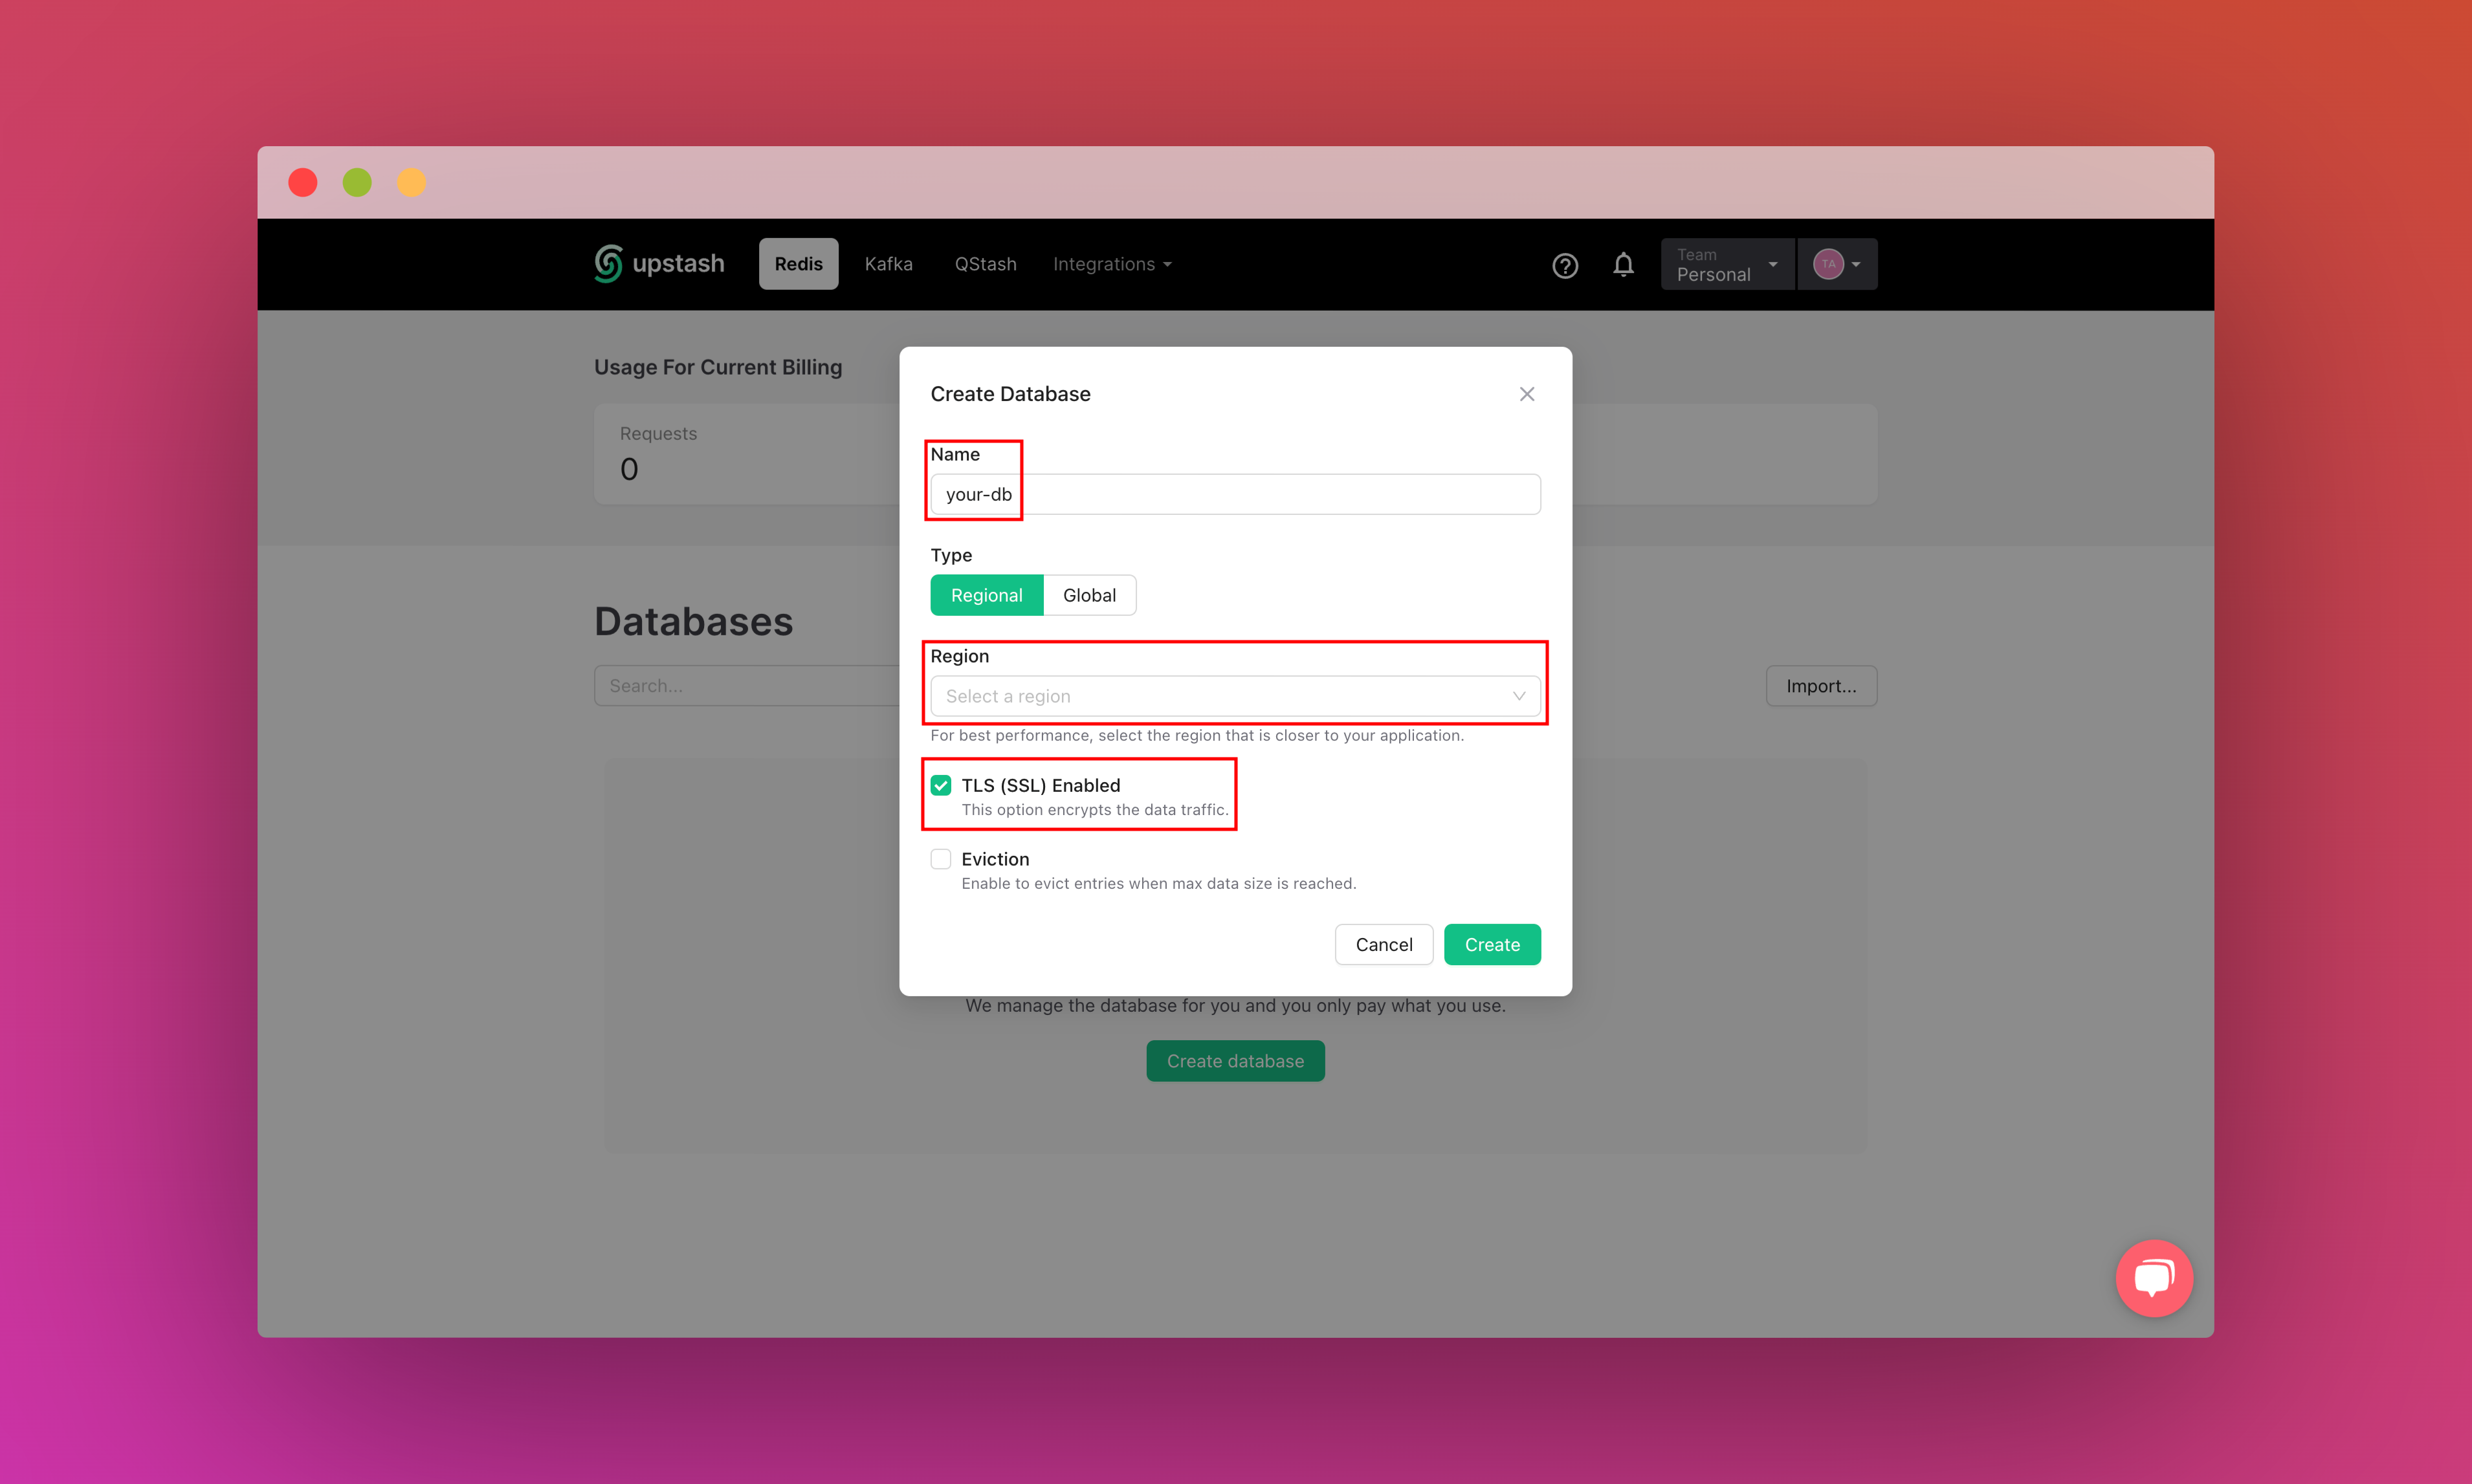
Once you have created an Upstash account and are logged in you are going to go to the Redis tab and create a database.
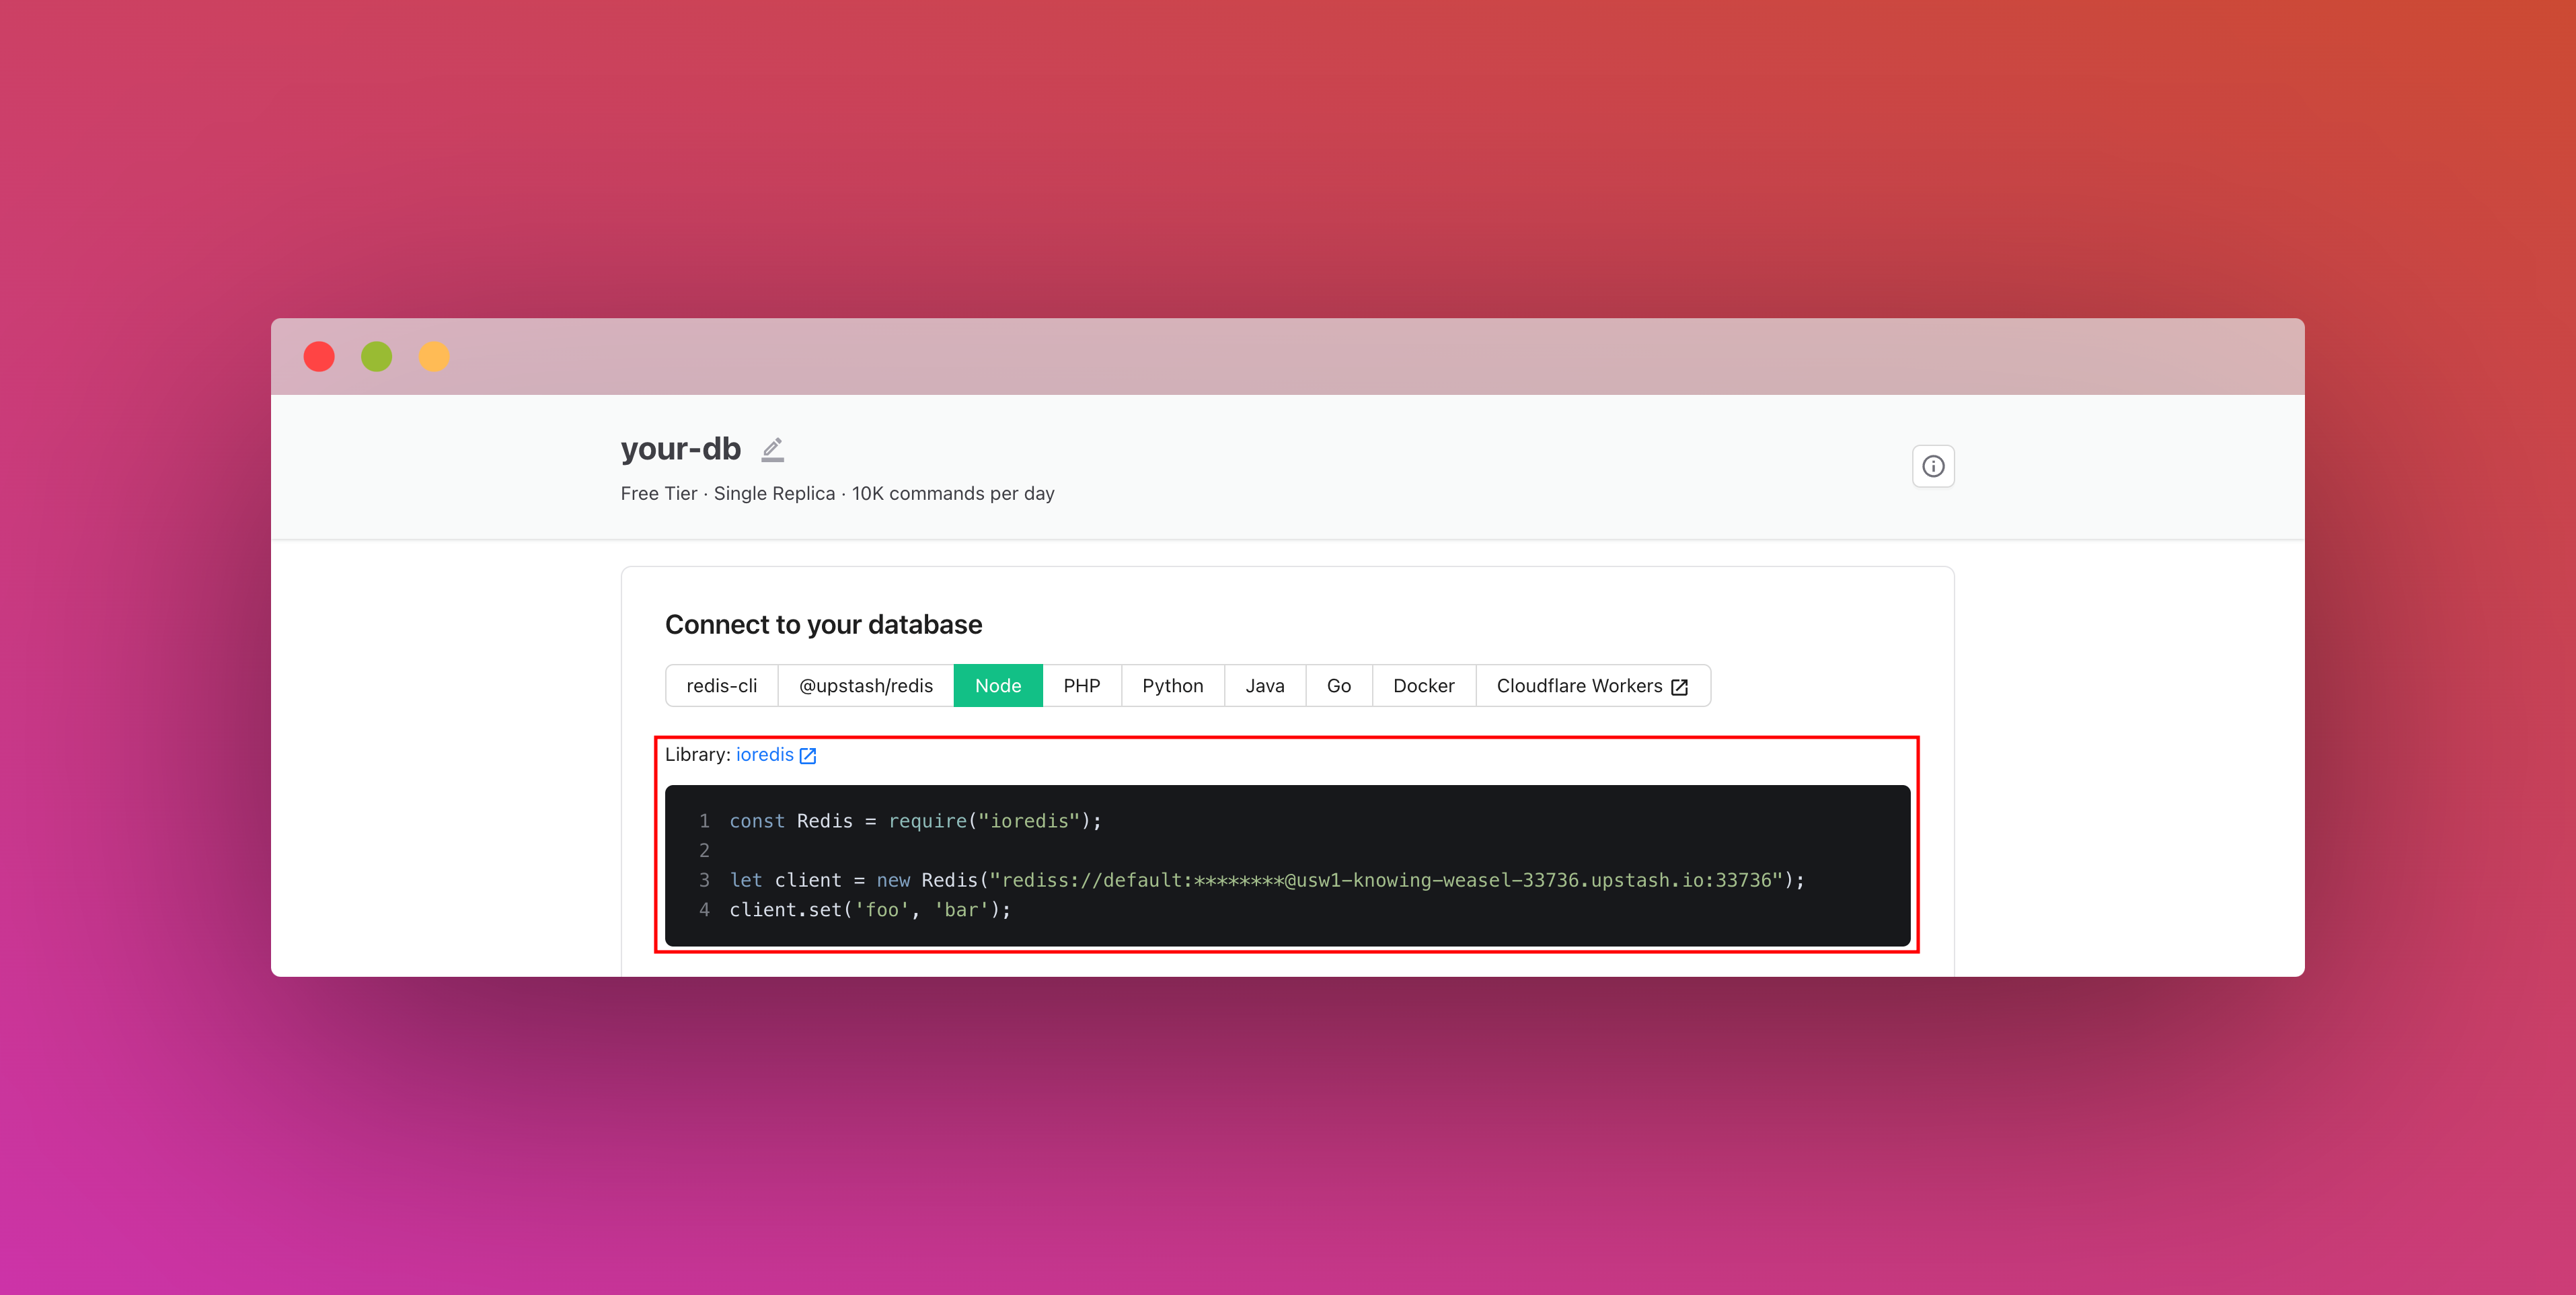
After you have created your database, you are then going to the Details tab. Scroll down until you find the Connect your database section. Copy the content and save it somewhere safe.
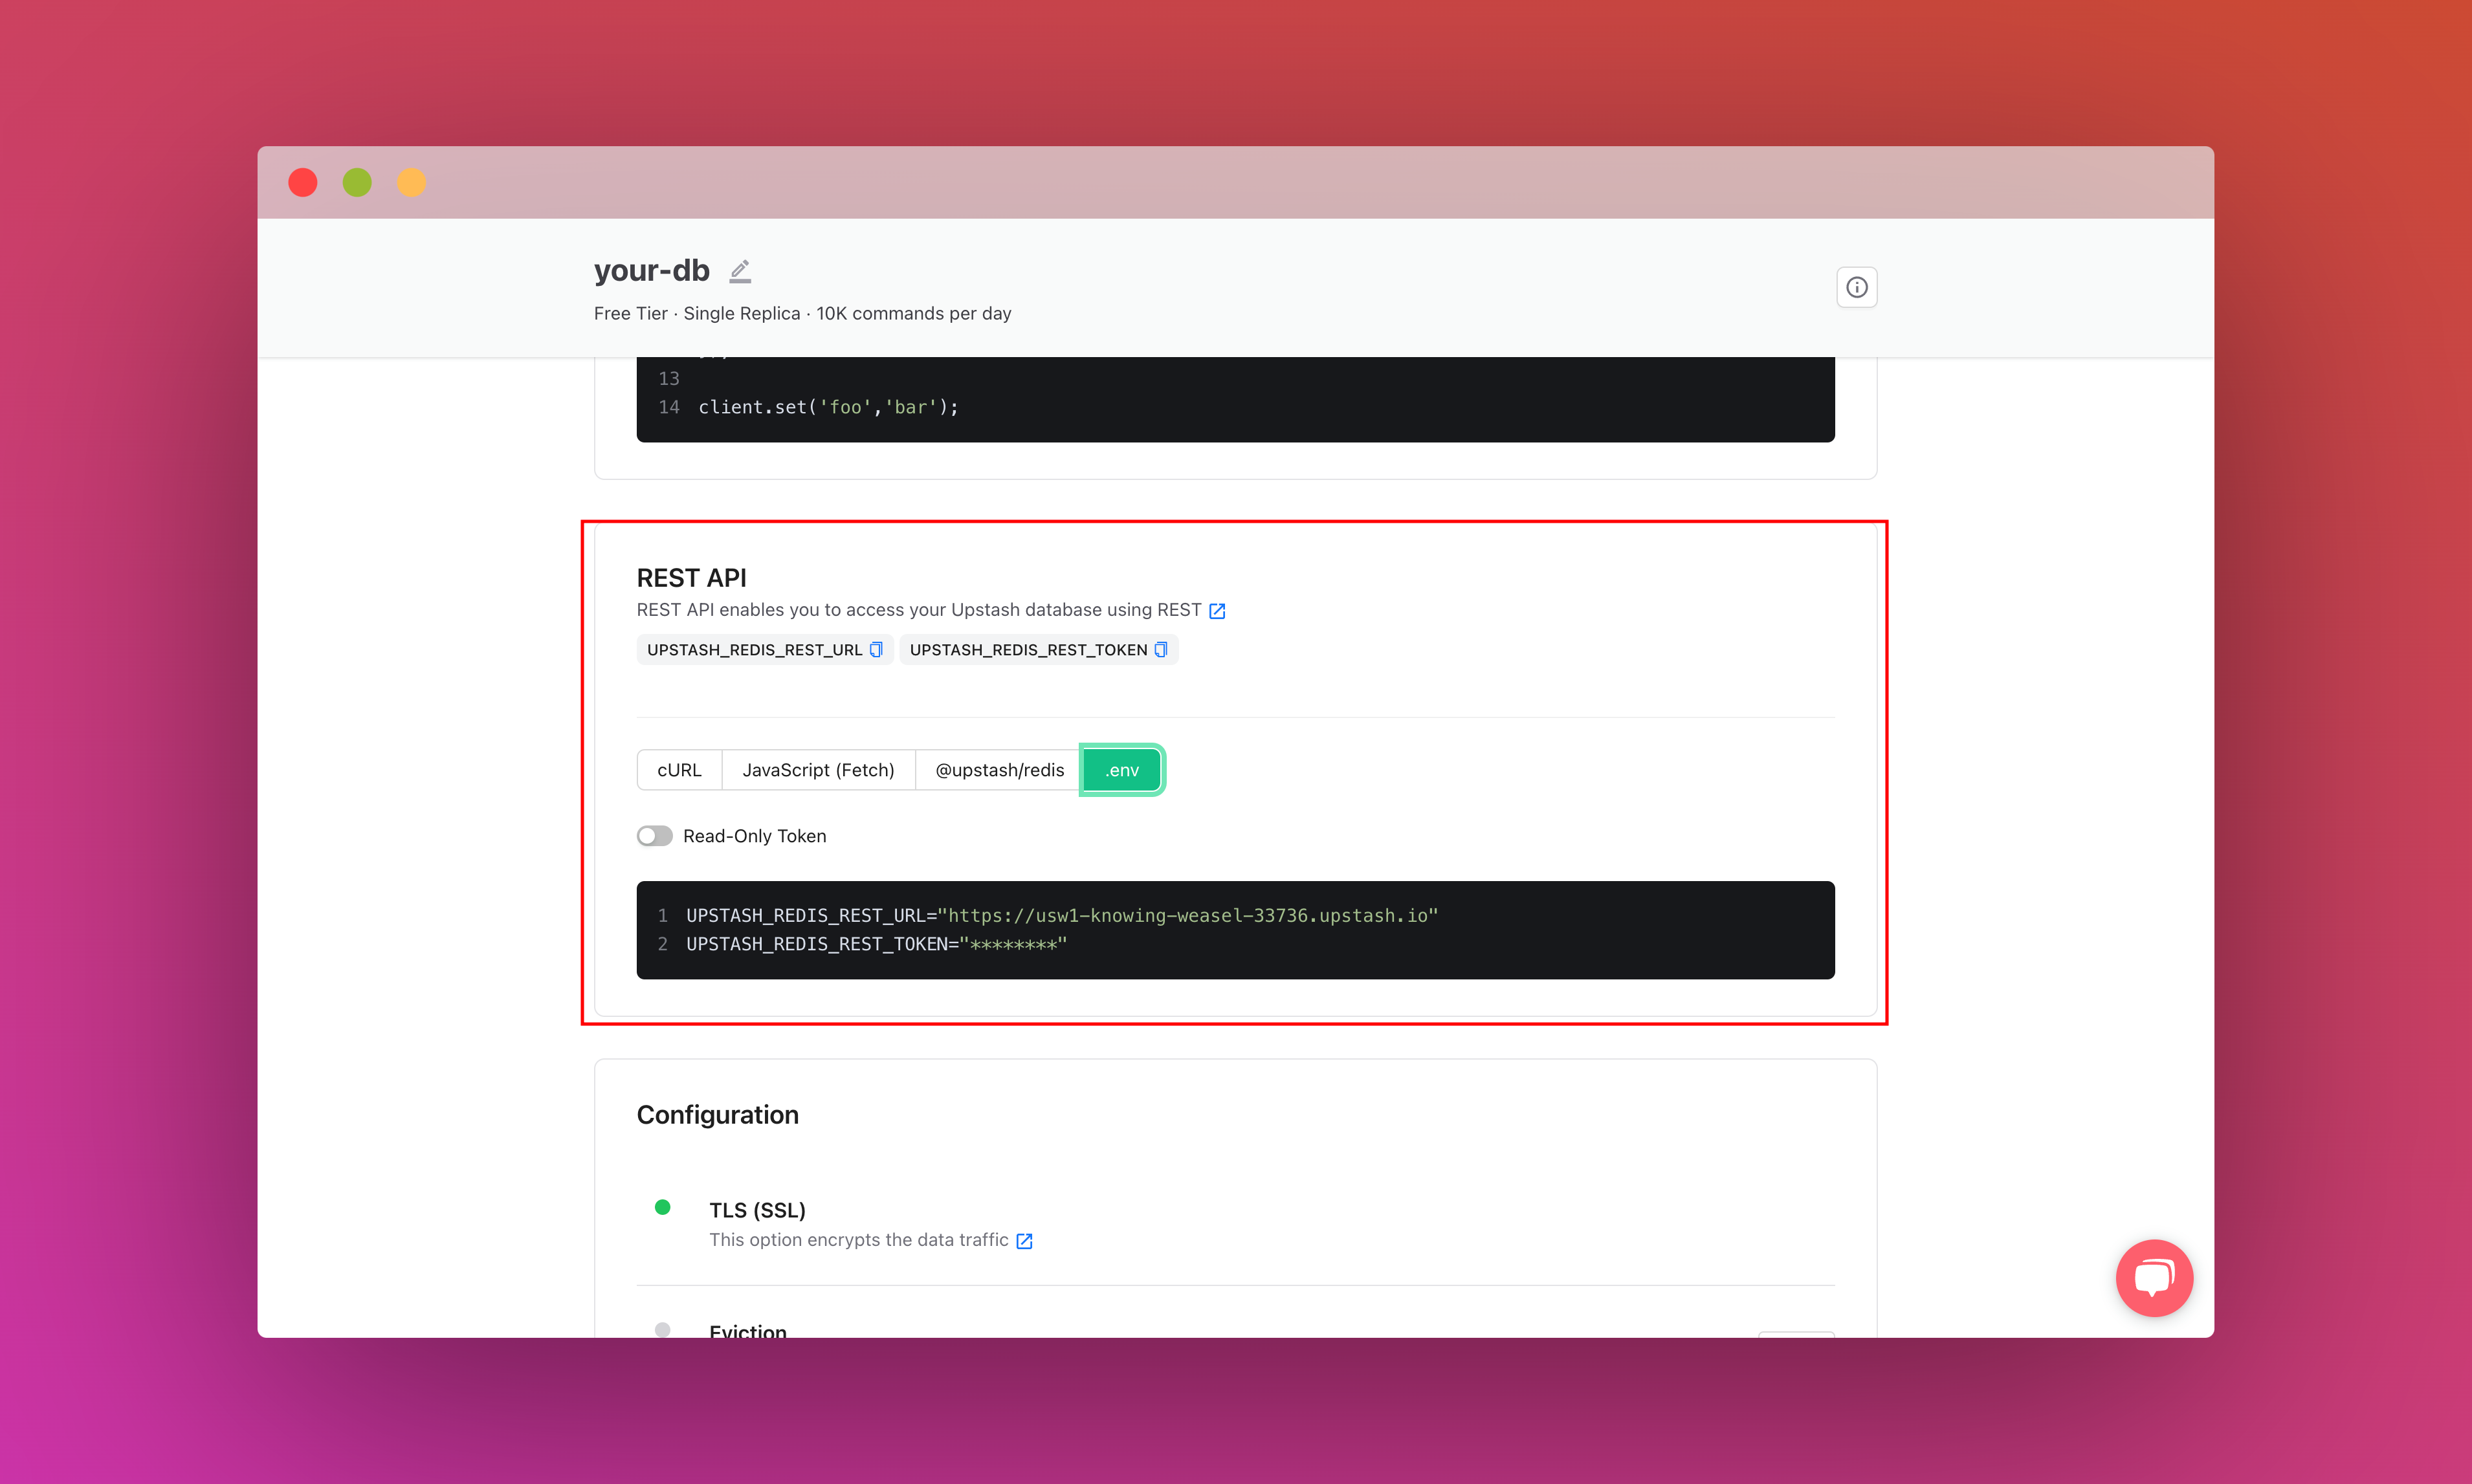
Also, scroll down until you find the REST API section and select the .env button. Copy the content and save it somewhere safe.
Setting up Upstash QStash
Once logged in you are going to go to the QStash tab and obtain the QSTASH_URL, QSTASH_TOKEN, QSTASH_CURRENT_SIGNING_KEY, and QSTASH_NEXT_SIGNING_KEY. Copy the content and save it somewhere safe.

Setting up the project
To set up, just clone the app repo and follow this tutorial to learn everything that's in it. To fork the project, run:
git clone https://github.com/rishi-raj-jain/custom-content-ai-chatbot
cd custom-content-ai-chatbot
npm install
Once you have cloned the repo, you are going to create a .env file. You are going to add the items we saved from the above sections.
It should look something like this:
# .env

# Obtained from the steps as above

# Upstash Redis Secrets
UPSTASH_REDIS_REST_URL="https://....upstash.io"
UPSTASH_REDIS_REST_TOKEN="..."

# Upstash QStash Secrets
QSTASH_URL="https://qstash.upstash.io/v1/publish/"
QSTASH_TOKEN="..."
QSTASH_CURRENT_SIGNING_KEY="sig_..."
QSTASH_NEXT_SIGNING_KEY="sig_..."

# OpenAI Key
OPENAI_API_KEY="sk-..."

# Admin Access Key
# Used to verify a training request as to be done only by an admin
ADMIN_KEY="..."
After these steps, you should be able to start the local environment using the following command:
npm run devRepository Structure
This is the main folder structure for the project. I have marked in red the files that will be discussed further in this post that deals with managing the vector store, creating API Routes for chatting with AI trained on your custom content (with caching the responses), and scheduling model training process.
.png)
High-Level Data Flow and Operations
This is a high-level diagram of how data is flowing and operations that take place 👇🏻
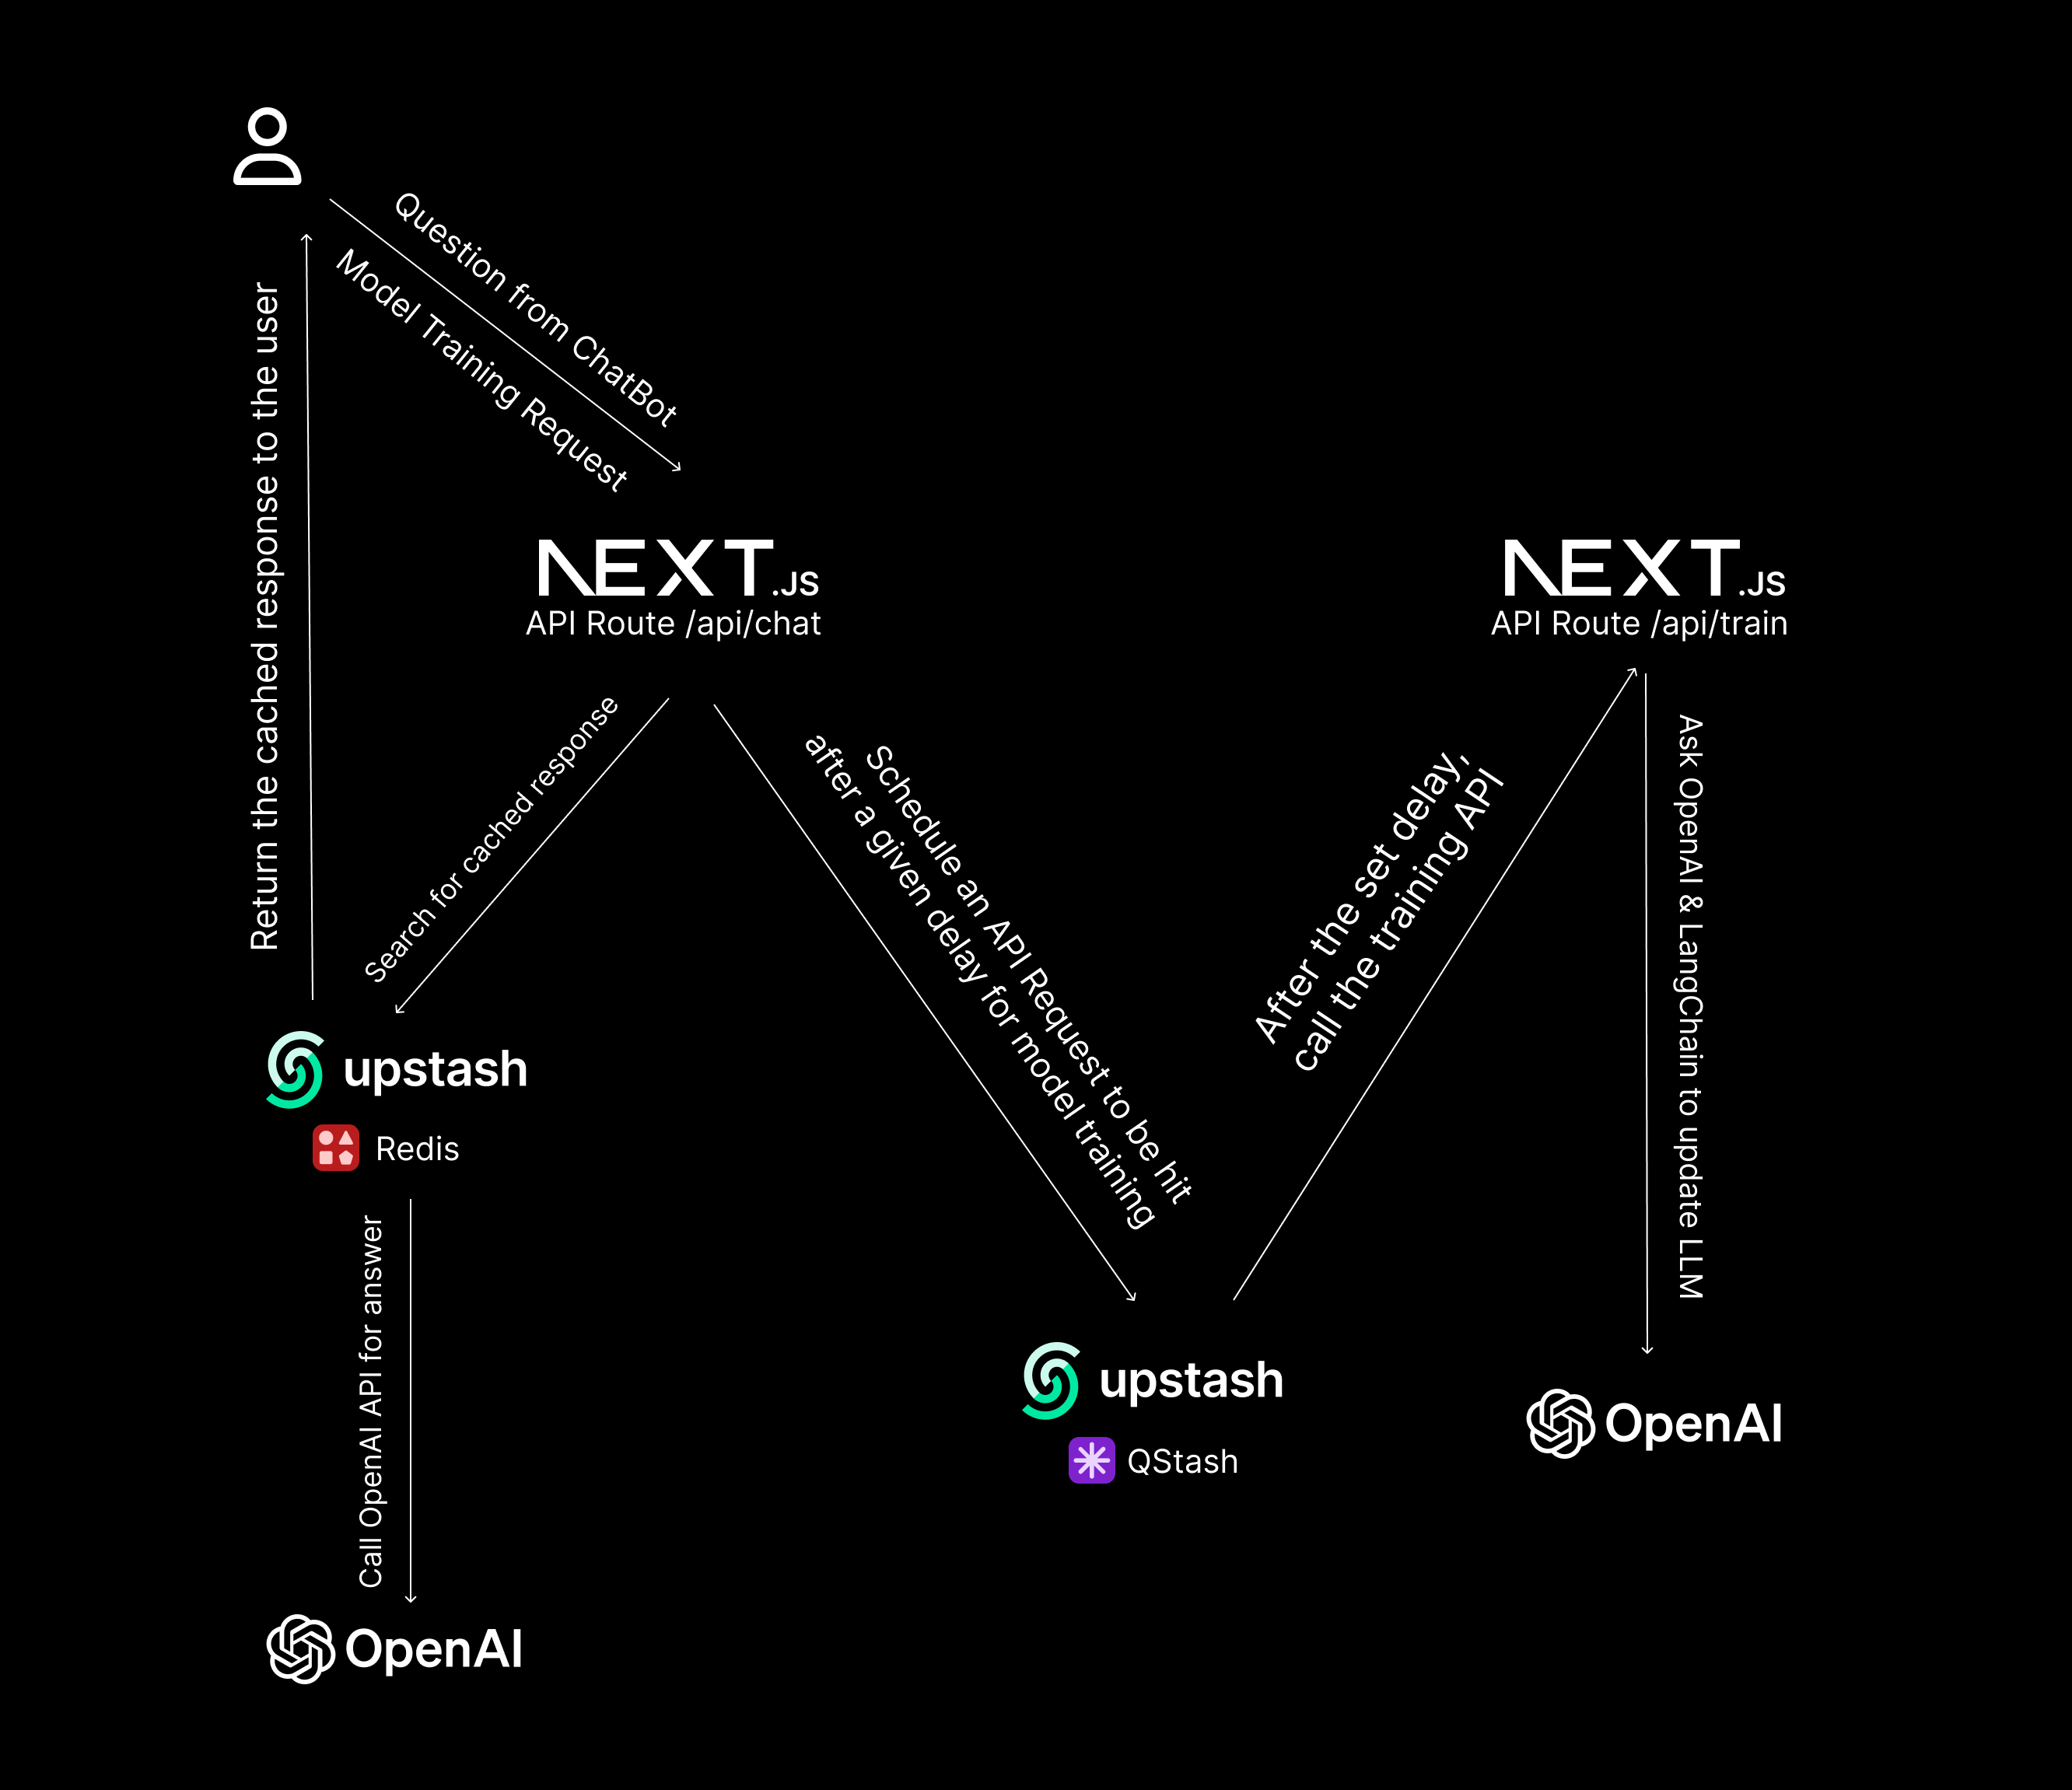
- When a user asks a question via the chatbot, users’ IP is checked against rate limiting, and a response, if not cached via Upstash Redis, is sought from OpenAI API (then cached) and streamed to the user
- When an admin requests training of the existing model on given set of URLs, with help of Upstash’s QStash a POST request is made in the serverless after a given delay to fetch the content in the given URLs and update the model (in the background)
Setup Chat and Train API Routes in Next.js
In this section, we talk about how we’ve setup the route: pages/api/chat.js to enable Cross Origin Requests, Rate Limit the Chat API Calls, Cache and Stream Responses to the users and expose a method to schedule content training on particular URLs, and pages/api/train.js to solely perform training on the given URLs but in the background.
1. Enable CORS
Using cors package, we’ve enabled CORS in the application to use the chatbot at multiple places, say as a bot on your website. As soon as the API Route is initialized, we run the cors setup as below 👇🏻
// File: pages/api/chat.js

// Reference Function to cors
import { runMiddleware } from '@/lib/cors'

export default async function (req, res) {
  try {
    // Run the middleware
    await runMiddleware(req, res)
    // ...
  catch (e) {
    console.log(e.message || e.toString())
  }
  return res.end()
}

// Cors Function
// File: lib/cors.js
import Cors from 'cors'

// Initializing the cors middleware
// You can read more about the available options here: https://github.com/expressjs/cors#configuration-options
const cors = Cors({
  methods: ['POST', 'OPTIONS', 'HEAD'],
})

// Helper method to wait for a middleware to execute before continuing
// And to throw an error when an error happens in a middleware
export function runMiddleware(req, res, fn = cors) {
  return new Promise((resolve, reject) => {
    fn(req, res, (result) => {
      if (result instanceof Error) return reject(result)
      return resolve(result)
    })
  })
}
2. Schedule Content Training Request(s) on given URLs
With Upstash QStash, one can create APIs that are like fire and forget. You don’t need to actively wait for the main function to get finished to get a response but rather do it in the background (optionally, after some given delay). It’s like a cron-job but that runs as per each request and not regularly at scheduled intervals.
In the same chat api route, we accept a request that has an admin-key header and if that matches with the server side secret (ADMIN_KEY), we schedule content training on the set of URLs passed in the request body after some delay (here 10s). The content training request after the set delay is made to a given endpoint (here: https://custom-content-ai-chatbot.fly.dev/api/train)
// File: pages/api/chat.js

// If the headers contain an `admin-key` header
if (req.headers['admin-key'] === process.env.ADMIN_KEY) {
  // If `urls` is not in body, return with `Bad Request`
  if (!req.body.urls) return res.status(400).send('No urls to train on.')
  // Hit QStash API to train on this set of URLs after 10 seconds from now
  await qstashClient.publishJSON({
		delay: 10,
		body: { urls: req.body.urls },
		url: 'https://custom-content-ai-chatbot.fly.dev/api/train'
	})
  return res.status(200).end()
}
Now, let’s dive into what’s there in the train API route (pages/api/train.js) 👇🏻
// File: pages/api/train.js

import train from '@/lib/train'
import * as dotenv from 'dotenv'
import { redis } from '@/lib/redis'
import { runMiddleware } from '@/lib/cors'
import { verifySignature } from '@upstash/qstash/nextjs'

dotenv.config()

// Disabling converting request body to JSON directly
// More on https://nextjs.org/docs/pages/building-your-application/routing/api-routes#custom-config
export const config = {
  api: {
    bodyParser: false,
  },
}

async function handler(req, res) {
  try {
    // Run the middleware
    await runMiddleware(req, res)
    // If method is not POST, return with `Forbidden Access`
    if (req.method !== 'POST') return res.status(403).send('No other methods allowed.')
    // If `urls` is not in body, return with `Bad Request`
    if (!req.body.urls) return res.status(400).send('No urls to train on.')
    // Train on the particular URLs
    await train(req.body.urls)
    // Once saved, clear all the responses in Upstash
    let allKeys = await redis.keys('*')
    if (allKeys) {
      // Filter out the keys to not have the ratelimiter ones
      allKeys = allKeys.filter((i) => !i.includes('@upstash/ratelimit:'))
      const p = redis.pipeline()
      // Create a pipeline to clear out all the keys
      allKeys.forEach((i) => p.del(i))
      // Execute the pipeline commands in a transaction
      await p.exec()
      console.log('Cleaned cached responses in Upstash.')
    }
    return res.status(200).end()
  } catch (e) {
    console.log(e.message || e.toString())
  }
  return res.end()
}

// Verify the incoming request to be a valid
// QStash Scheduled POST request with Upstash-Signature
export default verifySignature(handler)
In the code above, we’re performing three critical actions:
- Perform incoming request verification using QStash’s
verifySignaturemethod. This underneath looks forUpstash-Signatureheader and verifies it with the raw body received. - Call the
trainfunction that takes of fetching the URL content and adding to the existing vector store (and saving it). - Clear the cached responses in Upstash Redis after filtering out the keys that pertain to implementation of rate limiting via Redis Transactions.
3. Rate Limiting
To implement rate-limiting, we use Upstash Redis database client and a rate limiter library called @upstash/ratelimit.
// File: lib/redis.js
// Reference Function to ratelimiting

import * as dotenv from 'dotenv'
import { Redis } from '@upstash/redis'
import { Ratelimit } from '@upstash/ratelimit'

// Load environment variables
dotenv.config()

// Initialize Upstash Redis
export const redis = new Redis({
  url: process.env.UPSTASH_REDIS_REST_URL,
  token: process.env.UPSTASH_REDIS_REST_TOKEN,
})

// Initialize Upstash Rate Limiter
export const ratelimit = {
  chat: new Ratelimit({
    redis,
    // Limit requests to 30 questions per day per IP Address
    limiter: Ratelimit.slidingWindow(30, '86400s'),
  }),
}
Using Rate Limiting, I was able to make the use of service - totally free and public! This allowed me to showcase the benefits of the system i.e. the chat responses. Literally anyone can ask 30 questions in a day via the website. We’re able to enforce the rate limit of 30 questions in a day based on IP address as the key.
// File: pages/api/chat.js

import requestIp from 'request-ip'
import { ratelimit } from '@/lib/redis'

// ...

// Get the client IP
const detectedIp = requestIp.getClientIp(req)

// If no IP detected, return with a `Bad Request`
if (!detectedIp) return res.status(400).send('Bad request.')

// Check the Rate Limit
const result = await ratelimit.chat.limit(detectedIp)

// If rate limited, return with the same
if (!result.success) return res.status(400).send('Rate limit exceeded.')

// Continue with serving the chat responses
4. Load the saved indexed vector store and ask OpenAI for responses
With all the checks done, we are now heading onto the main work - calling OpenAI API with our custom content and sending the response to the user. To simplify things, we’ll break this into further parts:
- 3.1: Retrieving Saved Vector Store
// File: pages/api/chat.js

// Reference Function to loadVectorStore
import { loadVectorStore } from '@/lib/vectorStore'

// Load the trained model
const vectorStore = await loadVectorStore()

// ...

// Vectore Store Function
// File: lib/vectorStore.js

import { join } from 'path'
import { existsSync } from 'fs'
import { Document } from 'langchain/document'
import { FaissStore } from 'langchain/vectorstores/faiss'
import { OpenAIEmbeddings } from 'langchain/embeddings/openai'

export async function loadVectorStore() {
  const directory = join(process.cwd(), 'loadedVectorStore')
  const docStoreJSON = join(process.cwd(), 'loadedVectorStore', 'docstore.json')
  if (existsSync(docStoreJSON)) {
    // If the directory is found, load the vector store saved by Faiss integration
    return await FaissStore.load(directory, new OpenAIEmbeddings())
  } else {
    // If no content is there, load the vector store with just `Hey` for starters
    return await FaissStore.fromDocuments([new Document({ pageContent: 'Hey' })], new OpenAIEmbeddings())
  }
}- 3.2: Adding Prompt guidelines to the user queries
Using PromptTemplate by LangChain, with the user query we pass the instructions on how to, and in which manner shall the AI answer the question:
// File: pages/api/chat.js

import { z } from 'zod'
import { PromptTemplate } from 'langchain/prompts'
import { RetrievalQAChain } from 'langchain/chains'
import { OutputFixingParser, StructuredOutputParser } from 'langchain/output_parsers'

// Load the trained model
// ...

// Create a prompt specifying for OpenAI what to write
const outputParser = StructuredOutputParser.fromZodSchema(
  z.object({
    answer: z.string().describe('answer to question in HTML friendly format, use all of the tags wherever possible and including reference links'),
  }),
)

// ...

// Create an instance of output parser class to help refine the response of OpenAI
const outputFixingParser = OutputFixingParser.fromLLM(model, outputParser)

// Create a prompt specifying for OpenAI how to process on the input
const prompt = new PromptTemplate({
  template: `Answer the user's question as best and be as detailed as possible:\n{format_instructions}\n{query}`,
  inputVariables: ['query'],
  partialVariables: {
    format_instructions: outputFixingParser.getFormatInstructions(),
  },
})

// Pass the prompt to the query with the model to OpenAI API
const chain = RetrievalQAChain.fromLLM(model, vectorStore.asRetriever(), prompt)- 3.3: Stream and Cache Responses
To cache responses with Upstash Redis, we’ll make use of UpstashRedisCache cache library by LangChain. We pass on the existing Redis instance as the client, and pass the caching handler to the ChatOpenAI wrapper to use it to cache once responses are delivered:
// File: pages/api/chat.js

import { redis } from '@/lib/redis'
import { ChatOpenAI } from 'langchain/chat_models/openai'
import { UpstashRedisCache } from 'langchain/cache/upstash_redis'

// Load the trained model
// ...

// Create Upstash caching
const upstashRedisCache = new UpstashRedisCache({ client: redis })

// A flag to detect if response was not cached
let doesToken = false

const model = new ChatOpenAI({
  // Enable streaming to return responses to user as quickly possible
  streaming: true,
  // Cache responses using Upstash Redis cache client
  cache: upstashRedisCache,
  callbacks: [
    {
      handleLLMNewToken(token) {
        // Set the flag to true if we receive stream from OpenAI
        doesToken = true
        // Stream the token to the user
        res.write(token)
      },
    },
  ],
})

// Create a LLM QA Chain
// ...

// Store the output to refer to in case cached
const chainOutput = await chain.call({ query: req.body.input })

// If no tokens received implies that the content is cached
// Return the cached response as is
if (!doesToken) return res.status(200).send(chainOutput.text)
That was a lot of learning! You’re all done now.
Deploy to Fly.io
The repository comes in with a baked-in setup for Fly.io, specifically pertaining to:
- Dockerfile
- fly.toml
- .dockerignore
Deploying requires an account on Fly.io. Once you have an account, you can create an app in Fly.io by running the following command in the root folder of your project:
# Create an app based on the baked-in configuration in your account
# This will result only in the change of app name in existing fly.toml
fly launch
and deploy via 👇🏻
# Deploy the app based on the configuration created above
fly deploy
Now we are done with the deployment! Yes, that was all.
Conclusion
In conclusion, this project has provided valuable experience in implementing OpenAI response caching, rate limiting, and scheduled API requests to train the model, all while using a service that scales with your need, i.e. Upstash.
Next.js, Redis, TailwindCSS, LangChain, Serverless Scheduling
